Distributions Overview

Manage the distribution of forms for assessment & evaluation tasks.


Article Content

This article covers the following topics. Click on the topic to go to that section of the article.


Distribution Overview

A distribution defines who will complete a form, who/what the form is about, when the form will be completed, and how the form will be sent out. Usually, administrative staff manage distributions of forms to cohorts of learners, faculty, event participants, etc. Generally, the following language is used in the A&E module:
Assessor/Evaluator: The person completing a form/task
Target: The person, course, experience or other that the form/task is about
Distribution method: How the form/task is assigned and distributed to people (e.g. based on a date range, rotation schedule, event schedule, etc.). For more information on each distribution type, please see its respective help article. Types include:
A distribution wizard walks users through creating any distribution.

Note: A distribution is only saved once all five steps of the wizard are complete. You can navigate forward and backward in a distribution using the Previous Step and Next Step buttons. You can cancel a distribution at any time by clicking Cancel.

Return to Article Content Section Image Beveled v1


Create Distributions

Navigate to Admin> Assessment & Evaluation> Distributions tab
distrodashboard

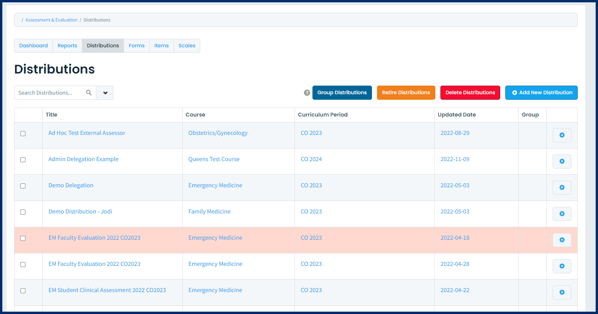
Click on Add New Distribution to begin the creation wizard. More details on creating different distribution types are in ensuing articles. Alternatively, copy an existing distribution by clicking on the Cog icon to the right of the distribution title. Edit the information in each step of the distribution wizard as needed and save your work. Further details about the 5 steps of the distribution wizard are described in the sections below.

Return to Article Content Section Image Beveled v1


Step 1: Form

On this step you define some basics like which form you are going to send out, and the relevant course and curriculum period. 

createadistro

Distribution Title:  This will display on the list of Distributions that curriculum coordinators and program coordinators can view. 
Distribution Description: Description is optional. If this is checked off, assessors/evaluators who receive a task from this distribution will not be able to to delete it. The task will remain on their A&E task list until it expires or is deleted by a distribution administrator.
Task Type:  If a distribution is to assess learners, it's an assessment. If it is to evaluate courses, faculty, learning events, etc. it is an evaluation. Notice that the language on Step 4 will change if you switch your task type.
Disable Target Release: This will only display for Evaluations. If you do not want evaluators to be able to release the form to the target upon completion, check this box. If left unchecked, evaluators will be able to release the form to the target upon completion.
Assessment/Evaluation Mandatory: This will be checked off be default.
Disable Reminders: Check this box to exclude this distribution from reminder notification emails.
Select Form: The form you want to distribute must already have been created in Elentra.
Select a Curriculum Period: The curriculum period you select will impact the list of available learners, events and associated faculty.
Select a Course: The course you select will impact the list of available learners, events and associated faculty.
Click Next Step to continue.
Return to Article Content Section Image Beveled v1
 
Step 2: Method
On this step you define the type of distribution you'd like to build (e.g., date-based, rotation-based). Different configuration options will display for the following creation wizard pages depending on which distribution type is selected. More details of each distribution type are provided on subsequent articles in this Knowledge Base, linked with each type below:
  • Task Expiry: Check this to apply an expiry date to tasks. After the expiry date has passed, users will no longer be able to complete the task.
  • Delay Task Creation: This option enables users to delay the sending of the distribution task which is currently being created until assessments from a previous distribution(s) were completed first. 
    • Select a distribution (be aware that you will only see distributions to which you have access).
    • Define how many tasks must be completed in the linked distribution(s) before the new distribution will take effect.
    • Enter a fallback date. This date represents when your distribution will create tasks whether or not the minimum number of tasks have been completed in the linked distribution. 
      • You can adjust the fallback date on the fly and the distribution will adjust accordingly to only generate tasks as appropriate (previously created tasks will still remain).
      • If you set a fallback date that falls before the release date, the fallback date will be ignored.
  • Other options will display depending on the type of distribution being built and are detailed in each of their respective articles.
Return to Article Content Section Image Beveled v1

 
Step 3: Targets
On this step you define the target of the task. The target is who/what the form will be completed on, and not to be confused with the assessor who is completing the form. This could be learners, faculty, events, or courses depending on the type of distribution being used. The targets can be set automatically as the attendees of rotations, or learning events for example, depending on the distribution type. Select the option that is most suitable to your needs of who should be set as the target(s) by clicking on its respective checkbox. Specify individual targets as needed.  
The Target Attempt Options specify how many times an assessor can assess each target, OR whether the assessor can select which targets to assess and complete a specific number (e.g. assessor will be sent a list of 20 targets, they have to complete at least 10 and no more than 15 assessments but can select which targets they assess).
kb90

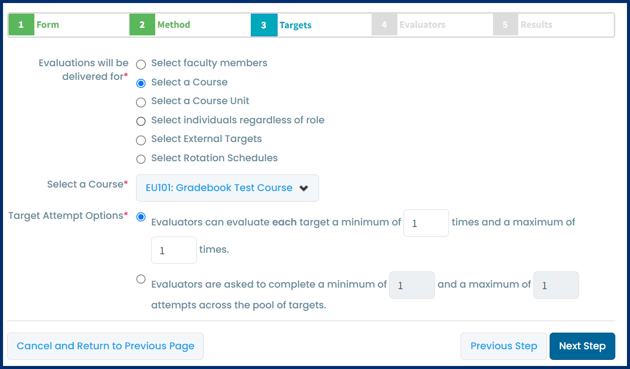
Note: You'll only see the option to set the rotation or faculty member as a target if you are creating an evaluation.

 Return to Article Content Section Image Beveled v1

Step 4: Assessors/Evaluators

On this step you define the assessors or evaluators who will complete the task. This could be learners or faculty courses depending on the type of distribution being used. These are the people who will be completing the assessments. To specify assessors, choose the Assessor Option which is most suitable to your needs.
Feedback Options
When completing a distribution you will notice a Feedback Options section in Step 4 if the assessor is set to faculty members (it will not appear when the assessor/evaluator is set to learners). If you check this off it will add an item to the form for this distribution, asking both the assessor and the target whether or not they met to discuss the target's performance (see sample text below).
kb86
You might choose to use this option and add the item if you want to collect data on how often preceptors are meeting with learners. The item that will be added to a form distribution if you click the Feedback Options checkbox is in the below screenshot:
kb87
In effect, this tool adds two items to a form. The first item will appear as above for the assessor to complete. Once the form is completed it will be stored in the learner's Tasks Completed On Me tab. The learner can access the form from there, and the learner will also receive an email notification that they can take action on the form.
The form is available for the learner to complete and answer the same question from their perspective. The comment box is available for learners to record any additional details.
kb88
Currently there is no reporting tool to compare learner and assessor responses, although they can be viewed on any completed forms. There is also no visual cue to an admin user that the response from the learner is pending; if there is no learner response displaying it means the learner hasn't answered the question.
 
Summary Assessment Task
The Give access to the results of previous assessments checkbox, or formally known as the Summary Assessment Task option, allows you to create a distribution that allows the assessor of the distribution to view the results of previously completed tasks (on a per distribution or form basis). The form that is then sent out based on this distribution will contain the option for the assessor to view previously submitted tasks of the target, as shown in the top right corner of the assessment page on the sent task. This previously submitted information can be viewed on the task page either by individual assessment, or in a compiled aggregate if the same forms and items were used between the completed assessments. 
Checking off this selection will enable the Summary Assessment task to be applied to the distribution, giving the assessor access to this information if any assessments have been completed. 
Using the dropdown, specify what other previous Distributions, Forms, and CBME Form Templates to give assessors access to while completing this distribution task. For more details about the Summary Assessment Task, please see the Knowledge Base article here

kb111
Return to Article Content Section Image Beveled v1

Step 5: Results
On Step 5 you can immediately save your work, or make some adjustments to the distribution options.
Authorship
distroauthors
This allows you to add individual authors, or set a course or organization as the author. This may be useful if you have multiple users who manage distributions or frequent staffing changes. Adding someone as an author will allow them to more quickly access the distribution from their distribution list.
  • Distributions are automatically accessible to all users with staff: admin group and role permissions.
  • Adding a course permission will make the distribution show, without filters applied, to program coordinators and faculty directors associated with the course.
  • Adding an org. permission will make the distribution accessible to anyone with administrative access to Assessment & Evaluation. (Note that most users will need to apply filters to access the distribution.) 
Target Release
These options allow you to specify whether the targets of the distribution can see the results of completed forms.
  • Task List Release: "Targets can view tasks completed on them after meeting the following criteria" can be useful to promote completion of tasks and is often used in the context of peer assessments. Targets will only see tasks completed on them after they have completed the minimum percentage of their tasks set by you.
  • Target Self-Reporting Release: This controls whether targets can run reports for this distribution (i.e. to generate an aggregated report of all responses). When users access their own A+E they will see a My Reports button. This will allow them to access any reports available to them.
targetrelease
Alternatively, targets can view tasks completed on them only after meeting specified criteria, as exemplified in the screenshot below.
kb89
This option makes the distribution require that users complete a specific percentage of tasks in a distribution before they can review their own results from the same distribution. This is typically used for peer assessments so that learners are required to provide feedback to others before they can see their own feedback.

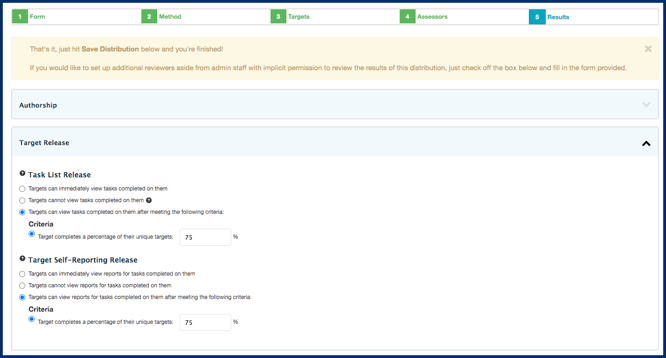
Please be aware that these settings are specific to a single distribution only. This tool does not require users to have completed a percentage of tasks across all distributions.

 
Target Self-Reporting Options
This allows you to specify whether or not comments included in reports are anonymous or identifiable. (This will only be applied if you have set reports to be accessible to the targets.)
targetselfreporting
 
Reviewers
This allows you to set up a reviewer to view completed tasks before they are released to the target (e.g. a staff person might review peer feedback before it is shared with the learner). See our Knowledge Base article here.
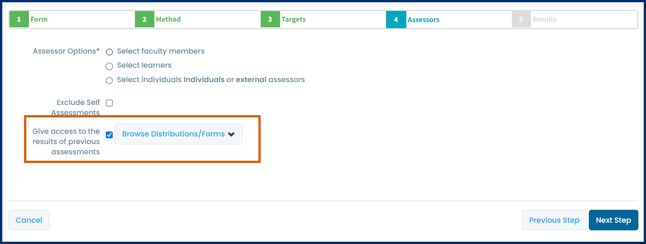
  • Check off the box to enable a reviewer.
  • Click Browse Reviewers and select a name from the list. Note that this list will be generated based on the course contacts (e.g. director, curriculum coordinator) stored on the course setup page.
Note: This list will be generated based on the course contacts (e.g. director, curriculum coordinator) stored on the course setup page.

Notifications and Reminders
notifications
  • Prompted Responses: This allows you to define whom to send an email to whenever a prompted response is selected on a form used in the distribution. For example, if you have an item asking about student completion of a procedure and "I had to do it" was set as a prompted/flagged response, any time "I had to do it" is picked as an answer an email notification will be sent.
    • You can optionally select to email Program Coordinators, Program/Course Directors, Academic Advisors, Curricular Coordinators, or you can add a Custom Reviewer. If you select to add a Custom Reviewer you can select their name from a searchable list of users.
  • Sender Details: Define the email address that notifications and reminders will be sent from for a distribution.
    • Options are the distribution author, an existing user, an existing generic email, or a new generic email.
    • To create a new generic email provide a name and email address. This will be stored in the system and available to other users to use as needed.
Return to Article Content Section Image Beveled v1

Manage Distribution Tasks

From the Distributions dashboard, click on the cog icon to the right of the distribution you want to review. Select View Distribution Report to view the following screen:

managedistro
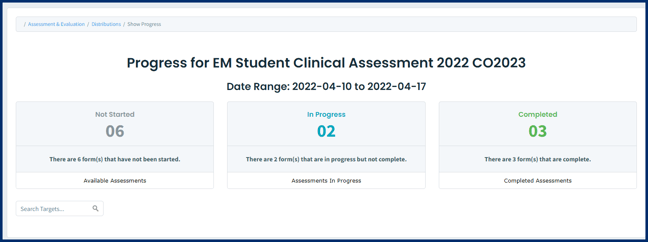
Click on any category (Pending, In Progress, Completed) to view more details about specific targets and assessors below the progress tiles.
mgdistro
To delete tasks tick off the box below the garbage icon on each task card and then click the red Delete Task(s) button.
To send reminders to those with incomplete forms, tick off the box below the bell icon on each task card and then click the blue Manage Distribution button and select Send Reminders from the dropdown list. To select all tasks for reminders click on the bell icon. Review your choices and click Confirm Reminders. You will get a green success message.
To add a task to a distribution, click the blue Manage Distribution button and select Add a Task from the dropdown list. Complete the required information and click Confirm Task.
Viewing progress results for learning event-based distributions: Program coordinators who set up such distributions should view progress from their My Assessments page.

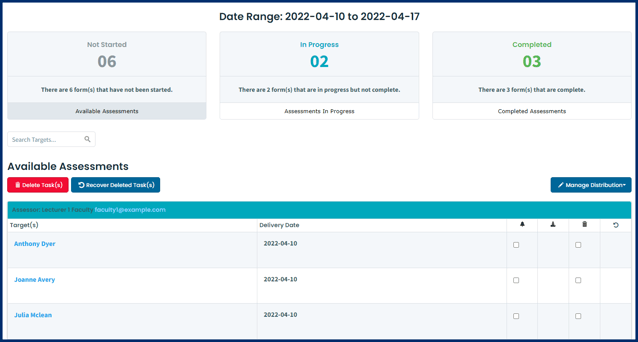
Manage Tasks by Individual
Many of the functions described above can also be completed at an individual task level when logged into the system as a program coordinator or faculty director. To begin, click the Assessment and Evaluation badge at the top right (beside the logout button), then the My Learners tab. Click on the appropriate tab for a learner (e.g. CBME, Assessments, Logbook). When looking at a user's Assessment & Evaluation dashboard, users will be able to send reminders, remove tasks, and download PDFs of selected tasks from their assigned learners or faculty.
Return to Article Content Section Image Beveled v1

Retiring and Deleting Distributions

When you retire a distribution, you preserve any existing data and pending tasks but prevent future tasks from generating. If you want to change a distribution partway through its use but you want to leave all existing tasks active, you can copy the distribution, alter it as needed, and then retire the original distribution on a defined date. If you delete a distribution you will no longer see it in the list of Distributions and it can't be recovered through the user interface.
To retire one distribution, click the menu cog to the right of the distribution name and select Retire Distribution. To retire multiple distributions at once, click the checkbox beside distribution names and click the Retire Distribution button. Set a Retirement Date for the distribution(s). As of this date, no more tasks will generate for this distribution. Click Retire to save.  
Retired distributions will still display on the list of Distributions, but they will have a small orange clock beside the name to show they have been retired. An informational notice will be included on distributions that are set to retire soon. The notice will be seen when you access the Progress Report for a distribution.
To delete a distribution, click the checkbox beside a distribution name, then Delete DistributionConfirm your decision to save.  

 Return to Article Content Section Image Beveled v1