Article Content
- Gradebook Assessments
- Setting a Grading Scale for a Course Gradebook
- Creating New Gradebook Assessments
- Assessment Details
- Assessment Event: Link Assessment to a Learning Event
- Assessment Graders: Assign Faculty or Learners to Grade Assessments
- Assessment Form: Attach an Assessment and Evaluation Form for Graders to Use
- Assessment Objectives: Assign Curriculum Tags to Assessments
- Attaching Exams
- Attaching Discussion Posts
- Group Assessments
Gradebook Assessments
Reminder: You must have staff: admin permissions or be a program coordinator or faculty director associated with a course in order to access assessments in a course gradebook. Only staff: admins and program coordinators can add new assessments (course directors can edit existing assessments).

- Navigate to Admin > Manage Courses, then search for a course as needed. You can either click on the course name and navigate to the gradebook tab or click the cog icon to the right of the course name and select Gradebook.
- Navigate to Admin > Manage Gradebook, then search for the name of the course and click on that name to open the gradebook. This will take you directly to the gradebook tab.
These are the details that are included within the settings of the gradebook assessment.
- Assessment Name: (Required) will display to learners and any graders associated with this assessment.
-
Assessment Description: (Optional) this will be displayed on the Edit Assignment screen, will be seen by learners when reviewing or submitting an assignment tied to this assessment, and will also display if you choose to include this assessment in the gradebook display on a course website.
-
Assessment Weighting: (Required) This can be left as 0% if an assessment carries no weight towards the final course grade. Otherwise, enter a value greater than 0% if the weight of this assessment should count towards the final course grade.
-
Audience Options: (Required) Use this to create an assessment for a specific course audience. Your options are for the entire course enrolment, a course group or groups if using you have configured course groups, specific cohorts or individuals in the course, or a custom list of learners.
-
Click the radio button for the appropriate audience option and then select the audience using selector. Be aware that you can search the list of cohorts/groups/learners as needed.
-
If you assign the assessment to specific course groups and you want all learners in one group to have the same grade recorded, check off Apply the same grade to all learners in the selected groups. If you use this option and an assignment drop box, one member of the group can upload the assignment and once graded, the mark will be applied to all group members.
-
If an assessment is assigned to a specific audience only those learners will see the assessment in their My Gradebook view (assuming the assessment is released for view) and have its weight (if any) applied to their grade calculation.
-
-
Notify if grade is below: (Optional) Use this feature to automatically send an email to the selected audience if students score below the designated threshold.
-
Check the box on the left to enable this feature.
-
Enter a threshold (e.g. 65%) and click Select Who Gets Notified to add the name(s) of people to notify. The options available will be based on the course contacts (e.g. course director, curriculum coordinator, and associated faculty).
-
If no options appear, make sure the course has course contacts on the Course Setup page. You can add multiple people to the list. To remove someone from the list, click the red minus button beside a name.
-
- Assessment Due Date: (Optional) This is not a required field but if used will create a due date visible to learners. If the assessment later has a drop box assignment added the drop box assignment will inherit the assessment due date.
- Distribution Assessment Deadline Finish: (Optional) This is not a required field but if used allows you to set a deadline for when completed assessments will no longer but counted towards the grade of the assessment.
-
Learners are required to complete this assessment: (Optional) This creates a flag in the database for this assessment but does not impact the learner's experience.
-
Characteristic: (Required) this is assessment type (test, paper, oral exam, etc.). The list of assessment characteristics can be modified in Admin > System Settings. Please see details here.
-
Selecting different assessment characteristics will dynamically open additional fields:
-
Track Late Submissions: This adds a late submission column that allows you to identify students who have submitted assessments late with a checkmark. This will be visible in the course gradebook.
-
Track Resubmissions: This adds a resubmission column that allows you to identify the number of times a student had to resubmit an assignment.
-
Extended Options: This allows you to define the type of questions used in the assessment. This stores information but is not currently used in reporting, nor is it visible to learners.
-
-
-
Marking Scheme: (Required) Elentra supports Pass/Fail, Percentage, Numeric, Complete/Incomplete, Grading Scale and Floating Numeric marking schemes.
-
If you choose Numeric you'll be prompted to ender the maximum points for the assessment (i.e., the denominator in the score). When entering grades you'll enter the numerator in the score.
-
If you chose Grading Scale as a marking scheme it means users will be able to choose from the grading scale characteristics (e.g., Honors, High Pass, Pass, Fail) to enter grades.
-
Floating Numeric can be used for numeric grades that do not have a denominator. Note that grades using this marking scheme can only have a weight of 0%.
-
Pass/Fail and Complete/Incomplete Marking SchemesIf you use the pass/fail or complete/incomplete marking schemes the information stored in the Elentra database about a learner’s grade will be 100 or 0, regardless of what you enter to record the grades. For instance, if you enter that Student A got a 65% and that registers as a P, the database will store a grade of 100 for them.You can control the threshold of what percentage score counts to register as a pass or complete with the database setting gradebook_passing_grade. (So for example you can make it so that a 50 registers as a P or that a 60 registers as a P. Either way what the database actually stores for a P is a 100.)
-
Record specific learner percentage grades in the database but represent them as a P or F to learners, you should build a grading scale that can be applied to an assessment for the purposes of displaying grades. That will allow you to record a 65 for a learner, store the 65 in the database and include the 65 in the student’s final grade calculation, but display a P to them in the gradebook.
-
-
-
Grading Scale: (Optional) Optionally set a grading scale for an assessment. (If you chose Grading Scale as your Marking Scheme make sure to select a Grading Scale!)
-
Be aware that if a grading scale was set for the entire course gradebook, that grading scale will be selected by default for newly created assessments. Users can edit the grading scale as needed.
-
If a grading scale is used, you can control how the learner will view their results (e.g. see grading scale, marking scheme, both). The option to set how learners view their results will be visible if you select Show this Assessment in Learner Gradebook further down the page.
-
The list of grading scales can be configured in Admin > System Settings. Please see here more details
-
-
Assessment Type: (Required) Formative and Summative are the options. Typically, formative assessment is to monitor student learning and provide ongoing feedback, and summative assessment captures overall student learning at the end of an instructional unit. You may wish to check with your institution’s student assessment coordinator or education consultant to clarify how your institution uses these terms. The number of formative and summative assessments in a course is reported by course in the Assessment Summary Report.
-
Narrative assessment: (Optional) Check this off if students receive written feedback for this assessment. This information is reported by course in the Assessment Summary Report.
- Self-assessment: (Optional) Check this off if students are assessing themselves. This does not give the learner the ability to enter his/her own grade in My Gradebooks, however it will prevent any other grader associated with this task from grading it.
- There is no existing report that displays which assessments are flagged as self-assessments, however a developer might be able to retrieve it from the database if required.
-
Show Assessment details to learners in the Gradebook and Course Website: (Optional) Selecting this option will always show the assessment as a line item on the gradebook page on the course website if the gradebook page has been used on the course website. The grade will never show on the gradebook page on the course website.
- Show Grade in the learner's Gradebook: (Optional) Select this option to control if and when to show a grade for the assessment in the learner's My Gradebook view.
- Optionally set the appropriate start and finish times. Students will be able to see this assessment grade during the active date range. If you enter grades after the designated start time, students will see their grades immediately when you save your work.
- Choose how to display grades to the learner. Optionally select to show them the marking scheme, grading scale, or both.
Tip: The above two options can be combined along with the Learner's are required to complete this assessment option to show the grade in the learner's gradebook in different ways. The combinations and views are described below:
- If the option Show Assessment details to learners in the Gradebook and Course Website is only selected (i.e., Show Grade in Learner's Gradebook and Learners are required to complete this assessment are not selected) then the assessment will not show in the learner's My Gradebook view. It will only show as a line item on the gradebook page on the corresponding Course Website (made through Communities).
- If the option Show Grade in the learner's Gradebook is only selected then the assessment will not show in the learner's My Gradebook view until a grade is entered. If time release options are selected then the visibility in the My Gradebook view will respect the time release options.
- If the Show Assessment details to learners in the Gradebook and Course Website option AND the Show Grade in Learner's Gradebook are both selected, but the Learners are required to complete this assessment option is NOT selected then the gradebook assessment will not show in the learner gradebook until the grade is entered.
- If all three options (Show Assessment details to learners in the Gradebook and Course Website, Learners are required to complete this assessment, Show Grade in Learner's Gradebook) are selected then the assessment will show to learners as a line item in their My Gradebook view and the status will be "Pending" until a grade has been entered.


Note: The green checkmark that displays in the Gradebook overview page shows whether a gradebook assessment is set to be visible in general (i.e., in the learner's gradebook and possibly on the course website if a Gradebook page is in use and that option is selected). It does not currently reflect whether the assessment is set up to display an individual's grade to them. This is dependent on the combination of options chosen from above.
![]()
-
Click Attach Learning Event.
-
Begin to type the learning event name and click on the appropriate event when you see it. You will only be able to pick from events associated with the specific course/program you’re working on. If an event you expected to see is not visible, check that the event is assigned to the course you are in, and that you are working in the correct curriculum period.
-
Click Attach Learning Event. The event should now display on the Edit Assessment page. When you visit the event page as an admin., you'll see the event type displayed in the event information overview in the top right. You can also link to the assessment from there.
-
Be aware that you can only link an assessment to one event.
-
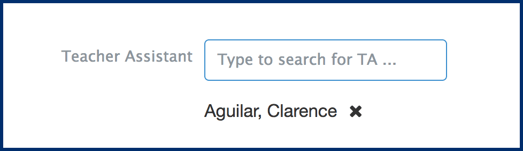
Begin to type a grader name into the search field and when matches appear, click on the appropriate name and select Add.
-
You may add multiple graders to one assessment.
-
Be aware that to add a student grader to an assessment and have them successfully access their grading tasks, the student must be listed as a Teaching Assistant on the Course Contact list managed on the course setup tab via Admin > Manage Courses. (The user interface in the gradebook will appear to let you add a student not assigned as a TA to the assessment, but the user won't be able to access the course via My Grading Tasks.)
Note: If you have set an assessment as a group assessment the interface will look slightly different. Please see more details on the Group Assessments page.
-
To randomly assign learners to graders click the blue Randomly Distribute Learners to Graders button.
-
To manually assign learners to graders, click the checkbox beside multiple learner names and click Assign Selected to Grader.
-
In the popup window, click the checkbox beside the appropriate grader name click Assign Learner.
-
The selected learners should appear beside the grader name in the Grader/Assigned Learners table on the left.
-
To delete a learner from a graders list, click the red minus icon.
Import Grader-Learner Assignment to a Gradebook Assessment
Graders and assigned students can be imported via CSV. After creating and saving the gradebook assessment, the buttons for importing and exporting grader-learner assignments will appear in the assessment's edit screen: 
Step 1: Click on “Import” and then “Download sample CSV file” to retrieve the import template.

Step 2: Complete the import template by applying the grader email address in the Grader Email column. To assign learners, apply either the learner email in the corresponding column, or the name of the previously-created course group.
Step 3: To import your CSV, click on “Import” again from within the gradebook assessment, then select your file and import the grader relationships.
Note: The “override” checkbox will replace any existing grader assignments with the contents of your import file if such an assignment already exists. By not enabling the “Override” functionality, any students that are already assigned to a grader will be omitted from import, even if they are included in the CSV data.
To export the existing grader relationships, use the Export button. A CSV will download to your device.
Assessment Form: Attach an Assessment and Evaluation Form for Graders to Use
![]()
Assessment Form: Attach Assessment Form via Distribution
![]()
Assessment Objectives: Assign Curriculum Tags to Assessments
-
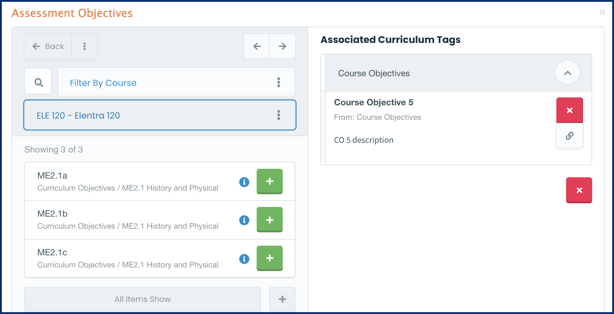
The Curriculum Tag Selector is hidden by default. Click the greyed out Assessment Objectives heading to open it.
-
The tag selector will be filtered by course by default. Curriculum tags assigned to the course will display for you to select from.
-
To remove the course filter and access all curriculum tag sets in your organization, click Filter by Course and deselect Course. Click the Filter By button to close the module.
-
-
Click the magnifying glass to search for a specific curriculum tag.
-
After finding the appropriate curriculum tag, click the green plus sign to assign a curriculum tag to the gradebook assessment.
-
Selected tags will appear on the right side Associated Curriculum Tags list.
-
To add a context-based link, save the assessment and reopen the edit screen. You'll now be able to assign context-based linkages by clicking the link icon.
- Pick Draft or Publish to indicate whether you want to finalize the assessment or leave it in draft mode. Once published, an assessment can still be edited, however if it is already shown in a learner gradebook, learners may see any changes made.
- Click Save.
Attaching Exams
You can attach an exam to a gradebook assessment from the gradebook or from an exam post. Doing this creates a link between the two so that exam grades will automatically populate the gradebook.
Note: If you include questions in an exam that need to be manually graded (e.g., short answer), student grades will initially be calculated and displayed in the gradebook without including their possible points from those questions. As such, it is recommended that if you include manually graded questions, you delay the gradebook assessment visibility to learners until you know the exams will be graded.
-
Create a gradebook assessment using the instructions in the Gradebook help section.
-
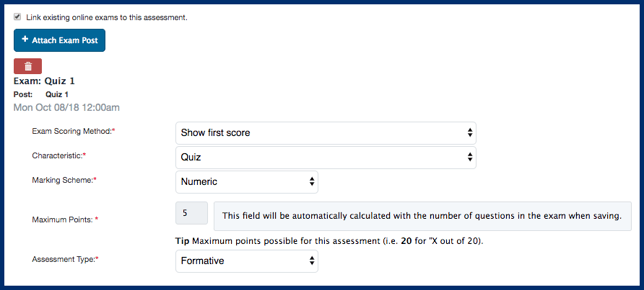
Click the checkbox beside Link existing online exam to this assessment.
-
This will cause the Add Exam Post button to appear, click this.
-
Begin to type the name of the exam and select it from the displayed list.
-
Click Attach Exam Post.
-
Be aware that you have a new item to configure which is exam scoring method. Your options are to: show average of all scores, show first score, show highest score, or show latest score in the gradebook. These options only apply if you set the exam to be taken multiple times by learners.
-
Set the other parameters for the assessment and click Save. You do not need to set graders for an exam in the gradebook assessment since you add graders to specific exam posts in the Exams module.
-
When the exam is completed and grading is complete (if required) the grades will automatically display in the gradebook.
Note: When you attach an exam to the gradebook from the edit assessment page, the system automatically determines the point total based on the number of questions on the exam (e.g. 5 questions = 5 points) if you are using a numeric marking scheme.
Note: You can't set the exam scoring method from here; you must navigate to the gradebook assessment to do so.
Attaching Discussion Posts
You can attach a discussion post to a gradebook assessment for grading purposes. Students can then be graded for their course discussion contributions.
To attach a Course Discussion Forum to a Gradebook assessment, you must have the following in place:
Note: Follow this link for the help guide on how to create a Course Website for your course in the Communities module.
-
Create a Gradebook assessment.
-
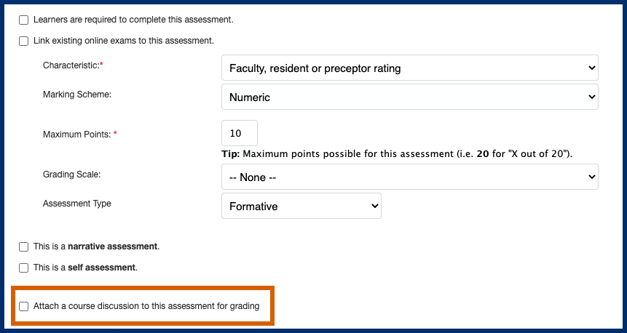
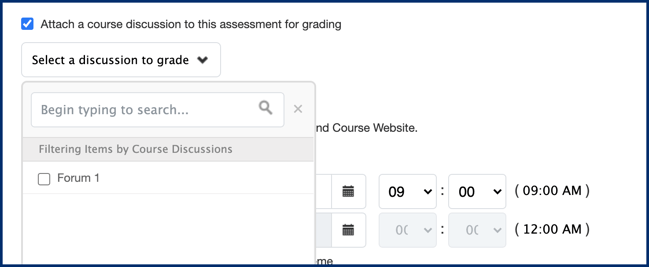
Click the checkbox beside Attach a course discussion to this assessment for grading.
-
The checkbox is below the area where you define the assessment characteristic, marking scheme and grading scale.
- If you select more than one forum, your grader(s) will be able to switch between forums to access the learners posts and replies for each.
-
Assign your learners to Assessment Graders as required.
-
Optionally, attach an Assessment Form to assist your graders in grading the discussion forum.
-
Optionally, create an Assignment Dropbox for the assessment, if the learner is also required to make a submission.
- Navigate to a course's Gradebook either through Admin> Manage Gradebook or Manage Courses> Select a Course> Gradebook tab.
- Create a new assessment by pressing Add New Assessment, or edit an existing assessment by clicking the pencil icon.
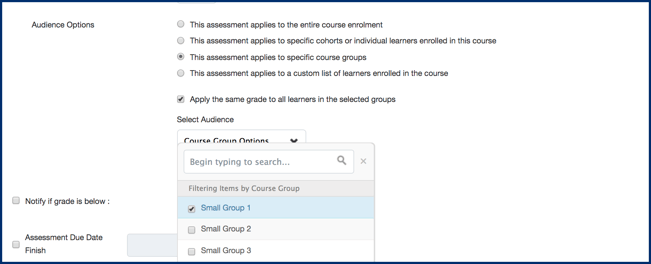
- In the Audience Options section (found under the Assessment Details heading), check This assessment applies to specific course groups.
- If you want learners in the same group to get the same grade, check the Apply the same grade to all learners in the selected group box.
- Under Select Audience, select the course groups you wish to apply the assessment to in the dropdown. Click the X beside the search or somewhere outside the selection window to close it.
- The selected groups will display on a list below the Select Audience dropdown.
- To remove a group from the list, click the X beside the group name.
- Press the Save button at the bottom of the page to save the changes made.
- Navigate to a course's Gradebook either through Admin> Manage Gradebook or Manage Courses> Select a Course> Gradebook tab.
- Create a new assessment by pressing Add New Assessment, or edit an existing assessment by clicking the pencil icon.
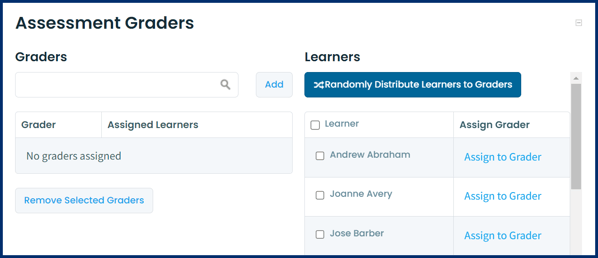
- Underneath the Assessment Graders heading, begin to type a name into the Graders search field and when matches appear, click on the appropriate name and select Add.
-
You may add multiple graders to one assessment.
-
If a course group(s) has been added as per the above section, you can assign groups to graders. The added groups will appear in the Learners box to the right of Graders. Click the checkbox beside the course group names you wish to add, and click Assign Selected to Grader.
-
In the popup window, click the checkbox beside the appropriate grader name click Assign Learner.
-
The names of individual learners in each group should appear beside the grader name in the Grader/Assigned Learners table on the left.
-
To delete a learner from a grader's list, click the red minus icon. Be aware that the learner will not be added back to learner's list since it only shows groups. If you remove an individual learner from a grader's list you need to ensure the student gets graded some other way.