Article Content
This article covers the following topics. Click on the topic to go to that section of the article.
- Course Groups Dashboard
- Creating Groups via the User Interface
- Creating Groups via CSV Import
- Copying Groups
- Manage Course Groups
Once there are students enrolled in a course, you can create groups of students within a course. Course groups are useful for:
- Assigning small groups of students to specific learning events (e.g., repeating clinical skills sessions where small groups of learners all do the same thing)
- Tailor gradebook assessments to a specific audience (e.g., Groups 3 and 6 did this assignment, Groups 1 and 5 did this assessment).
- Course groups are required to assign a grader to exams in the Exams module.
- Course groups can also be used to link tutors to assigned learners.
- Linking tutors and groups of learners allows faculty to review specific students’ logged encounters, or act as academic advisors (especially relevant if you are using the competency-based medical education module of Elentra).
- Tutors linked to groups will also be able to access any community shared resources restricted to that group.
Caution: Users assigned as a tutor to a course group (in any role) will be assigned as a faculty member (in the Tutor role) on learning events created via CSV import & published. Assignment occurs upon publishing & cannot be turned off at this time. If you do not want course group tutors to be added to events assigned to said course groups, create your schedule of events for these groups before assigning the tutor to the course group.
Course Groups Dashboard

Create and manage course groups from within a course's Groups tab. Course groups are specific to each curriculum period associated with the enrolment on the Setup tab of the course. Before making any changes check that you are working in the correct curriculum period, adjusting it as needed with the dropdown menu on the upper right-hand side of the page.
From the Course Groups dashboard you can
- View course groups for a specific curriculum period
- Add New Groups through the user interface
- Import & Export course groups via CSV
- Copy course groups to another curriculum period or course
- Manage, edit, and delete course groups
- Search for a course group
![]()
Create Groups via the User Interface

-
- Learners: Include all learners or select specific learners from the enrolment list for the relevant Curriculum Period.
- Groups: This is a required field if you choose to auto-populate the groups. Either use the Number of Groups option or use the Group Size option to create the groups.
- If you use the Number of Groups option the system will try to split the number of students evenly among the number of groups.
- If you use the Group Size option then the system will make as many groups as necessary to split up your students into the specified group size.
- Populate Groups: Optionally select to base groups on gender (male, female, not-specified). You can choose to have them balanced or homogenous.
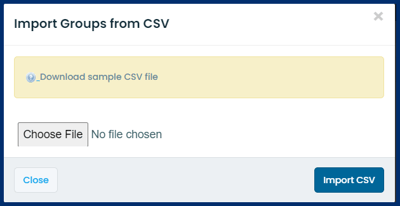
Create Groups via CSV Import

Note: Please be aware that the tutor role in the group will give the tutor access to the student's Learner Explorer. This means that the tutor will be able to see the student's performance across all of their courses.
Tutors Numbers: List tutor number(s). This is the institutional number assigned to each user on their user profile. Separate entries with a semi-colon if necessary.
Note: To import an event schedule in Manage Events that uses groups as the audience the system currently requires the use of unique group names across curriculum different periods (e.g., 2023s ENT Group 1 in one curriculum period and 2024s ENT Group 1 in a different curriculum period).
![]()
Copying Groups
Note that groups you create in a course apply only to that course by default. If you want to use the same groups (populated with the same students) across multiple courses, you can copy groups from one course to another through the user interface, or download groups from one course, make updates, and import them to another course. You can also copy groups across curriculum periods for the same course.
Copy Course Groups from the User Interface

Download and Re-Import Course Groups

From this screen, you can
- add or remove tutors.
- To add a tutor start by typing the tutor's name into the tutor search box, then click on the person's name. Select the type of tutor for the associated faculty (tutor, teacher, teacher's assistant, or auditor). Currently, this does not have any impact on the content that the user can or cannot access for their associated learners.
- To delete an existing Tutor, click on the x to the right of the tutor name.
- delete existing group members by selecting the checkbox next to their name under the View Members section, then clicking Delete Members.
- To add members, use the search selector under Add Members.
After you have made your changes click the Proceed button.
Deleting Course Groups
Step 1: From the Course Groups tab select the course group(s) you would like to delete by checking the check box next to the course group's name.
Step 2: Click the Delete Groups button.

![]()