Schedule learners into rotations of varying lengths, granular clinical experiences, and optionally affiliate sites and preceptors with a rotation
Note: Staff: admin users, program coordinators and faculty directors can access Admin > Clinical Experience and the Rotation Scheduler. Program coordinators and faculty directors will only see schedules, rotations, etc. for the courses they are associated with on a course's setup page.
-
Schedule learners into rotations of varying lengths (e.g., 2, 4, or 8 weeks)
-
Schedule learners into granular clinical experiences (e.g., a half day in a clinic)
-
Optionally affiliate rotations, blocks, slots and bookings with sites and preceptors
- Build a Rotation Schedule which acts as a holding place for rotations. An example of a schedule might be a course and year (e.g., Internal Medicine, 2023-2024). Once a rotation schedule is created, rotations can be added for the learners within it.
- Build rotations within a schedule. Rotations include the various clinical experiences learners might have within your program (e.g., Rheumatology, Cardio Consults, Hematology, Infectious Disease, etc.). Within a rotation you can define sites and preceptors. For each rotation, you can upload files and optionally select to automatically send a standard rotation evaluation. (Please see screenshot after the steps below).
- Manage blocks within a rotation. Blocks represent the time periods of which rotations will be scheduled into. These will be based on the block structures available to your course and curriculum period that were first configured in the System Settings by a user with administrator permissions. You can also define sites and preceptors for a block.
- Add and manage slots within a block. Within a slot you can define minimum and maximum number of participants, define sites and preceptors, and define availability for on service and off service learners.
- Book learners into slots. This can be done either directly through the user interface or by importing a CSV file. The CSV import will allow you to import each learner's rotation schedule (regardless of rotation length).
- Schedule learners into granular clinical events as desired. Granular Clinical Scheduling allows users to capture the variability in a learner's schedule during a rotation. Administrative users can better manage specific clinical events that occur for short periods of time, enforce occupancy limits and accommodate call schedules.
Note: If you plan to use Elentra's Lottery module, you will need to create slots with only one associated site. This is so the lottery can apply the maximum occupancy limits.
Prerequisites
-
Ensure that the relevant curriculum periods have blocks built. Blocks must be built by someone with an administrator role (see Admin > Manage Curriculum > Curriculum Layout to check if blocks have been created. For additional information on creating and managing blocks, see the Curriculum Layouts & Periods article).
-
Optionally have sites defined (sites are the different locations relevant to your programs, like cities or hospitals). Sites have to be configured through Admin > Manage Locations by someone in an administrator role. For more information please see the Manage Locations article here.
Accessing the Rotation Scheduler
-
Navigate to Admin > Clinical Experiences.
-
Click the Rotation Schedule tab under the Filter option card.
-
By default you will see all published and draft schedules you currently have permission to access.
-
If you see Available Off Service Rotations listed at the bottom of the page, off service rotations created by other courses/programs have been made accessible to your course/program.

-
Navigate to Admin > Clinical Experiences.
-
Click the Rotation Schedule tab under the filter card.
-
Click New Draft.
-
Select a curriculum period.
-
The curriculum period selected will define the block structures available for rotations created for this rotation schedule.
-
-
Select one or more courses
-
Be aware that the courses available to select will be those that have an enrolment for the selected curriculum period.
-
-
Provide a title (e.g., Neurology Class of 2020) and click Confirm.
-
You will return to the list of rotation schedules and should see your newly created schedule on the list in Draft status. Note that a Courses column displays which course(s) a rotation schedule is affiliated with.
Note: Remember to return to this screen later to publish the rotation schedule so that its contents become visible to learners. You might do this after a lottery has run or after all courses have set their schedules.
-
Navigate to Admin > Clinical Experiences.
-
Click the Rotation Schedule tab under the Clinical Experiences heading.
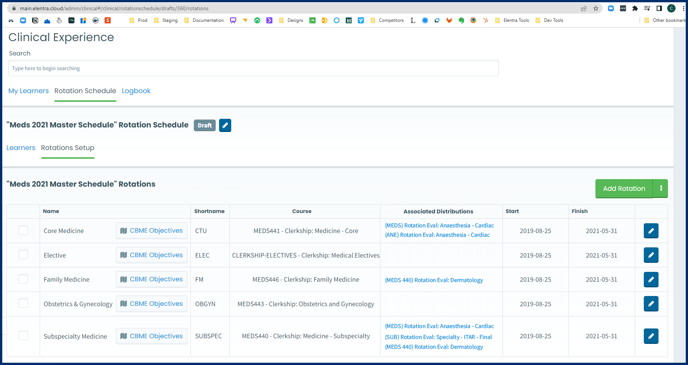
- Click on the View Schedule button of a schedule.
- Click on the Rotations Setup tab
-
Click the pencil icon beside the schedule name to open the edit screen. (Be aware that only authors can click on this, and they must currently be on the Rotations Setup tab as well.)
-
Existing authors will show as blue under the authors list.
-
Click the down arrow to open a search field and begin to type a user name.
-
Click on the name, or click enter when the name is highlighted, to add the name to the author's list.
-
Click Save when you've added all the required names.
Note: You can add author permissions to a rotation schedule, but not an individual rotation.
How to Publish a Rotation Schedule
-
After you have added slots and/or booked learners into slots, return to the main list of rotation schedules.
-
Click the checkbox beside a draft which will cause a publish button to display in the lower right hand corner.
-
Click Publish and then confirm your action by clicking Publish again in the confirmation window.
Note: You can continue to edit rotations and bookings within a rotation schedule even after it has been published.
How to Edit an Existing Rotation Schedule (Published or Draft)
- From within Admin> Clinical Experience> Rotation Schedule, click View Schedule next to the name of the schedule you'd like to edit.
- Click on the Rotation Setup tab.
- Click on the pencil icon beside the schedule name.
- Be aware that you must be on the Rotation Setup tab in order for the pencil icon to be clickable. Only authors of a rotation schedule have access to clicking and editing . Additional authors can be added to the schedule by using the pencil icon, allowing them to edit and make changes as well.
-
Edit the information as required.
- Click Save.
-
Import a list of rotations via csv file
-
Copy rotations from another Rotation Schedule
-
Build rotations manually through the user interface
Note: Before building rotations, please double check the block schedule template in the relevant Curriculum Layout > Curriculum Period. Ensure it has the appropriate number of blocks and the dates are accurate.
-
Navigate to Admin > Clinical Experience.
-
Filter by course or cohort as needed.
-
Click Rotation Schedule.
-
Create a draft rotation schedule if needed. Otherwise, click View Schedule on a rotation schedule.
- Click the Rotations Setup tab
- Click the menu options beside Add Rotation and select Import Rotation Schedule from the dropdown options.
-
From the popup that appears, optionally download a sample CSV.
-
Complete the CSV as needed (must include short name and full name for all rotations).
-
Drag and drop or browse your computer to select a file.
-
Select a Template from those available (these are defined by the blocks built in the relevant curriculum period). You can select more than one block schedule template in which case all rotations listed in the CSV will have blocks automatically built for the corresponding schedule (e.g. 2 week and 4 week blocks). Each block will automatically have one slot configured.
-
Click Import Rotations.
-
The created rotations will display in a list.
-
Click the blue pencil on the right to go into a rotation and view the automatically created blocks and slots.
-
Create a draft (see above). Click View Schedule if you aren't already in the draft.
-
Click Rotations Setup to switch tabs.
-
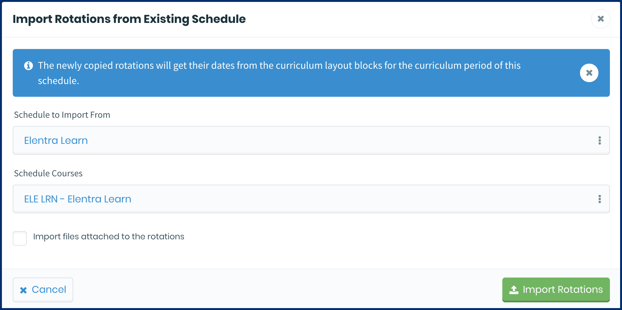
Click the hamburger icon beside Add Rotation and select Import Rotations from Existing Schedule from the dropdown options.
-
Select an existing schedule from the dropdown menu (note that your options will be limited to the courses you have access to).
-
Select the relevant course(s) you are copying from.
-
Be aware that the newly created rotations will use the block dates of the curriculum period you are copying to.
-
Optionally select to include files attached to rotations by checking the tick box.
-
Click Import Rotations. Please be aware that the process of copying rotations may take some time.
-
The copied rotations will display in a list.
-
A note for CBME users: When you copy an existing rotation schedule, CBME objectives associated with the rotations are not copied. You will need to define the likelihood and priority settings for the EPAs associated with each rotation when you copy a rotation schedule.
-
Also note there is currently no way to copy only one/some rotations from a rotation schedule. If not all existing rotations apply to a new curriculum period or course it may be fastest to copy the rotation schedule and then delete the rotations you don't need.
-
Navigate to Admin > Clinical Experiences.
-
Click the Rotation Schedule tab under the Clinical Experiences heading.
-
Click View Schedule on a schedule that is either published or in draft.
-
After opening a schedule, click the Rotations Setup tab and you will see a list of existing rotations, or no rotations if it is a new schedule.
-
Click Add Rotation.
-
Provide a title, code and description. The code becomes the shortname of the rotation and is displayed on the rotation scheduler and on learners' schedules.
-
You can select appropriate sites, buildings and rooms from the dropdown menus to specify where the rotation will be located. You can associate multiple sites, buildings and rooms with a rotation which will make those same sites available when you build blocks and slots.
-
Click Sites to open the list of available sites and click the green Add button beside those you wish to make available to this rotation. Click Sites again to close the card.
-
Repeat the same steps for Buildings and Rooms as appropriate.
-
Associate one or more preceptors with this rotation as needed. Adding preceptors to a rotation will allow you to more quickly find the people you need to associate with a clinical event if you are using granular clinical events.
-
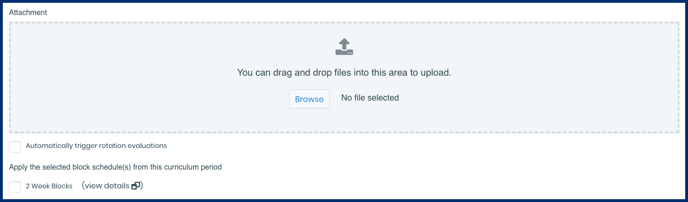
Add attachments relevant to the rotation as needed. Drag and drop files or browse your computer as needed.
-
If you want to automatically have rotation evaluations sent to learners booked into this rotation, check the box. To use this feature, you must have a standard rotation evaluation form built and permissioned to the course in which this rotation exists. A rotation evaluation form will automatically be sent to all learners in the rotation. Set a number of days and whether the rotation evaluation should be sent before or after the end of the course. You will require the help of Elentra support in order to set this up.
-
Please know that using this option means you would NOT need to set up an additional distribution to send rotation evaluations to learners. The automated rotation evaluation will automatically be sent, however you will not be able to view a progress report for it as you would a normal distribution. You can rely on the Admin > A&E dashboard to monitor progress of tasks sent via the automated rotation evaluation. Additionally, you can report on results using the Automated Rotation Evaluations (Aggregated) report.
-
-
Choose the block schedules you wish to associate with this rotation. By associating block schedules with a rotation, you can make those specific time periods accessible for booking learners at a later stage. Click the view details link beside a block title to view the individual blocks and their dates.
-
Click Save. You will be redirected to the list of rotations in the rotation schedule in which you are working.
How to Manage Existing Rotations
- Navigate to your list of rotations within your rotation schedule via Admin> Clinical Experience> View Schedule> Rotations Setup tab
- Click on the pencil icon to edit its title, description, code/short name, site, date, etc.
- Note that you can use the Shift Blocks button on the rotation settings page to move blocks forward or back by several days. This will shift the start and finish date of all blocks.
- Click Save.
- Navigate to any rotation schedule via Admin> Clinical Experience> Rotation Schedule> View Schedule.
- Click on the Rotations Setup tab.
- Click the ellipsis icon beside the Add Rotation button and select Export Report from the dropdown options.
- Select a block type from the dropdown options. (You can only select one block type at a time.)
- Click Export.
- A CSV file will download to your computer. The file will include enrolled learners (name and student number), and all blocks in the rotation. Each cell will display the shortname of where the learner is assigned during each block. Please note that this export will only include the first booking that matches the start and the end date of it's template block. That means that bookings with custom dates won't be exported because the start/end date won't match the template. If there are multiple bookings for the same template block, only the first one will be exported.
-
Navigate to Admin > Clinical Experience.
-
Filter for the appropriate curriculum period and course if needed.
-
Click Rotation Schedule below the Filter option card.
-
Click View Schedule on the appropriate rotation schedule.
-
Click on Rotations Setup under the Rotation Schedule title.
-
Click on the pencil icon to the right of the rotation you want to edit slots for.
-
The rotation details will open; scroll down until you see a list of blocks.
-
Click on the pencil icon to the right of a block name to open the block details card.
-
On the Block Details card you can edit the title, provide a block description, tailor the start and end dates, specify sites, buildings and rooms, and specify preceptors as needed. The details you add here will be accessible to the slots in this block.
-
A note on making your selections:
-
Click Choose Site or Choose Preceptor to open a list of options.
-
Click on the Sites or similar bar to search for or select your option. Clicking the checkbox beside a site or building will make the children of that entity available as selections. To add a site or building, click the green 'Add' button to the right of the site name.
-
To close the searchable list of sites click Sites again, or click Choose Site.
-
Everything you choose will display on a list and have a red Remove button beside it if you need to remove something.
-
-
After making your selections, click Save.
-
On the next card down, you can manage the available slots for the block. Elentra automatically creates one on-service slot for every block.
-
Click Add Slot.
-
Select a slot type from the list. The options are on-service learner or off-service learner. On-service slots will be open to learners enrolled in your program. Off-service slots can be made available to learners from other programs, and if so, will display on the rotation lists of those programs. Currently, there is no user interface to change these two slot type options.
-
Optionally select a site for the slot by clicking Choose Site. The quick pick list of available sites is based on the sites assigned to the block.
-
Optionally select a preceptor for the slot by clicking Choose Preceptor. The quick pick list of available preceptors is based on the sites assigned to the block.
-
The Enforce occupancy limits is used to limit the number of learners booked into a specific slot. This feature is optional but must be used if you plan to use the Elentra Lottery tool.
-
If you turn Enforce occupancy limits on, set the minimum and maximum number of learners for this slot.
-
Click Save.
-
You can add multiple slots to a block to provide an infinite number of opportunities for learners.
Note: If you plan to use the Elentra Lottery tool and you have multiple sites available, you must create a slot per site and define the maximum numbers for that site. This is the way the lottery can make sure to appropriately schedule learners.
![]()
Note: Learners can be booked into slots either individually through the user interface, or be imported by using a CSV file. The following sections will guide you on how to individually book learners into slots and how to import learners using a CSV file.
Booking Learners into Slots Individually Through the User Interface
-
Open an existing schedule via Admin> Clinical Experience> Rotation Schedule> View Schedule.
-
Note that Staff: Pcoor users will only have access to their affiliated courses/programs.
-
For multi-course rotation schedules, assigned Program Coordinators will be able to create bookings for their course, but not others.
-
-
Mouse over the block where you want to book a learner and click.
-
The system will identify all available rotations and slots with start dates in the block you clicked on. When you complete a booking the resulting card will fill the exact dates of the slot within the associated blocks.
-
Select a rotation from the drop down menu.
-
Any off service rotations available to the learner will be displayed at the bottom of the list.
-
-
Indicate a block span if you wish to book the learner in multiple consecutive blocks.
-
Select a block from the dropdown menu. If you indicated a block span, additional blocks will automatically be displayed.
-
Select a slot (on service or off service) for each slot.
-
You may customize the dates for a slot booking if needed, which will impact the display of the rotation in both the admin view and learner view of the rotation schedule. Click the checkbox and adjust the start and end dates for the slot.
-
Add a site or preceptor for the slot as needed.
-
Click Save.
-
You can add a learner to multiple slots within a block. To do so, click anywhere on booking and then click + New Booking.
-
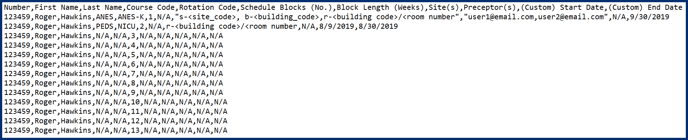
Number: Required. Enter the learner's Institution ID/Student Number. For learners who do not have Institution Numbers, enter their email address instead.
-
First Name: enter the learner's first name.
-
Last Name: enter the learner's last name.
-
Course Code: Required. Enter the Course Code associated with the rotation.
-
Rotation Code: Required. Enter the rotation's code (i.e., shortname).
-
Schedule Block (No.): optionally, enter the Block number into which the rotation will be scheduled. This block number corresponds to the Rotation Schedule in which you are working. It is the block in which the rotation is schedule or starts in (see notes regarding Schedule Block (No.), Block Lengths, and Start/End Dates below).
-
Block Length (Weeks): optionally, enter the length of the rotation in weeks (see notes regarding Schedule Block (No.), Block Lengths, and Start/End Dates below).
-
Site(s): optionally, enter the codes that correspond to the sites at which the learner will be participating in the rotation. This field can take Site, Building, and Room information in the following format:
-
Format: s-, b-,r-/
-
For example: When importing site of Kingston General Hospital (code = KGH), building of Richardson Labs (code = RLabs), and room Lab 1 (name Lab 1), the cell would be filled as follows: s-KGH, b-RLabs, r-RLabs/Lab 1
-
Note that these entries are case sensitive.
-
-
-
Preceptor(s): optionally, enter the email addresses of the preceptor(s) that will be associated with the rotation. If entering more than one preceptor, separate their email addresses with a comma and a space.
-
(Custom) Start Date: optionally, enter the start date for the rotation (see notes regarding Schedule Block (No.), Block Lengths, and Start/End Dates below).
-
(Custom) End Date: optionally, enter the end date for the rotation (see notes regarding Schedule Block (No.), Block Lengths, and Start/End Dates below).
-
If Block Length (Weeks) and Start and End Dates are left blank, the system will use the start and end date of the Block identified in the Schedule Blocks (No.) column.
-
If Block Length (Weeks) and Start Date are populated and Schedule Blocks (No.), but End Date is left blank, the system will calculate the End Date.
-
When the last block of the schedule is longer, and the rotation booking is in the last block and the difference between the calculated End Date and the last block’s End Date is less than 7 days, the system will use the last block’s End Date as the End Date for the rotation.
-
-
If Block Length (Weeks) and End Date are populated, but Start Date is left blank, the system will calculate the Start Date.
-
When the first block of the schedule is shorter, and the rotation booking is in the first block and the difference between the calculated Start Date is smaller than the first block’s Start Date, the system will use the first block’s start date as the Start Date for the rotation.
-
-
If Start Date and End Date are populated, the system will generate the rotation booking based on these dates.
-
If all columns are populated (Schedule Block, Block Lengths, and Start/End Dates), Block Length (Weeks) will be ignored, and the system will rely on the Schedule Block (No.) and the Start and End Dates defined to generate the rotation booking.
-
Navigate to Admin > Clinical Experience.
-
Filter by course or cohort as needed.
-
Click on Rotation Schedule.
-
Click on view schedule of an existing rotation schedule.
-
Click Import CSV.
-
Click Import CSV again and select your file.
-
Click Next.
-
You will be prompted to confirm your next steps - either replace the existing schedule, or merge your file with the existing schedule. Make your choice and click Next.
-
You will see a schedule preview. Review it.
-
Click Import Schedule.
-
You will see the relevant rotations display for each learner.
-
While on the learner scheduler within a rotation schedule, click anywhere on a filled booking to reopen it.
-
Click Edit in the bottom right corner.
-
Make changes as necessary on the Edit Booking card and then click Save.
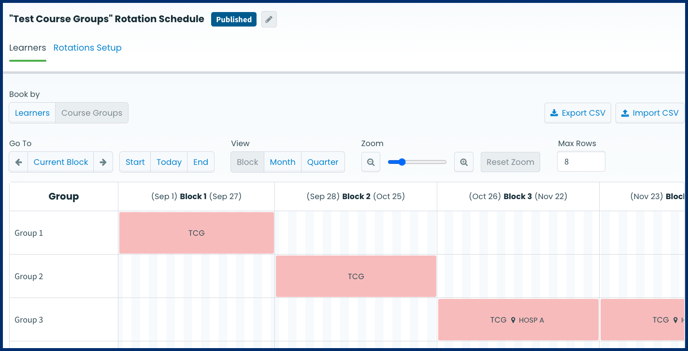
Booking Course Groups into Rotations

-
While on the Course Group tab of the scheduler within a rotation schedule, click on the existing booking.
-
Click Delete.
-
Confirm your choice.
-
Be aware that currently this will remove the course group booking from view but will not impact the schedules of the individual learners. You will need to delete the booking for each individual if you made a mistake when booking a course group.
Note: There is a database setting to optionally allow program coordinators associated with courses to delete slots that have off-service learners in them and make changes to the slot spaces (setting: allow_program_coordinator_manage_booked_slots). This setting is enabled by default. If you wish to prevent program coordinators from being able to do these things, please contact Elentra support to request the setting to be changed.
![]()
-
Navigate to Admin > Clinical Experience.
-
Click Rotation Schedule.
-
Ensure that the top level filter settings are set as needed (e.g., if filtering by course you have a curriculum period and course set).
-
Click View Schedule beside the schedule you want to view. Note that Staff: Pcoor users will only have access to their affiliated programs.
-
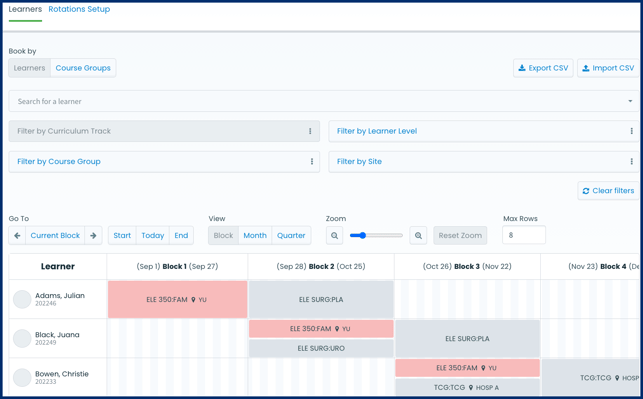
You will be taken to the Learners tab.
-
Optionally search for a specific learner.
-
Set any filters as required (e.g. Curriculum Track, Leaner Level, Course Group, Site).
-
Clear filters using the button on the right.
-
-
Enrolled learners will display in the first column. Their names, photos, id numbers and learner level (CBME learners only) will be included. The other columns represent the blocks available for learners to be scheduled into.
-
Be aware that the rotation scheduler will display the largest existing block structure available to the schedule. There is currently no way to adjust that view in the user interface (i.e., you can not toggle between viewing 2-week blocks and 4-week blocks when viewing the schedule).
-
Jump to the current block with the button on the left. Move between blocks with the forward and back arrows.
-
Jump to the start, today, or end of the rotation schedule using the available buttons.
-
Toggle from block to month to quarter view if desired.
-
When using quarter view note that they system will still book a block in its specific dates even if the view is less clear.
-
-
Zoom in or out as desired. Note the option to reset the zoom.
-
Configure the number of rows displayed.
-
-
Bookings will show the course code and rotation code, as well as a site if one is defined.
-
Greyed out bookings indicate that the learner is scheduled into another course's rotation schedule (e.g., for a learner that is enrolled in two courses). Users can't edit a booking outside the rotation schedule they are currently working in (they can book the learner into another slot in the same block).
- Off service rotations you've booked a learner into will display in grey and show the rotation shortname.
Viewing Booking Details
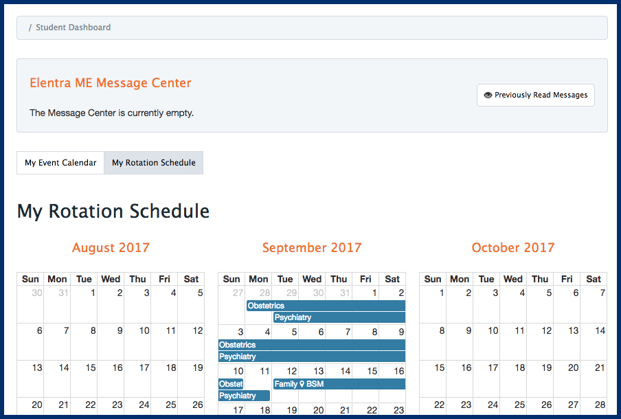
From within the My Learners tab, click on an existing learner booking, then click Edit. You will be taken to the Details tab for that booking.

From this screen, you can navigate to the Clinical Events tab to view & manage granular clinical events for this rotation. From the History tab, you can view an ordered list of changes that have been made to the booking since it was created.
Note: There is a database setting option to allow you to show learner rotation schedules in the same calendar as their event view (calendar_display_rotations)
-
If a learner is booked into overlapping slots, their rotations will stack on top of each other (e.g. obstetrics and psychiatry below).
-
If a site is assigned to the booking, the learner will see the site code displayed beside the rotation name.
Warning: Having the learner manage their attendance through their granular clinical events schedule is a setting option in Elentra and is disabled by default. If you'd like to have learners use this feature please contact Elentra support to make sure that 'clinical_event_approval_enabled' is enabled in the settings table.
-
If learners have been scheduled into granular clinical events, they can view them from the Dashboard by clicking on the My Event Calendar tab. Learners can view their calendar by day, week, or month and can use the date selector to easily move to a specific date.
-
Clinical events are shown with the first aid kit icon beside the event time.
-
The learner will be able to click on each granular clinical event where a pop up appears with the date and time, location and preceptors associated with the event. The learner can confirm or approve a scheduled clinical event in this pop up.
-
The learner will also be able to log an encounter directly from this pop up. (They must first confirm their attendance.)

Database Setting Options
|
Database Setting
|
Use
|
|---|---|
|
clinical_event_approval_enabled
|
If you use granular clinical events, optionally allow for learners to confirm their attendance at events and have staff access an administrative view of that information. Disabled by default.
|
|
allow_program_coordinator_manage_booked_slots
|
Control whether program coordinators can delete slots that have off-service learners booked in them or make any changes to the slot spaces. Enabled by default.
|
![]()