Article Content
This article covers the following topics. Click on the topic to go to that section of the article.
Form Overview
A form is a collection of items used to assess a learner, or evaluate a faculty member, event, rotation, course or anything else in your organization. Forms can be created for specific courses, or for use across an entire organization. Once created, the administrator can set up distributions to deliver the forms at the appropriate time to the appropriate audiences.
Note: If you are creating a form to be attached to a gradebook assessment, not all item types are supported because there is no structure to weight them on the form posted to the gradebook. When creating a form to use with a gradebook assessment it is recommended that you only use multiple choice, dropdown selector, and rubric (grouped item only). Free text items can be used on the form but cannot be part of the scoring, since there is no way to weight free text responses. Do not use date selector, numeric, or autocomplete (multiple responses) items. Please see additional details about form behavior in gradebook in the Gradebook section.
Form Types
Generic Form
This is a fully customizable form which can accommodate unique use cases.
Standard Rotation Evaluation Form
This form type is for use with the Clinical Experience rotation scheduler, when your organization uses an identical form to evaluate all rotations within a course. This form can be automatically distributed based on a rotation schedule (set by administrators when building rotations) OR can be made available to be accessed by learners on demand (using on-demand workflow).
-
You will need to contact Elentra support to add this form to your organization. They will input the preset form items that appear on the form each time one is created.
-
When a new form is made, the templated items (if any exist) will be automatically added to it. Users can then optionally add additional items. After adding items, the form must be published before it can be used.
-
Forms must be permissioned to a course to be used, and each course can only have one active standard rotation evaluation form at a time. If a new form is created it will overwrite the existing form.
- Each course must have its own form permissioned to it. (If forms are identical for all courses, you can create one form, copy it multiple times and adjust the course permissions.)
Standard Faculty Evaluation Form
-
You will need to contact Elentra support to add this form to your organization. They will input the preset form items that appear on the form each time one is created.
-
When a new form is made, the templated items (if any exist) will be automatically added to it. Users can then optionally add additional items. After adding items, the form must be published before it can be used.
-
Forms must be permissioned to a course to be used, and each course can only have one active form at a time. If a new form is created it will overwrite the existing form.
- This form can be made available for learners to initiate on demand using on-demand workflows.
Note: Organizations with CBME enabled will see additional form types. Please see the CBME section for additional details on the form types of rubric, supervisor, field note, procedure, PPA, and form templates
![]()
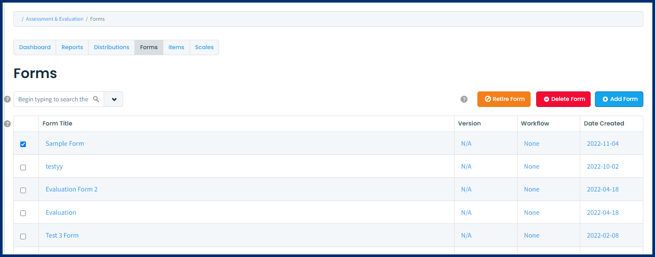
To begin, navigate to Admin> Assessment & Evaluation > Forms tab> Add Form button.
-
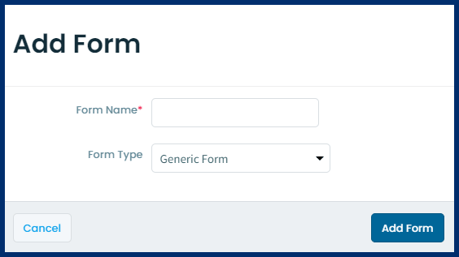
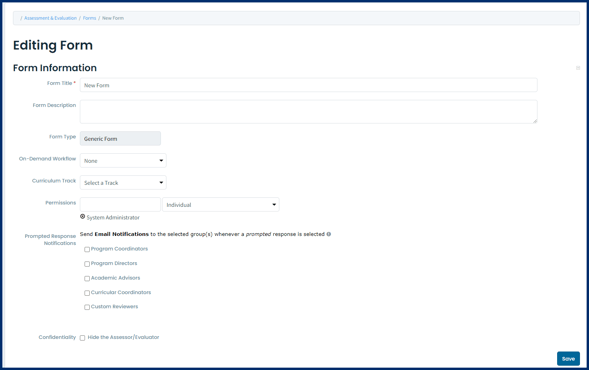
Form Title: Created in the previous step.
-
Form Description: Optional. This will display to users when the form is accessed.
- Form Type: Assigned in the previous step.
- On Demand Workflow: If your organization uses workflows like EPA or Other Assessment (i.e. allows users to initiate specific forms on-demand), make the appropriate selection. Set to None if you do not want users to access this form on-demand.
-
Permissions: You can optionally give permissions to individuals, a course or an organization.
-
Any individual given permission to the form will be able to edit it until it is used in a distribution.
-
We strongly recommend permissioning forms to courses rather than individual faculty, so that staffing changes are simplified. By permissioning a course, any user who is a course contact for that course and who also has permission to access Admin > Assessment & Evaluation, will be able to access the form and include it in a distribution if needed.
-
Currently, permissioning a form to an organization only allows medtech:admin users to access it. As such we recommend relying mostly on course permissions.
-
Forms using a workflow (e.g. EPA, Other Assessment, Rotation Evaluation or Faculty Evaluation) must be permissioned to the appropriate course.
-
Standard Rotation Evaluation and Standard Faculty Evaluation forms must also be permissioned to a course.
-
- Prompted Response Notifications: Optionally, send email notifications when a prompted response is selected on a form. Prompted response reviewers set on distributions or on admin-triggered assessments will override these selections. Read more about Prompted Responses in our Knowledge Base article.
- Confidentiality: Check this box if you'd like completed tasks using this form to replace the assessor/evaluator name with Confidential. See further details below.
Form Items
-
To create new items while creating your form, click Add Items and then click Create & Attach a New Item. When you complete your new item and save it, you will be returned to the form you in the process of building.
-
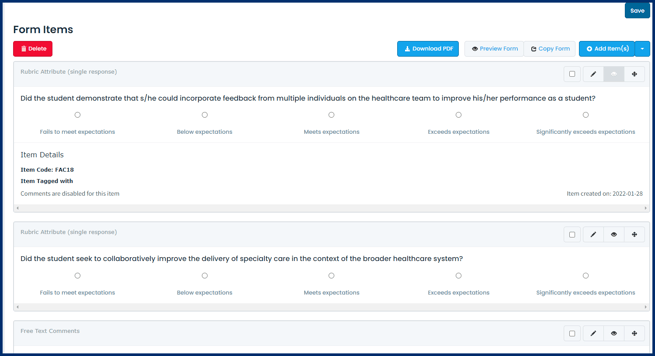
To preview your form, by clicking on the eye icon/Preview Form button.
- To download a copy of the form, use the Download PDF button.
- Adding a Curriculum Tag Set is a very specific tool that supports field notes for use in family medicine. Most use cases will not require this functionality.
Confidential Assessors/ Evaluators

-
To delete items on a form, tick off the box on the item card and then click the red Delete button on the left.
-
To rearrange items on a form, click the crossed arrow icon on the item card and drag the item to where you want it to be.
-
To edit an item, click on the pencil icon on the item card. Please be advised that an item already in use on a form that has been distributed will not be able to be edited. Instead you must copy and attach a new version of the item to edit and use it.
-
To quickly view the details of an item, click on the eye icon on the item card

To copy a form, click on the Copy Form button from within the Edit Form screen of the form you want to copy. Edit the form as needed (e.g., add additional items, change permission, etc.).
-
If you edit an item on a form and that item is in use on other forms, you will affect all of the associated forms. You can optionally view all forms that include the item.
-
For grouped items you can optionally copy and attach the grouped item to the form allowing you to change it as needed.
- For single items you can optionally copy the item to edit it. This will create a brand new item with no connection/link to the item it is copied from.
Retire or Delete an Existing Form