Create and manage your organization's academic years
Article Content
This article covers the following topics. Click on the topic to go to that section of the article.
- Curriculum Layouts & Periods Introduction
- Curriculum Layouts
- Curriculum Periods
- Create a curriculum layout and period
-
Reorder the appearance of curriculum layouts in the user interface
-
Deleting Blocks & Block Schedules
Curriculum Layouts & Periods Introduction
Curriculum layouts and periods define the structure of your school's courses & content. These must be built within Elentra prior to most other features, since they define the structure of courses, learning events, gradebooks, and most other Elentra modules. You can build your curriculum tag sets and your curriculum layouts & periods in tandem. 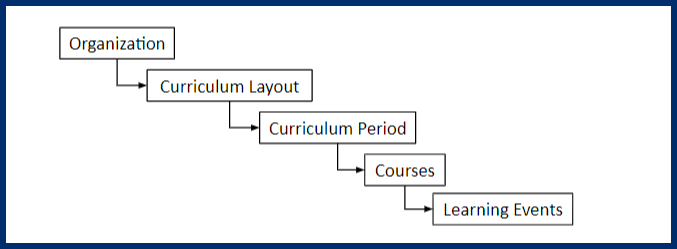
![]()
Curriculum Layouts
Curriculum Layouts define the general blocks of time within an organization used to manage teaching and learning. Curriculum layouts house your courses, which in turn house learning events, gradebooks, and other Elentra features. Examples of layouts include year, term, semester, phase, etc.
Curriculum Periods
A curriculum period is an iteration of a curriculum layout. Examples of curriculum periods are Fall semester 2021, Winter semester 2022, Spring semester 2022, etc. 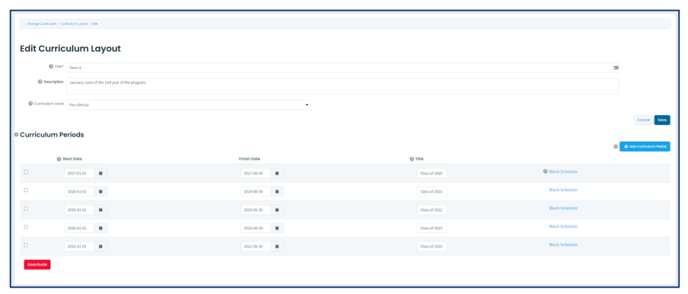
Create a curriculum layout & period
- Navigate to Admin > Manage Curriculum > Curriculum Layout (on the left side bar)
- Click on Add Layout
- Complete the required information. You will be required to define the Layout Title and at least one Curriculum Period in order to save.
Note: Under the Curriculum Level you may see preclinical/clinical or Undergraduate/Postgraduate depending on which version of Elentra you are using. There is currently no user interface to change these levels. There is a feature that is disabled by default that allows this field to be used to categorize multiple curriculum layouts into on academic level for the AAMC Curriculum Inventory Report.
Reorder the appearance of curriculum layouts in the user interface
You can reorder your curriculum layouts by clicking and dragging the curriculum layout row to the appropriate place in the list and then click Save Ordering.
Deleting curriculum layouts & periods
Deleting Curriculum Layouts
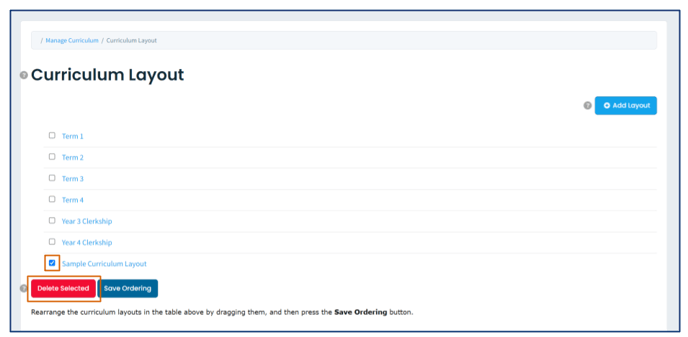
To delete a curriculum layout:
Step 1: Click the checkbox beside the layout you wish to delete
Step 2: Click Delete Selected. You will be brought to another page to review the deletion selection.
Step 3: Click Confirm Delete once you are sure you want to permanently delete the selected curriculum layout(s).

Deleting curriculum periods
Step 1: Open the existing curriculum layout where you want to delete curriculum periods.
Step 2: Click the checkbox beside the curriculum period you want to delete.
Step 3: Click Deactivate.
Block Schedules
In the Elentra software if a specific curriculum period is a time when learners will need a rotation schedule in the Clinical Experience module, then a block schedule will need to be created within that curriculum period.
Note: A block schedule is a collection of blocks which specify periods of time with a specific block type (e.g., 1 week blocks, 2 week blocks, 4 week blocks, etc.) and the start & end dates that a rotation will be offered. One or multiple block schedules will need to be applied to a rotation when creating it in a rotation schedule.
Every time a rotation is created under a curriculum period with block schedules the block schedules are then available to be copied to that rotation. The start and end dates of individual blocks within a block schedule are configurable and the blocks do not have to be contiguous.
Caution: If you require multiple block schedules to be built, we strongly recommend you build your largest blocks first and create the required block schedules in a descending order. For example, if you have some rotations that run for 8 weeks, some that run for 6 weeks, and some that run for 4 weeks, we advise building your 8 week block schedule first, then the 6 week, then the 4 week (all within the 1 curriculum period).
By default, the first block schedule created will inform the rotation schedule display; meaning in the cited example, 8-week blocks will appear in the rotation schedule. Rotation bookings in shorter block schedules will nest inside according to the booking and block dates. A database setting is configurable if you prefer to view your schedule from the perspective of the smallest block schedule. In such a case, the 4-week blocks of time would appear in the rotation schedule, and rotation bookings that were longer than 4 weeks would span multiple blocks, based on the rotation booking dates.
Note: At your institution you may refer to the blocks inside of a block schedule by another name (e.g., weeks instead of blocks). While you are able to name your blocks what you would like the columns in the spreadsheet admin view of the rotation schedule in the Clinical Experience module will be referred to as blocks and this is not currently configurable.
Create a Block Schedule
Step 1: Navigate to Admin > Manage Curriculum > Curriculum Layout > select the applicable layout. Then click on Block Schedule > New to start creating your block schedule.
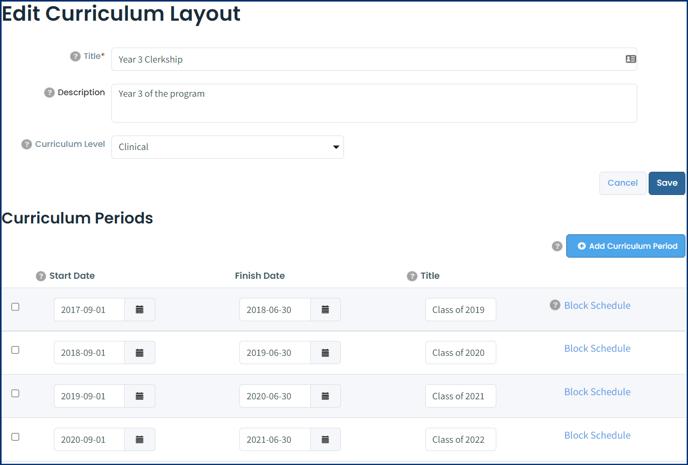

Step 2: You will need to configure the block schedule and create a shell to be able to create the blocks within the block schedule.
- You must provide a title and block type. You can optionally provide a description which is only visible when you go into the block schedule in Manage Curriculum. The title you use should be a general title and should describe the block type so that it is easily identifiable in the Clinical Experience module (e.g., 1 week blocks or 1 week blocks CO2022). The blocks will typically be used across rotations so the title should not include a course/rotation name.
- Block Type options are 1 week, 2 week, and 4 week by default. If your organization requires alternative block options (e.g., 6 week, 8 week, 12 week, etc.), submit a support ticket or contact your Account Manager.
- The dates will be set according to the Curriculum Period you selected previously and cannot be changed here.
- Click Save to create the block schedule shell.

Step 3: Once you save the blocks schedule shell then you are able to create the blocks.
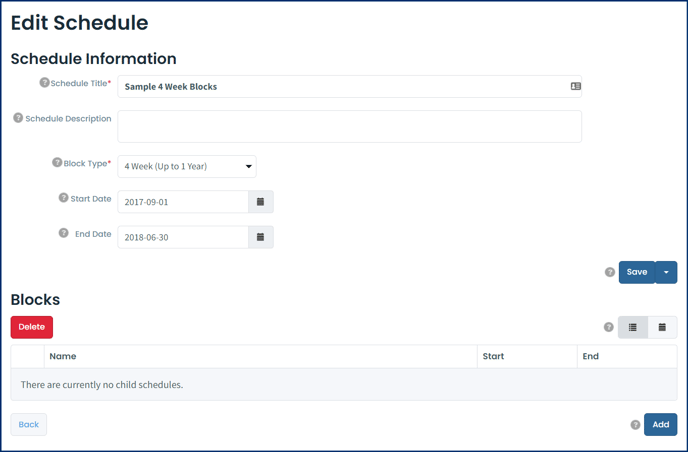
Blocks can be created in one of two ways:
- Manually
- Auto-generated
1. Manually Creating Blocks
To create blocks one at a time, click on the Add button at the bottom of the block schedule and you will be brought to the following screen.
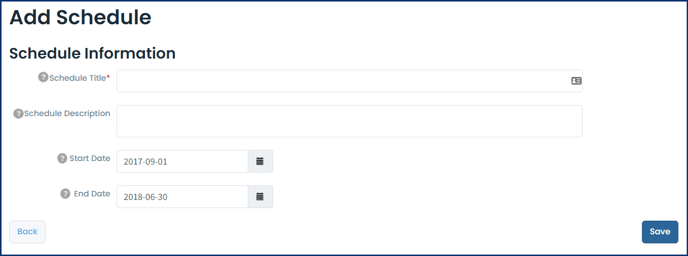 You must add a title and define the start and end dates. You can optionally add a description, but note the description will not show throughout the system. Click Save and repeat this process for however many blocks you wish to make in the block schedule.
Note: Because you are able to manually define you blocks dates the blocks do not need to be contiguous and do not necessarily have to follow the block type (1 week, 2 week, 4 week etc.).
2. Auto-generate Blocks
To auto-generate blocks click on the drop-down arrow next to the Save button, then click Auto-generate Blocks.
 A window will appear with the following options:
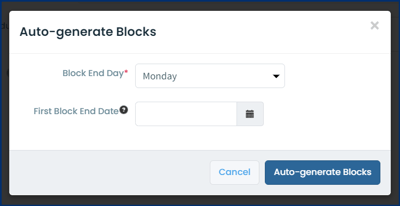
Block End Day: This is the day of the week you want blocks to end.
First Block End Date: Optionally, you can use this to set the first block to end on a specific date (useful if the curriculum period starts on an irregular day).
Click Auto-Generate Blocks to continue. The number of blocks created will depend on the block type (1 week, 2 week, 4 week, etc.) and your curriculum periods. It will make however many number of blocks that fit in between the start and end dates of your curriculum period.
Once generated, you can edit the individual blocks by clicking into the Block Name on the individual block. Click Save once completed.
Note: The block auto-generation feature assumes that you have contiguous blocks that run 7 days a week. If you would like to have non-contiguous blocks it is recommended to manually create the blocks instead of auto-generating them and then adjusting dates.
Warning: When creating your rotations in a rotation schedule the system simply makes a copy of the block schedule(s) you chose to associate with the rotation. This means that once a rotation schedule has been built and rotations created using the block schedule templates, any changes made to the block schedule template in a curriculum period will not be inherited by the existing rotation schedules. You will need to either rebuild your rotations or if they have already been extensively used, adjust the block dates per rotation if you find you need to change the dates on the blocks in your block schedule template.
Deleting Blocks & Block Schedules
Deleting a block in a block schedule
To delete a block in a block schedule select the check box next to the block name(s) you wish to delete then click the Delete button located at the upper left hand side of the blocks table. You be brought to another page where you will be asked to confirm your deletion by hitting the delete button a second time.
Reminder: These kinds of changes do not get inherited by pre-existing rotations that are using this block schedule.

Deleting a block schedule
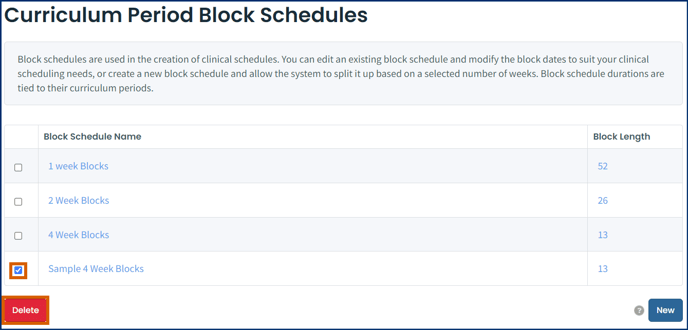
To delete a block schedule select the check box next the block schedule name(s) you wish to delete then click the Delete button located in the lower left hand side of the page. You be brought to another page where you will be asked to confirm your deletion by hitting the delete button a second time.
Reminder: These kinds of changes do not get inherited by pre-existing rotations that are using this block schedule. The copy of the block schedule will remain in the rotation that is using it. If block schedules are deleted and there are existing rotations that are using that block schedule you will not be able to copy that rotation into another rotation schedule using the Import Rotations from Existing Schedule feature in the Clinical Experience module. You will be able to import rotations via CSV in your new rotation schedule.
.png?width=688&height=189&name=Confirm%20Deletion%20of%20Block%20Schedule(s).png)

.png?width=688&height=195&name=Confirm%20Deletion%20of%20Block(s).png)