Article Content
This article covers the following topics. Click on the topic to go to that section of the article.
Add, Edit, or Delete a Location
Within Elentra, Locations can be created and used in the Manage Events and Clinical Experience modules. In Clinical Experience, sites can be added to lists of "Location pools" for rotations, which then creates a quick pick list of locations when booking someone into a rotation. The location can also be added directly to the booking without creating location pools. The locations assigned to each booking in a rotation schedule will be visible to admins for scheduling and tracking purposes, and to the learners on their own rotation calendar. In addition, locations can optionally be assigned to rotation slots with capacities to be visible in the Lotteries module and be visible in rotation schedule distributions in Assessment & Evaluation.
In Manage Events locations are used to tell students where their event is located, as well as use the Lecture Capture capabilities in the system.
While all data points are visible to admins, only some fields are visible to Learners. Admins can also choose to hide specific Locations from Learners on their list of locations.
Adding, Editing and Deleting Locations can only be done from the Manage Locations module, either individually through the interface, or creation with a CSV import. To begin, click on Admin > Manage Locations.
Add or Edit the Location Manually
Step 1: Go to Admin > Manage Locations.
Step 2: Click the Add Location button (+), fill out the required details, and click Save.
Step 3: The Location should then be viewable on the Table View. The Location Status & Visibility will still be undefined and must be manually updated from the Status & Visibility tab. See the Locations - Details section in this article for further details on the Status & Visibility tab.
Bulk Create Locations with CSV import
Note: Make sure the Location doesn't exist in the system already. If Elentra detects a duplicated Location Code, it will prevent the import from successfully occurring.
Step 1: Go to Admin > Manage Locations
Step 2: Click on the Import/Export button
Step 3: Click on the Download sample CSV file menu item
Step 4: Within the CSV file, complete the template by filling in the Locations' information into the sample CSV.
- On the Status column, for each Location on the file, indicate Active or Inactive. When the Location is Active, you are allowed to associate it to Rotations' Location Pools when creating a rotation.
- On the Visibility column, for each Location on the file, indicate 1 (Visible) or 0 (Hidden).
- When a Location is "Visible," Learners can see it from the Locations page available for them.
- If these columns are empty or contain invalid values, the import will still happen, and both will remain undefined.
- When a Location is "Visible," Learners can see it from the Locations page available for them.
Delete Locations
Deleting Locations can directly be done through the Manage Locations module.
Be aware that it is a soft delete.
Step 1: Go to Admin > Manage Locations
Step 2: Select the Location(s) you wish to delete, click the Delete selected button and confirm.
![]()
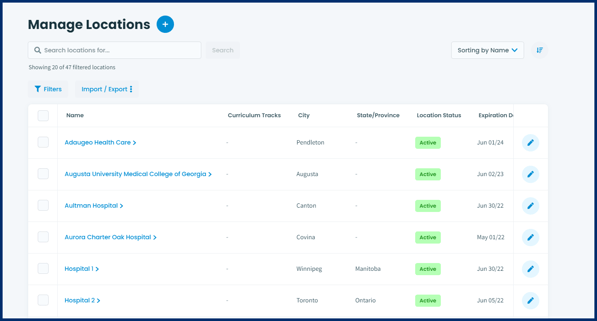
Locations Table View
When accessing the Manage Locations module as an admin, you'll see a list of Locations with the fields that are added manually or in bulk (Name, Curriculum Tracks, City, State/Province). The rest of the additional fields are managed through the Location's Details tabs.
From this view, you can:
- Search a Location by Name
- Sort the table by any column
- Import/Export locations
Locations - Details
When clicking on one specific Location's Name hyperlink, you can access and edit its details through the different tabs.
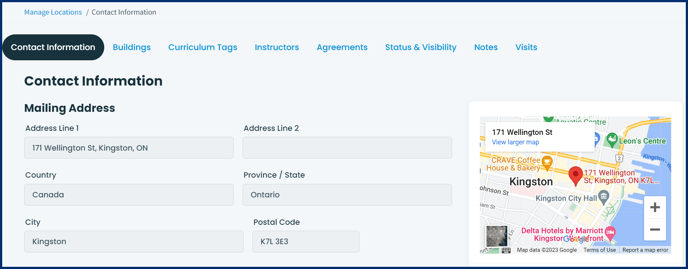
Contact Information Tab
All these fields are set through the Manage Locations module, either manually or in bulk.
The Map functionality works by detecting the Mailing Address.
The Contacts section can only be added manually at the moment.
Building Tab - Adding, Edit, or Delete Buildings and Rooms Manually
Location is the top tier of the location management system, but it can get more granular if needed: within a Location, you can add Buildings, and within a Building, you can add Rooms.
An example:
Location: University/College Name, Hospital Name
Building(s): New Medical Building, Abramsky Hall, Student Athletic Centre
Room(s): 201A, 201B, 430, 431, The Caldwell Room
Currently, this information can only be added manually.
- To add a Building, click the Add Building button (+), fill out the required details and click Save.
- To add a Room, click on the Building's name, then the Add Room button (+), fill out the required details and click Save.
Curriculum Tags Tab
In this tab you can associate Curriculum Tags to the Location to allow Admins and Learners to filter Locations by the tag.
Instructors Tab
To associate Instructors, click the Add Instructor button (+), search for and select instructors to be added and click Save. To remove an instructor, click the checkbox beside their name and press the Remove Selected button.
To add instructors, there must first be instructors added into the system. Please review the Manage Instructors module for more information on how to add instructors.
Agreements Tab
Upload agreement documents and assign expiration dates to the Agreements Tab. To add an Agreement, click the Add Agreement button (+), fill in the fields and upload the agreement document, and press Save.
The Expiration Date column on the Locations Table View will be calculated based on the latest expiration date of all agreements.
Status and Visibility Tab
The Status & Visibility fields per Location will be undefined (empty) by default and can be updated individually through the interface or in bulk with .csv
You can set the Status of the Location to Inactive or Active. When the Location is Active, you are allowed to associate it to Rotations' Location Pools.
You can set the Visibility of the Location to Hidden or Visible. When a Location is Visible, Learners can see it from the Locations page available to them.
Notes Tab
This tab is intended to contain any comments used to input additional information for internal use or to show to Learners. Press the Add Notes (+) button to add any notes, and press Save.
Visits Tab
Stores information related to visits. This tab will only show if the school has information on their database. To add a Visit, press the Add Visit button (+) and fill in the fields as required, and press Save.
![]()