This article covers the following topics. Click on the topic to go to that section of the article.
Introduction to Creating & Managing Events
All users have access to the learner view. What events they have access to in this view will depend on their permission level. The following image is an example of the Learner View.

The following user permission levels have access to the administrator view. Depending on the user permission level they may have limited capabilities to create and/or manage events. The administrator view may not be called “Administrator View” for each of these users.
|
Permission Level |
Admin View Name |
Capabilities |
|
Medtech:Admin |
Administrator View |
Can manage every aspect of events in Elentra |
|
Staff:Admin |
Administrator View |
Can manage every aspect of events in Elentra |
|
Staff:PCoordinator |
Coordinator View |
Can create & manage events for which they are listed as the Curriculum Coordinator under the course contacts section on the Setup tab of a course. |
|
Faculty:Director |
Director View |
Can create events for any course. Can only view and manage events for which they are listed as the Course Director under the course contact section on the Setup tab of a course or where they are listed as the teacher on the event. |
|
Faculty:Lecturer |
Teacher View |
Cannot create events. They have the ability to manage events for which they have been listed as the teacher on the events. They do not have access to the Setup tab of an event but have access to all the other tabs in the administrator view of an event. |
|
Faculty:Faculty |
Has no Administrator View |
Cannot create or manage events |

Manage Events Page
When navigating to the Manage Events module every user will be brought to a page where they will be able to search for the events they are wanting to view. In this view they have access to filtering capabilities that they do not have on the Dashboard Calendar to aid in their search. Some users who have access to the Administrator view are also able to create new events from this page either individually or in bulk and can export events via CSV.
The following image shows the view of the Manage Events page for those users who can create events. From this page, events can be copied, exported, or deleted.
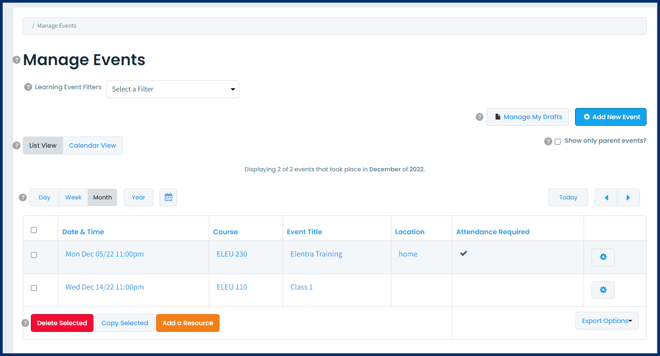
Warning: Deleting an event in Elentra is a permanent action which cannot be undone.
Filtering Capabilities
- Teacher Filters: Allows you to filter by the teachers who are listed as the teacher(s) on the event.
- Teacher as Event Audience Filters: Allows you to filter events where someone from the Faculty group is part of the event.
- Student Filters: Allows you to filter to specific students schedules. It is looking at where the student is part of the audience of an event.
- Cohort Filters: Allows you to filter events to see to specific cohorts' events.
- Week Filters: Allows you to filter events by the weeks set up for the units used in a course. You must be using the Units feature in the course in order for this filter to work
- Learning Event Type Filters: Allows you to filter events by the learning event type(s) listed on the event.
- Curriculum Tracks: Allows you to filter events by the curriculum track(s) listed on the event.
- Curriculum Tag Filters: Allows you to filter events by specific curriculum tag sets.
- Hot Topic Filters: Allows you to filter events by hot topic(s) listed on the event. Please note that the Hot Topic feature in Elentra is being deprecated and it is now recommended that users use a tag set to capture the hot topics of an event.
- Departments Filters: Allows you to filter events by the departments of the Faculty users.

List & Calendar View
Creating & Managing Events
In the Manage Events module there are multiple ways to create events. You can
- create events individually through the user interface
- create events in bulk using a CSV
- copy individual events & event series, and use the copy forward feature to roll events forward to a new curriculum period of a course
Individually Creating New Events in the User Interface
To individually create an event or event series from the Manage Events page do the following:

- Select Course: All events must be affiliated with a course. For this reason some organizations create a general course for non-curricular events if needed.
- Event Type: This will display to the event audience. If you hover over an event type you'll see its description. This is customizable to your organization - see more on the Learning Event Types Knowledge Base article. The options that show in this drop down list must be built in System Settings first before you can make the event.
- Be aware that you can add multiple event types to a single event (e.g., 60 minute lecture, 60 minute small group work, etc.)
- Duration: Elentra will automatically put a default duration for each event type segment added. To adjust the default durations or set a default maximum or minimum duration for your organization, contact Elentra Support.
- Title: This will display to the event audience and will also be used in other modules of Elentra where you might be linking something to an event (e.g. posting an exam to an event).
- Start Date and Time: This is required and controls the start date and time of the event.
- End Date and Time: By default, the end date and time will be automatically calculated based on the event start date and time and the duration of the event. If you want to create a long event to display on the learner calendar for one or more days, check the tick box and enter a different end date and time.
- Curriculum Period: Setting the curriculum period helps the system filter the audience for your event. The curriculum period may automatically be populated based on the course and start date and time of the event. This is dependent on whether or not there are overlapping curriculum periods defined in the course. If the date of an event is included in two or more curriculum periods you can select the appropriate curriculum period. You can also optionally set the curriculum period to No Period Selected. If your event falls on a date that could be in more than one curriculum period, how you assign curriculum periods will impact the audience of the event.
- Impacts of the curriculum period on the audience of an event:
- If the curriculum period is set to No Period Selected for an event, and the event audience is set to All Learners Enrolled, all learners who are in any curriculum period that encompasses the start time will see the event.
- If a curriculum period is defined for the event and the event is set to All Learners Enrolled, only the learners enrolled in the course for the matching curriculum period will see it.
- Impacts of the curriculum period on the audience of an event:
- Event Series: Use this option if you are creating recurring events (e.g. you want to schedule 10 identical events for 10 small groups).
- Event Location: Define where the event will be. This will display to the event audience. If your organization has sites, buildings and rooms configured in the Manage Locations module you can assign the event to an existing room. Elentra requires you to provide a room for an event, not just a building or site. If you do not have the site, building, and room defined in the Manage Locations module you can instead manually type in the location into the field.
- If you need to add locations to your organization please see the Knowledge Base article called Introduction to Manage Locations.
- If you want to type in a location, pick Other location from the dropdown option (URLs entered here will become clickable links on the event page).
- Course Unit: This option will only be visible if you have weeks and units enabled for your organization. It is disabled by default. Speak to your Elentra account manager to have it enabled if it is not already.
- Associated Faculty: Add teachers to this event by beginning to type a name, clicking on it and clicking Add. Note that you can define an associated user as a teacher, tutor, teacher's assistant or auditor. This data is used in several reports including the Teaching Report by Faculty Member (hourly), Teaching Report by Faculty Member by Course (hourly), and Faculty Teaching Report by Department (half days).
Note:
- Teacher's Assistance and Auditors will default to 0 minutes and not be editable. These roles are excluded from Annual Reports. TAs and Auditors have no administrative permissions to the events they are listed on.
- An additional database setting (events_teaching_minutes_self_edit_enabled) can allow faculty and Course Directors to adjust teaching minutes from the Content tab of an event.
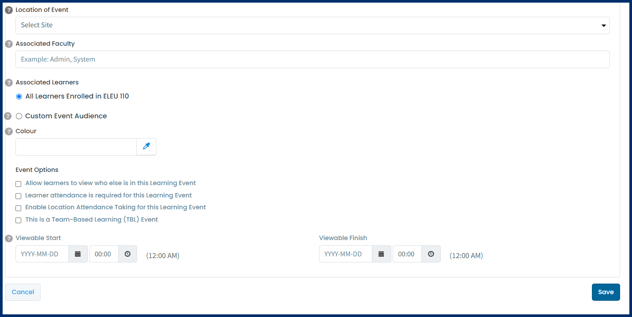
- Associated Learners:
-
- All Learners Enrolled: This option is selected by default when creating events. This option is useful if you plan to roll forward a schedule from one year to the next. All learners enrolled in the course, for the curriculum period defined in the event, will see the event.
- Custom Event Audience: This allows you to assign a cohort, course group, or individual(s) as the event audience. If you add multiple cohorts or groups to an event you'll be able to specify how much time each group will be participating in for the event. For example, if you assigned a medicine cohort and a pharmacy cohort to a sixty-minute event you could indicate that the meds students will be there for the full hour, while the pharmacy students will be present for thirty minutes.
- To use this tool, add your audiences and then click on the grey clock icon beside the cohort/group name. This will open an Event Audience Time Override window where you can click and drag the slider (from either side) to set the appropriate time for the audience you're working with. Click the Warn me checkbox if you want to be alerted to overlapping times. Click Close to save your changes. When times have been adjusted for specific audiences the small clock icon will display green.
- Color: If you select a color here it will display on the learner calendar and override any course color, event type color or default color you have set up for your organization. You can input hex color codes here to use any color you would like and are not bound to the color palette given in the user interface.
- Event Options:
-
- Allow learners to view who else is in this Learning Event
- Learner attendance required: If checked the teacher of an event (or an administrator) be able to record attendance during the event itself.
- Enable Learner Self Recorded Attendance for this Learning Event: This is used for enabling learners in the event audience to mark themselves as attended, or request an absence for the event.
- Enable Location Attendance Taking for this Learning Event: This is used for geo-location attendance tracking (i.e., letting learners mark their own attendance based on their physical proximity to a building).
- This is a Team-Based Learning (TBL) Event: This will only display if you have TBL enabled for your organization. Checking this box will allow the event to have the TBL user interface elements displayed assuming you have associated exams with the event (e.g., iRAT and tRAT).
- Time Release Options: Leave this empty to allow users in the event audience to access the event at any point. Completing these fields will restrict when learners will be able to view and access the event. Note that there is another tool that allows you to apply time release options to specific resources when adding them to learning event.
Note: These events will be published immediately for users to see. If there is a time release set they may not be visible to all users immediately.
Warning: You cannot recreate an event series after saving on the initial Add Event page. You do have the opportunity to adjust the information on each of the events in the series after it is created. You can also add more events to the series by using the copy feature from the list view of the Manage Events page.
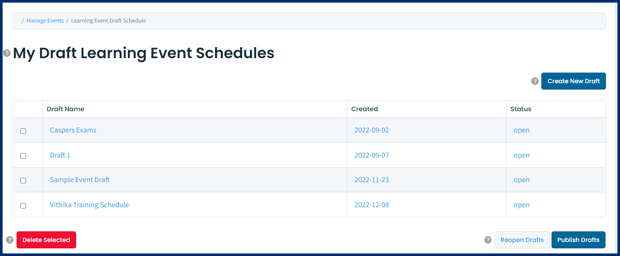
A draft schedule allows you to create new events in bulk either from a CSV import, or from copying forward events from preexisting events in the system. These events won't appear on user calendars until they are published. This allows for further editing and the ability to control when exactly when events will appear a user's calendar. Other users who can manage events will only be able to view the draft schedule you have created if you have given them permission to the draft.
Create a Draft Schedule of Events
To create a Draft Schedule of Events, do the following:
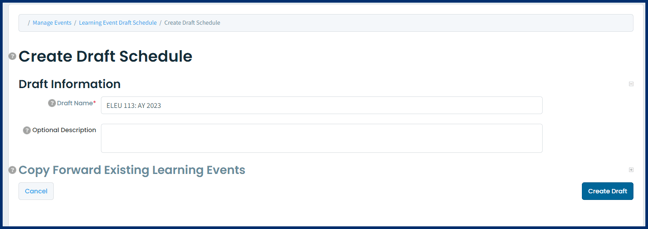
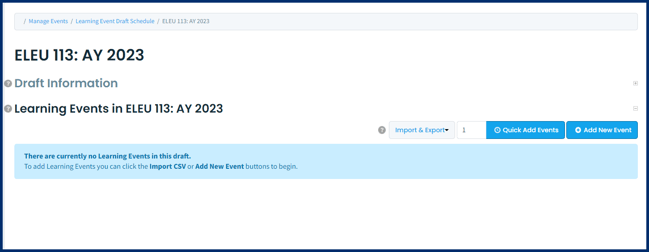
Note: At this point a greyed out Draft Information heading will display, and it can be expanded by clicking on the grey heading, or the + button to the far right of the heading.
Step 4: (Optional) Add Draft Authors

Note: Only Staff: Admin and Faculty: Director users can be added to draft schedules.
Add New Events to the Draft Schedule Individually from the User Interface
Adding an event individually inside of a draft is a similar process to adding an event individually outside of a draft from the Manage Events page. A major difference is that the event inside of the draft will not be published automatically upon saving it. It will not get published until the draft itself is published. To add events individually inside of a draft schedule do the following:
Step 1: Click on Add New Event.
Step 2: Follow the instructions in the Individually Creating New Events in the User Interface section of this article.
Add New Events to the Draft Schedule via CSV Import
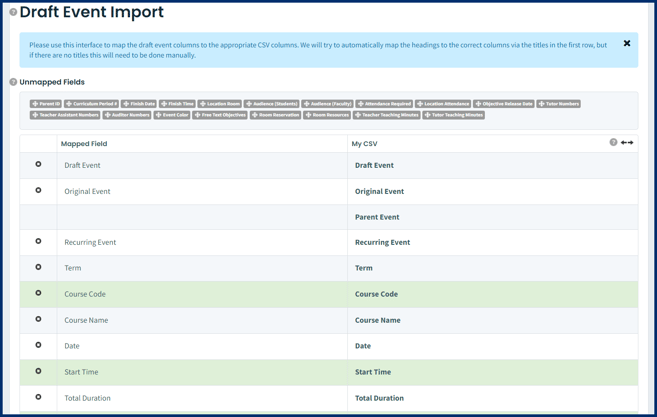
- Fields that are matched and green indicate required fields.
- Fields in the top section and in red are required and you'll need to add them to your CSV if you haven't already included them.
Create an Event Schedule CSV file for Import
- Course Code: This schedules the events in the correct course. You can find course codes on a course setup tab.
- Event Types: This defines the event type and can hold multiple event types if needed (e.g., a two-hour session split between lecture and small group work).
-
- Event types must match the list of event types in your organization. If using more than one event type, and separate them with a semicolon and space (e.g., lecture; small group). Keep the order the same as the event type duration column.
- Event Title: Enter the event title.
- Date: Enter the date. Multiple formats are accepted.
- Start Time: This is what time the event should start. Enter in 24 hr. format.
- Event Type Durations: If you have multiple event types scheduled in one event, this column can be used to indicate how much time is allotted to each event type. Enter the time in minutes and separate times with semicolons and a space (e.g., 60; 60). Put the times in the same order as you list the event types.
-
- If there are not multiple event types scheduled during an event, this column should be identical to the Total Duration column.
- Draft Event: If you have exported a CSV of copied events, this column will already be populated for you. If you are importing a completely new schedule (i.e. you did not roll forward a schedule), this can be omitted or left blank.
- Original Event: If you are importing a completely new schedule, this column can be left blank. If you have exported a CSV of copied draft events, this column will be populated with the unique ID numbers of the existing events. This information should not be changed as the original event ID will help Elentra know which resources, curriculum tags, etc. to associate with this event.
- Recurring Event: If you are creating a brand new schedule, enter the draft event ID of the first event in the series in the recurring event column for the main event and each subsequent recurring event. If you are working with a schedule of events copied forward, you will see the identifier of the draft event number of the first event in the recurring series.
- To add additional recurring events to a schedule, copy a line representing a recurring event. Edit the duplicated draft event so that it has a new, unique draft id number, and update the title, audience and location as required. Leave the original event information as it is.
- This field can take any integer value greater than 0.
- Parent ID: This column is applicable only if the event is part of a recurring event series and is to be linked as a child to a parent event.
- If the event is a child event, enter the draft event ID of the relevant parent event.
- If the event is not a child event leave this column blank.
- This field accepts any integer greater than 0.
- Curriculum Period Number: Specify which curriculum period the event should be associated with (or leave it blank). This is especially important if you have events on dates that fall in two different curriculum periods within the same curriculum layout. You need to use the curriculum period id from the database to provide this information. You can find the cperiod_id from the URL when you click on the Block Schedule of a curriculum period in Manage Curriculum > Curriculum Layout. If you have issues finding this number contact Elentra Support. Alternately, you can assign curriculum periods to events in the user interface after you have uploaded a csv. See the Assign a Curriculum Period to Draft Events section later in this article.
- Finish Date: Use this to create long events appropriate for assigning tasks to learners to complete over several days.
- Finish Time: Use this to create long events appropriate for assigning tasks to learners to complete over several days.
- Total Duration: This is the total duration for the event (including different event types). Enter in the number of minutes. If you are using long events, this represents the time a task is expected to take students.
- Course Unit Number: This is only applicable if you have units built for the relevant course. You need to use the course unit ID from the database to provide this information. Contact Elentra Support for assistance.
- Location: Use this column only if you don't have sites loaded for your organization. Manually type what you'd like users to see.
- Location Room: This can be used to indicate a building and room for an event. Enter the building code and room number (e.g., CH-100). You can find building codes in the Locations section of System Settings. If you are not a medtech or staff:admin user you may need to ask for the building codes to be provided to you as you won't be able to access System Settings. (Be aware that what displays on the learning event is actually the building and room name if a name was provided.)
- Audience - If you'd like the audience for an event to default to the learners enrolled in the course you should not fill in any information in any Audience column.
- Audience (Groups): If the course to which the event belongs is using the course groups function and one or more groups is the audience for this event, provide the group name(s) here. Group names can be found via Admin > Manage Courses > select course > Groups.
Caution: If a course group has a tutor assigned (in any role), the tutor will be assigned as a faculty member (in the Tutor role) on learning events created via CSV import & published. Assignment occurs upon publishing & cannot be turned off at this time. If you do not want course group tutors to be added to events assigned to said course groups, create your schedule of events for these groups before assigning the tutor to the course group.
- Audience (Cohorts): If a specific cohort is the audience for this event, enter the cohort here.
- Audience (Students): If individual students need to be added to the audience, provide the institutional ID in this column, separated by a semicolon.
- Audience (Faculty): If specific faculty are to be included in the audience, enter their institutional ID. Separate multiple numbers with a semicolon.
- Event Description: Enter the event description.
- Attendance Required: If attendance is required for this event and will be taken via the Elentra attendance feature enter a 1. If the Elentra attendance feature will not be used for this event, enter 0.
- Course Name: Enter the course name. (You can omit this since you've already provided the course code, however some people find it useful to include for their own reference.)
- Term: This refers to the curriculum layout the course is a part of. Examples include terms, years, phases, etc.
- Objective Release Dates: If there are specific release dates for the objectives linked to this event, enter 1. If not, enter 0.
- Teacher Number/Email: Enter the institutional ID or email address of any teachers to be linked to this event. Separate multiple numbers or emails with a semicolon.
- Tutor Numbers: Enter the institutional id of any users to be linked to this event as tutors. Separate multiple numbers with a semicolon.
- Teacher Assistant Numbers: Enter the institutional id of any users to be linked to this event as teacher's assistants. Separate multiple numbers with a semicolon.
- Auditor Numbers: Enter the institutional id of any users to be linked to this event as auditors. Separate multiple numbers with a semicolon.
- Free Text Objectives: This can be text and will populate the free text objectives box on the event content page (if such a box is enabled).
- Teacher Name: This is not a required field and will not be checked by the system; however, some people find it useful to include in their CSV to more easily view who is teaching what.
- Learning Event Color: If you supply a color code here it will override any course color set. (Note, you will not see this column in the event export.)
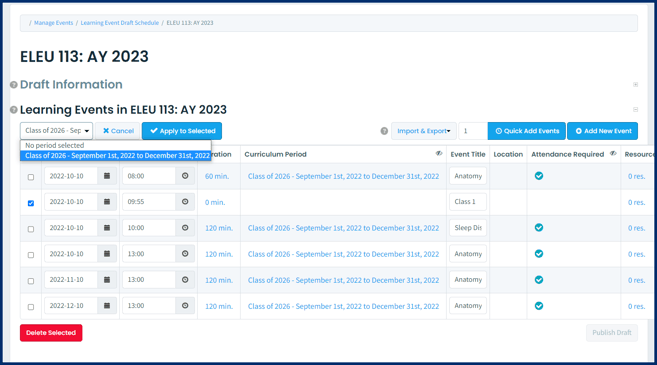
Assign a Curriculum Period to Draft Events
Editing & Deleting Events in a Draft Schedule
- You can edit the start date and time, and event title from the list of events in your draft. To edit the whole event either click on the event to open it and edit it individually or click on the Import & Export button and click on Export CSV File to export the list of events in a CSV to make changes in the CSV and then reimport the list to update the events in the draft.
Warning: If you want to update events in the list you need to ensure that you first export the events and then reimport them. If you try to use an original CSV file that was used to create the events initially the system will create duplicate events.
- To delete an event,
- Step 1: Select the checkbox beside an event name (there is a Select All box at the top of the column).
- Step 2: Scroll down and click Delete Selected.
- Step 3: Review the events you've selected and scroll down to click Confirm Removal. You will get a green success message and be redirected back to the draft event list
In the Draft Schedule the columns can be hidden by clicking on the header of the column. They can be restored by clicking Some columns are hidden - click here to restore.
Publish a Draft Schedule of Events
Note: In order for the draft to be able to be published, all the events need to have a green check in the right side Valid column. If there is a red X next to any events, the required information will need to first be input into that event in order to publish the draft.
Once all of the required information is, click Publish Draft to publish your events.
