Event Pages: Content

Configure content delivery for learning events


Article Content 

This article covers the following topics. Click on the topic to go to that section of the article.


Content Tab Overview
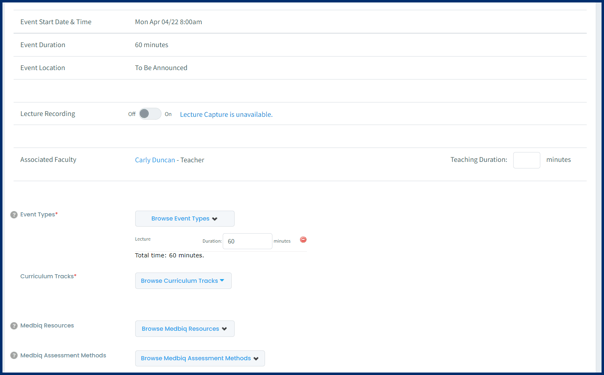
The content tab of an event page is where you can provide learners with details about the contents of the event. It can be accessed either by clicking on an event in Manage Events, or by clicking the Content tab right after creating an event. The first several fields on the page (date, time, duration, and location) are controlled on the event setup page and only displayed on the event content page.
contentpage
Associated Faculty: In this section any associated faculty will display. If enabled, you can allow faculty to record or adjust their teaching minutes here. Faculty will only be able to adjust their own teaching minutes, with the exception of a course director who can adjust minutes for others.
Event Types: You can edit the event types of the content page (this allows faculty to adjust the event types in their events if you allow them to). Note that you cannot adjust the event duration on this page; if you change the event types their total time must equal the original duration. By default, Elentra faculty can adjust the learning event types in their own teaching events. This can be disabled if you only want administrative staff to have that ability.
Medbiq Resources: If you are using the Curriculum Inventory Reporting Tool or your organization is tracking Medbiquitous information you can select a MedBiquitous resource from the dropdown menu. (The list of MedBiquitous Instructional Methods can be configured in Admin>System Settings.) This information will not be visible to learners on the event page but will be reported in the Curriculum Inventory Reporting Tool.
  • If you have mapped your learning event types to MedBiq resources the mapped resources will display automatically. They can be removed from the event by clicking the small x.
Medbiq Assessment Methods: If you are using the Curriculum Inventory Reporting Tool or your organization is tracking MedBiquitous information you can select a MedBiquitous assessment method from the dropdown menu. (The list of Medbiquitous Instructional Methods can be configured in Admin>System Settings.) This information will not be visible to learners on the event page but will be reported in the Curriculum Inventory Reporting Tool.
  • If you have mapped your learning event types to MedBiq assessment methods the mapped resources will display automatically. They can be removed from the event by clicking the small x.
Event Description: Provide details about the event here. This information will be visible to learners on the event page and will also appear in Curriculum Search results and some reports (Curriculum Review Report, Course Summary Report).

 Note: This a rich text editor and you can embed media, change the font, etc.

Required Preparation: Provide details about what learners should do to prepare for this event. This information will be visible to learners on the event page and when they preview events from the dashboard calendar.
Event Keywords: This is an optional feature that can be turned on or off in your installation. Once on, it can be used to map Medical Subject Headings (MeSH) keywords to a learning event. Keywords will be displayed to the learner on the event page. If you have an organization specific list of keywords it is suggested that you build it as a curriculum tag set. The keywords feature is specific to MeSH terms. Keywords are not reflected in Curriculum Search results.

Event Objectives

Indicate which curriculum tags are addressed in this event using the curriculum tag selector. 
The list of curriculum tags will automatically be filtered to the course and curriculum period the event belongs to. Optionally remove the course filter to see all tags, or switch courses to view a different subset of tags. 
If you want to delay the release of the event objectives, check the hyperlinked text release all objectives now. This will open a menu from which you can select to delay the release of all objectives or never release the objectives. If you select delay, you will be prompted to enter a release date and time. This may be useful in the case of TBL or similar case-based learning.
eventtagging
Click the three dots to open and close the filter selector. Curriculum tags assigned to the course will display on the list individually if they were assigned to the course individually, or under their tag set name if they were added as a set. Click the Back button at the top left of the mapping drawer to go back a level. 
Click the green add icon to assign a tag to the event. Assigned tags will display on the right side under the Associated Curriculum Tags list.
Once a tag is assigned to an event you can optionally provide sessional free-text objective details for that tag. Information entered here will display to learners.
To remove a tag from an event, click the red x on the tag card. To remove all tags assigned to an event, click the red x at the very bottom of the list.

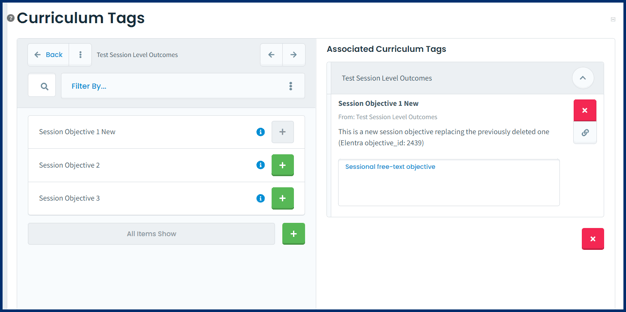
Contextually Link Assigned Event Tags

If you choose to, you can contextually link an assigned curriculum tag it to another curriculum tag. We call this context-based linking. You are essentially saying that in the context of this event, this tag maps to this tag. For example, for a specific event, "Take a history" may map to "pediatric patient" or "geriatric patient." Other examples of curriculum tags people contextually link to are integrated threads, disciplines, Bloom's taxonomy, CanMEDS roles (if not included in their objectives already), etc. Context-based linkages are not used by all organizations and are not required.
  • Context-based linkages DO NOT depend on the allowable mapping configurations set in Manage Curriculum for each tag set. You will be able to access any curriculum tag set when contextually linking.
  • Context-based linkages are not stored in Admin > Manage Curriculum and will not display there.

Add a Contextual Link

From within your event content tab, click the link icon on an assigned curriculum tag. The curriculum tag selector will open a drawer on the left specific to this contextually linked tag.
  • Search for the tag to select and click the green add button. The contextually linked tag will display under the assigned curriculum tag.
  • To remove a contextually linked tag, click the x beside the tag name.
  • To remove all contextually linked tags click the eraser icon and confirm your choice.
  • Close the contextual link mapping drawer to return to assigning tags to the event.

Free Text Objectives
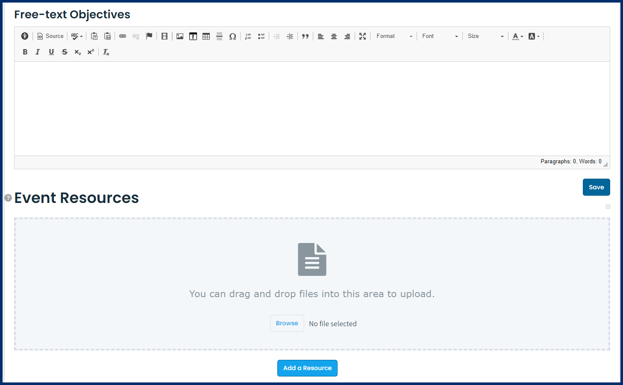
This is an optional field that can be turned on or off in your installation using a database setting (events_freetext_objectives_enabled). If on, it allows faculty to type in objectives relevant to the event. These objectives will be displayed on the learner view of the event page and can also be viewed across an entire course using the Curriculum Review Report.
freetextnresources
Return to Article Content Section Image Beveled v1

Event Resources

To add resources to an event you have two options: a Quick Add drag and drop tool and the regular Add a Resource tool. The Quick Add tool is useful for files, whereas the the regular tool allows you to add different types of resources.
Quick Add Option: 
Use the Quick Add tool by dragging and dropping resources into the greyed out upload area or clicking Browse and selecting the files to upload.
Before the files are added, you can decide how users will view the resource, provide a title for the file(s), and decide whether to add timed release dates (click yes to enable and then provide the appropriate dates).
Note: If you post multiple files through the quick add tool they will all have the same settings applied to them.
If you use the Quick Add tool to add files to an event that is part of a recurring event series, the resource will only be added to the event that you are editing; it will not be added to all events in the series. To add a resource to multiple events in a series, use the Add a Resource tool instead.

Add a Resource Wizard

Using the Add a Resource button will allow you to upload different resource types. When a resource type is defined, it will appear as a label on the resource in the learner view of the event. Each resource behaves a bit differently when added, but generally you can set the following parameters through the Add a Resource wizard:addaresource1
There are some additional resource types supported by the database and not enabled by default. They include:
  • Bring to Class 
  • Homework
  • Textbook Reading
If you'd like to make these resource types available in your organization, contact Elentra Support. 
Each resource behaves a bit differently when added, but generally you can set the following parameters through the Add a Resource wizard:
addaresource2
  • Whether the resource is optional or required
  • When the resource should be accessed (before, during, or after class, or no timeframe)
  • How much time (in minutes) the learner should spend on the resource
  • Whether to add timed release dates to the resource. Elentra looks at whether a resource is to be accessed before, during, or after class and if you opt to time release resources, the system will require a time that matches the before, during, or after parameters.

addaresource3

  • Whether to hide the resource from learners (this will make it accessible to faculty but not learners)
  • Whether to set the resource as published or draft (a draft resource will not be accessible to the event audience)
  • How to view the resource
  • The title and description of the resource
  • If you are adding a resource to a recurring event, you'll be able to indicate which events to apply the resource to. 
Posting an event resource includes a copyright statement users accept by default if they proceed to post the resource.
After posting a resource to an event, you'll see it displayed on the event page. Small badges identify characteristics of the resource.
resourcesbytimeframe
  • View a preview of the resource by clicking on the download arrow.
  • Edit an existing resource by clicking on the resource title to reopen it.
  • Delete a resource by clicking on the trashcan icon.
When resources are posted to a learning event, a tally of resources will be displayed in the learner calendar when learners mouse over an event. This gives learners a quick view of what is included in an event.

Reordering & Grouping Resources

Once resources are added to an event, you can optionally group them into sections. This can help organize resources to improve the learner experience.
Grouping Resources:
  • Click on the file folder icon to the right of a resource to create a section or move the resource to a section.
    • Create New Section: Provide a section title and click Confirm.
    • The newly created section will display below any other existing resources and will contain the resource from which the create action was initiated.
    • Note that a section you create in one time frame (i.e., Before Class) will be automatically available in other time frames.
    • Move to Section: Use the dropdown selector to choose a section to move the resource to and click Confirm.
    • You will see a green success message and the resource should now display in the relevant section.
  • To remove a resource from a section, click the folder icon and click Remove from Selection.
  • To edit a section name, click on the folder icon to the left of the existing section name.
  • Note that sections cannot currently be reordered and will display in the order created.
  • There is no option to delete a section, however, if you remove all resources from a section, the section will be hidden.

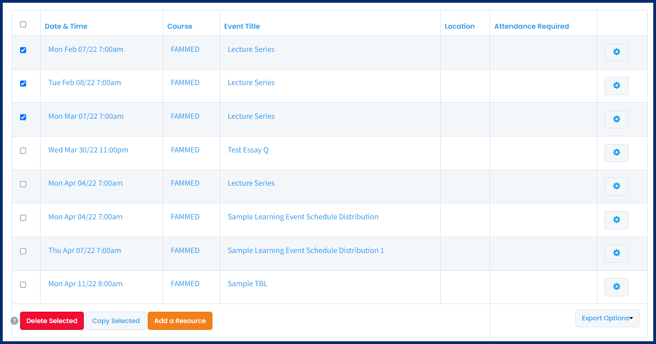
Reordering Resources:

After event resources are added, they can easily be reordered by clicking on the resource and dragging it to a new position. Please note that you can only reorder resources within their designated timeframe (e.g., Before Class, During Class) and within any application section. Reordering resources on a recurring event series will NOT reorder resources on the other, linked events.

 Return to Article Content Section Image Beveled v1


Bulk Event Feedback Management

Bulk Event Feedback Management

If you'd like to add a Feedback Form to multiple events at once, you can do so from the Events tab. Optionally, generate an access code for the feedback from.  These are optional features which require Elentra Support to enable them.  Contact us to get started. From List View, check off the applicable events, then scroll to the bottom of the page and click Add a Resource.
bulkaddfeedbackform 
The only currently supported resource is Feedback Form. Click Next Step. Work through the Events Resource Wizard.
  • Reminder that on third step of the wizard you'll see an option to make the resource available relative to the event start/end time. Enter the days and hours before or after the event start or finish.
  • The setting you add will apply to all events.
  • Select the appropriate form.
  • If you have the access code option enabled, you'll also see an option to require an access code.
  • Click Save Resource. Close the wizard.
To see the newly added Feedback Form, go to an event with the resource posted.
In Admin. or Teacher view, the event resource will have the Access Code displayed on the resource card (if applicable). Teachers should provide this code to learners to access and complete the evaluation.
Learners can access the evaluation from their Assessment & Evaluation task list. The forms will only be accessible for the defined time frame, after which they will disappear. Learners can additionally see the Feedback Form on individual learning events. Use the Learning Event Feedback Forms Report to view the data collected.
 Return to Article Content Section Image Beveled v1