Article Content
This article covers the following topics. Click on the topic to go to that section of the article.
- Learning Objects Overview
- Add a Learning Object to Elentra
- Use Learning Objects in Elentra
- Review Learning Object Usage Data
Learning Objects Overview
TinCan, SCORM, and URL files can be uploaded to Elentra into the Learning Object Repository. Once created, these learning objects can be added to an event for learner use. Learning objects can also optionally be connected to a gradebook assessment, allowing for automated grading of quizzes built into your file.
Note: The maximum file size for learning object files is 500mb.
To use learning objects in Elentra, connected to an event and gradebook assessment, the setup steps are as follows:
Step 1: Create your learning object file in your preferred application.
Warning: For best results, we recommend using the TinCan (xapi) file type, which is most compatible with the Elentra's supporting Gradebook and Event Resource Analytics features. SCORM and URL file types are also supported in the Learning Object Repository module, but do not have the same functionality as TinCan files. By using xapi, the files are highly configurable to allow for customizable tracking of module completion features such as quizzes and other content; the data of which will be automatically transmitted into Elentra for tracking and viewing purposes.
SCORM files and URLs can be uploaded as learning objects and opened with their content loading and acting as expected, from a student user's perspective. However, there are limited usage metrics that can be obtained from these file types. As such, in the Event Resource Analytics for the connected learning objects, these files:
- Can only track the learner's # of attempts and, completion percentage
- Do not track quiz scores or time tracking
- Do not track quiz question responses by learners
- The gradebook connection is not supported by these file types
For the best experience using learning objects connected to a learning event and gradebook assessment, we recommend using the TinCan (xapi) file type.
Step 2: Add the learning object in the Learning Object Repository in Elentra (see guide below).
Step 3: Create the gradebook assessment within the course & curriculum period required.
Step 4: Create the event where the learning object will be used as a resource.
Step 5: Add the learning object to the event as a resource (see guide below). The resource configuration wizard will allow you to connect the resource to the gradebook assessment created in step 3.
Add a Learning Object to Elentra
Step 1: Navigate to Admin>Manage Learning Objects.
- Existing learning objects will display on the screen.
- To view an existing learning object, click on the arrow in the last column.
- To edit the information about an existing learning object, click on its title.
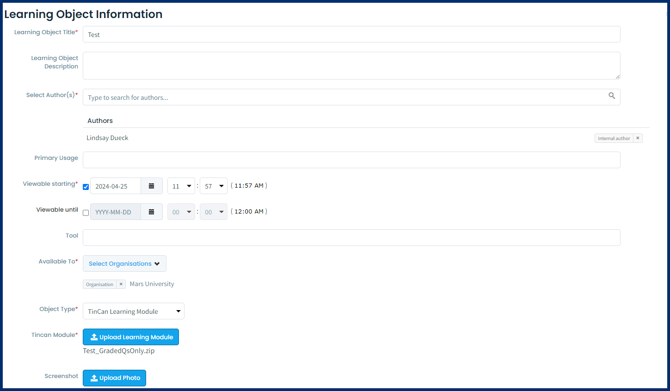
- Title: This will display on the list of learning objects and will also display to users when they view learning objects.
- Description: This will display to users when they view learning objects.
- Authors: This tool allows you to credit the creators of an object. You must list at least one author. You have the option to add an external author by providing their name and email. Authors will display on the the admin view list of learning objects and will also display to users when they view learning objects.
- Primary Usage: This will display to users when they view learning objects.
- Viewable Start and Until: This is designed to control when user access to a learning object begins and ends.
- Tool: This can be used to store information. It does not display to users viewing learning objects.
- Object Type: Set the type of object you will upload. Supported formats are Link/URL, TinCan Learning Module and Scorm 1.2/2004 Learning Module. Note that users with access to learning objects will be able to filter by object type when searching for learning objects.
- For a link or URL, paste the URL in the appropriate place.
- For TinCan or SCORM items, click 'Upload Learning Module.' Although the screen says you can drag and drop content, do not do so. Please browse your computer to select a zip file.
- Screenshot: This section allows you to upload a screenshot to serve as an image for the learning object. This will be visible to users from their Learning Objects page. You must provide a screenshot to serve as the image, the system doesn't automatically select an image from the learning module for you.
- Click 'Upload Photo'.
- Drag and drop an image or browse your computer to select a file. Click 'Done'. The image should display in the Upload Image section.
Use Learning Objects in Elentra
Gradebook
Learning Object completion & grades can be captured within Elentra. To begin, create a gradebook assessment to capture the grade for this activity. See the Gradebook Knowledge Base article for more details on creating gradebook assessments.- Marking Scheme dropdown:
- Select ‘Complete/Incomplete’ if you want the Gradebook to track the completion progress of the learning object, rather than the quiz grades from the object.
- Select ‘Percentage’ if you want to track the learning object’s quiz score in the gradebook rather than its completion progress.
Note: Do not change the gradebook assessment's marking scheme after the learners start using the Learning Object, as this will cause an inconsistency in learner scoring.
Caution: The detail captured by the learning event progress record & gradebook depends on the way your TinCan, SCORM, or URL file is configured. We recommend testing your files in your staging environment, connected to a gradebook assessment, to ensure the files have been configured appropriately. For the best experience using learning objects connected to a learning event and gradebook assessment, we recommend using the TinCan (xapi) file type.
Learning Events
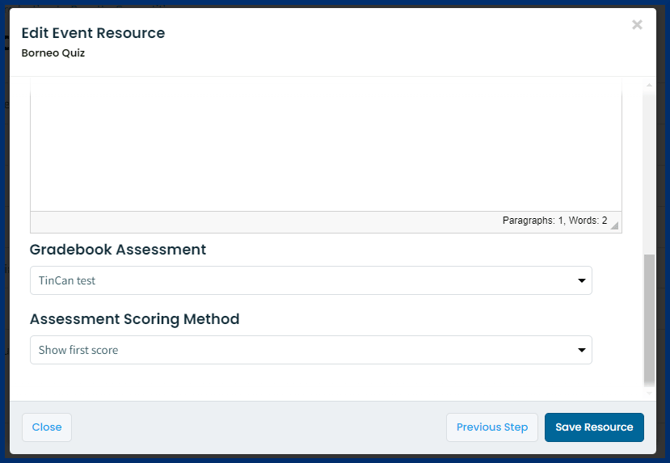
- For Learning Objects, select "Online Learning Module" in the resource wizard.

- To attach the learning object to a gradebook assessment, on step 3 of the event resource wizard, set the gradebook assessment & scoring method accordingly.
Caution: Copying an event with a learning object connected to a gradebook will result in duplicated resources attached to the same gradebook assessment and cause errors. When rolling over learning events, be sure to reconfigure your learning objects to direct to the appropriate gradebook assessment.
Caution: Be sure to set the Assessment Scoring Method correctly. If you edit the resource to change the scoring method after learners have completed the resource, the scoring methodology will not be automatically updated, until the learner completes another attempt at the resource.
Review Learning Object Usage Data

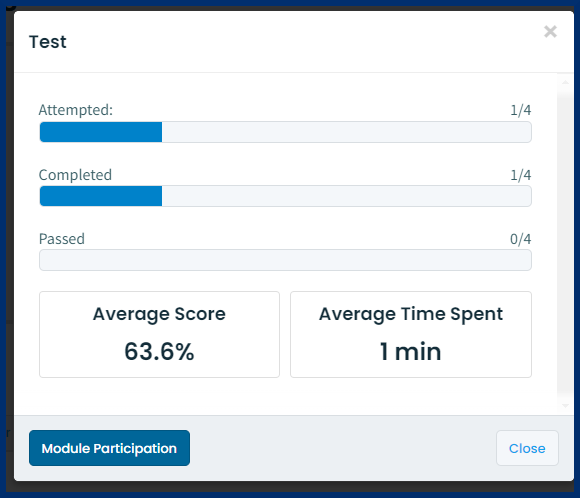
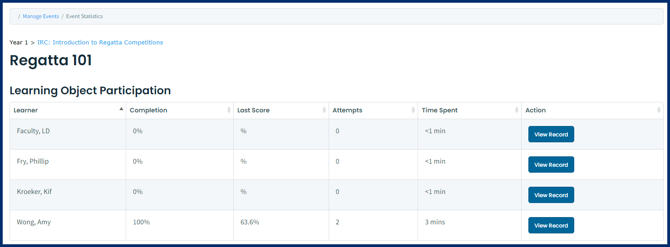
Warning: The level of detail available in the "View Record" area of the progress record will depend on how your files were configured. For the best experience using learning objects connected to a learning event and gradebook assessment, we recommend using the TinCan (xapi) file type.
If you have connected the learning object resource to a gradebook assessment, learner activity will also be captured in the assessment as configured.