Article Content
This article covers the following topics. Click on the topic to go to that section of the article.
- Create an Exam Post
- Edit an Exam Post
- Delete an Exam Post
- View an Exam Post Information
- Add Graders to an Exam Post
- Monitor & Manage Exam Activity
Create an Exam Post
Please note that you can also post an exam directly from a learning event. To do so, go to the event Content tab, scroll down to Event Resources and click Add a Resource. Select Exams as your resource type and you will be redirected to the exam post wizard described below.
Step 9: Click on the appropriate event.
Step 10: Select an event using the drop down menu.
- Enter a Start and End date for the exam to be available as needed. (Click the small gray checkbox before you enter a date and time.)
-
Submission Deadline: This is an optional feature. If you set this, exams must be submitted by this time.
-
Time Frame: This determines where the exam will display in the resources section of a learning event page. Select from none, pre, during and post.
-
Time Limit: This allows you to limit the length of time a learner has to complete the exam (e.g. 60 minutes). Enabling this feature will also make a Time Left counter appear to learners during an exam.
-
Auto Submit: If using a time limit, you can also use the auto-submit feature so the exam is automatically submitted when the time expires, assuming the learner is still active in the exam. The auto-submit tools works only when a learner is still active on the exam screen to effectively cut them off when the time limit is reached. If a user logs out without submitting their exam, auto-submit will not submit it for them.
-
Hide Exam From Learners: If you hide the exam learners won’t see the exam in their My Exams task counter.
-
This option is frequently used on exams being delivered in TBL events.
-
Hide Exit Button: When checked, the Exit Exam button will be hidden.
-
Required: Click the box to make this exam required.
-
Attempts: Adjust this if you’d like students to be able to complete the exam more than once.
-
Free Navigation: Enable this if you want learners to be able to view questions already completed.
-
Exam Security Mode: Apply as needed. If you apply this, the wizard will require you to complete Security settings after completing the other steps. ( Respondus and alike programs will be activated by enabling this setting)By Enabling this field it with activate Use Honor Code and will display the option for you to enter your schools Honor code - allowing the user to agree to it.
-
Mark for Faculty Review: Enable this to allow students to make notes during the exam and mark them as viewable by faculty. Note that once an exam is submitted students can’t add comments. There is a report to use after an exam is completed to review the scratchpad notes that were flagged for faculty review.
-
Calculator: Enable this to allow students access to an inline calculator during the exam.
-
Self Timer: Enable this to allow the learner to set a timer for him/herself during the exam.
- Excluded: Clicking this checkbox will exclude the learner from the exam audience.
-
Exam Start and End Date: Click this and provide modified dates to change when a learner can access the exam.
-
Submission Deadline: Click this and provide a new deadline to change the deadline for a learner.
-
Extra Time: Click this and enter a percentage increase in time for the learner to complete the exam.
-
Max Attempts: Click this and enter a modified number of exam attempts for the learner.
-
Your changes will be displayed in the table.
-
To delete an exception, return to the edit window for a specific learner on the list and click 'Clear'. Confirm your choice.
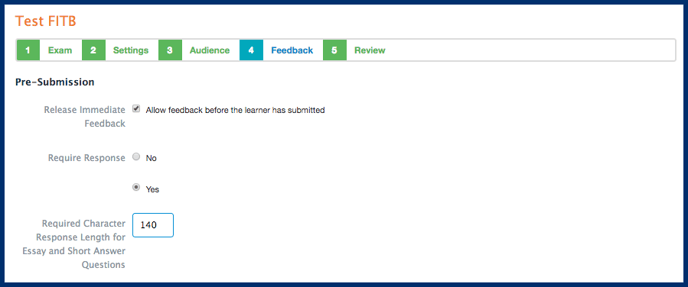
Feedback
-
If you check off the Release Immediate Feedback checkbox you can configure a couple of other options.
-
Require response: This dictates whether a user has to provide a response before being shown the question feedback.
-
Require character response length: This allows you to set a minimum character count that users must hit before the system will release question feedback to them (please note there is no AI to check the user responses).
-
Release Score: Click this to return scores to learners after they submit an exam. Enable ‘Release Feedback’ if you want learners to access the information stored in the rationale section of the exam items when they get their scores; you can further modify whether to release rationale for all question or just incorrect questions. If you have included short answer or essay questions in an exam and you expect faculty to provide narrative feedback which you wish students to view, you must set the exam to release feedback for ALL questions for learners to be able to see the narrative comments from the grader.
-
Set the release start and end dates to delay feedback if required. This might be useful if two sections of a class are completing the exam at different times and you don't want any learners to see their results until all learners have completed the exam.
-
Re-Attempt Threshold: Set a minimum score to merit completeness, then set an allowable number of attempts to attain the minimum score. For example you can specific that a learner must achieve 80% on this exam and has two attempts to do so. If the learner scores 50% on their first attempt the system will automatically let them take the exam once more.
- Attach GradeBook: Select an existing gradebook entry to attach the exam to (the list will prepopulate based on the course and event selected in earlier steps and the contents of the gradebook for the relevant curriculum period). The results of this action are that once graded, the grades from this exam will automatically populate the gradebook entry.
-
Basic Password: Set (or generate) a password that you’ll distribute to learners in order for them to access the exam.
-
Other security options: Follow the online instructions (and see more detail in each relevant help section)
-
Click 'Save Security Options'.
-
You will be redirected to the list of exam posts.
-
Safe Exam Browser
-
RPNow
-
Examity
-
Respondus Lockdown Browser
Please note that use of the Respondus Lockdown Browser license much be purchased through the Elentra Sales team.
Edit an Exam Post
Step 1: On the Posts tab, click the cog in the Actions column for a specific exam post.
Delete an Exam Post
View an Exam Post Information
Add Graders to an Exam Post
- To be added as a grader to an exam, users must also be course contacts for the course the exam is posted to.
- You can add faculty as course contacts in the "Associated Faculty" section of a course Setup tab. You can add staff in either the Curriculum Coordinator (staff:admin users) or Program Coordinator (staff:pcoor users) roles.
- If you wish to set up students as exam graders, they must be designated as Student Admins in their user profile and be added as a teaching assistant in a course (via the course Setup tab).
- To set up exam grading you must have groups within a course.
-
- Make sure you have groups configured before you try to add graders as the only way to successfully save grader names is for them to be attached to a group.
-
- Or, if already viewing an exam, go to the Posts tab.
-
- Click the checkbox beside one or more group names.
-
- Click Assign Selected to Grader.
-
- Select the appropriate grader.
-
- Click 'Assign Groups'.
-
- The grader and their assigned groups should display on the left.
- To delete a group from a grader click the red minus icon. The group will move back to the right side under the groups list.
If an exam is attached to a gradebook assessment so that the course gradebook automatically populates with the exam score, you will see the option to add graders to the gradebook assessment entry. Adding graders to a gradebook assessment alone will not allow faculty to access the exam to grade. To allow someone to grade an exam they must be added as a grader to the specific exam post.