Article Content
This article covers the following topics. Click on the topic to go to that section of the article.
- Introduction
- Event Permissions
- Your Elentra Calendar
- Learning Events Page
- Managing Content on Events
- Taking Attendance in Events
Introduction
Elentra refers to any scheduled activity within an organization's calendar as an "event." The platform encompasses various types of events, each serving a specific purpose within the educational framework. The following types of events may be displayed on the dashboard calendar for faculty members in Elentra.
- Learning Event: A comprehensive tool for faculty to organize, execute, and evaluate teaching activities within the framework of their courses. The learning event automatically appears on your dashboard calendar if you have been listed as a teacher on the event. You can optionally enable other course calendars to view them on the dashboard calendar. You may be required to add content to events, take attendance, or turn on Lecture Capture. Your role within events will be defined by your institution. Each learning event allows for:
- Scheduling and logistics of timing and location
- Attendance tracking
- Learner & Faculty resource repositories
- Curriculum objective tagging
- Categorization of the learning events (e.g., lecture, workshop, directed independent learning, exam, etc.)
- Faculty to be listed as a Teacher, Tutor, TA, or Auditor on the event
- Teachers & Tutors can also have their teaching minutes defined here, which facilitates teaching hours reporting.
- Community Event: A collaborative activity associated with a specific community or group rather than a course. For faculty, it provides a platform to facilitate shared learning, discussions, or events within a defined group of participants, such as research teams, interest groups, or interdisciplinary committees. Community Events can include meetings, workshops, or presentations, and they support resource sharing, communication, and engagement within the community framework. If used by your institution, you will see these events on your dashboard calendar if you are a member or administrator of the community.
![]()
Event Permissions
As a faculty user in Elentra, your permission settings on any given learning event will depend on what type of faculty user you are, course permission settings, and event teaching assignment settings. Faculty users typically fall into one of three categories regarding their access to any given event:
- Learner view: This is a read-only view of events.
- Content access: This allows the user to view and edit the Content, Attendance, History, and Statistics tabs of the event through their "teacher" or "director" view. The user has the ability to modify the event type and associated number of minutes of the learning event, as well as add or remove content and resources through the Content tab. Additionally, they can manage attendance records using the Attendance tab.
- CRUD access: CRUD is an acronym that represents the four essential functions of data management: Create, Read, Update, and Delete. Users with CRUD access are granted comprehensive permissions, enabling them to perform all actions related to managing event records. See the Admin User Guide on the Manage Events module for more details.
The following table outlines the permission levels assigned to various faculty roles based on different event configurations:
| Role | Course Settings | Event Settings | Event Permission Level |
| Faculty: Faculty | No Access | No Access | Learner View |
| Faculty: Lecturer | No Access | Assigned to an event in any role | Content access |
| No Access | Not assigned to event | Learner View | |
| Faculty Admin | Applied as Curriculum Coordinator | No Access | CRUD access |
| Not applied as Curriculum Coordinator | Assigned to event in any role | Content access | |
| Not applied as Curriculum Coordinator | Not assigned to event | Learner View | |
| Faculty: Director | Applied as Course/Program Director | No Access | CRUD access |
| Not applied as Course/Program Director | Assigned to event in any role | Content access | |
| Not applied as Course/Program Director | Not assigned to event | Learner View |
Your Elentra Dashboard Calendar
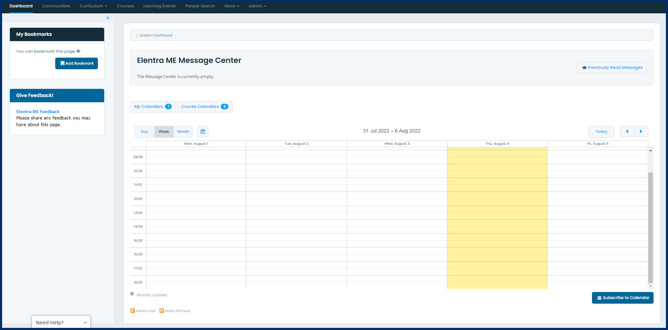
Your Dashboard Calendar, found below the ME Message Center on the Dashboard page, will showcase the learning events to which you are assigned. It can optionally display any events for non-course communities that you are a member of by clicking on the My Calendars button and selecting the communities for which you want their events to display on the calendar. Then click the Apply button.
On the Dashboard Calendar you can do the following.
- View your schedule by day, week, or month.
- Use the right and left arrow buttons to scroll through time, and click on the Today button to return to today’s date.
- Click on an event to view a pop-up modal will appear. This modal will display an event summary.
- The modal for your learning events will include a link labeled "Review Learning Event." Clicking this link will direct you to the learner view of the event, where you can explore additional details about the learning event and access any associated resources.
- For your events connected to a community the pop-up modal will only contain a summary of the event and will have a link to the community.
- If you would like to connect your dashboard calendar to a third party calendar then click on the Subscribe to Calendar button beneath the calendar to subscribe to all calendars or subscribe or download individual course calendars.
Warning: Elentra cannot guarantee the frequency of Elentra calendar data refreshing in third-party calendar applications. We advise using the Elentra desktop or mobile application calendar for real-time updates. If choosing to use a third-party tool, we recommend using a tool that allows users to initiate data syncing from imported calendars.
To export a course calendar, navigate to your main Dashboard tab. Click on the Subscribe to Calendar button, below the calendar.
A selector window will appear:
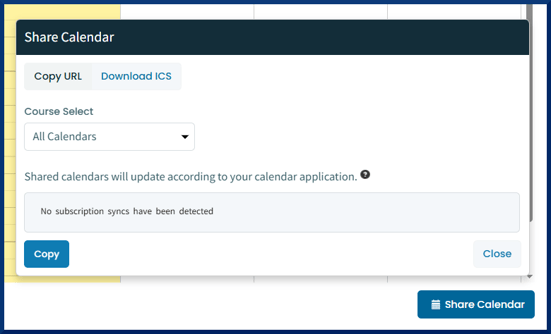
Select All Calendars to export the courses to which you are assigned, across all courses, or select a specific course to subscribe to. To subscribe to a calendar URL which updates as events are updated, use the Copy URL function. See the warning above regarding the frequency of data refreshing in your selected calendar application. Elentra cannot guarantee the frequency of Elentra calendar data refreshing in third-party calendar applications.
To download a static calendar file of events, use the Download ICS function to download the file. Use the iCal file or URL to connect Elentra events to your preferred calendar application.
Tip: Consider using the Elentra Mobile App to access your Elentra calendar.
For more details, see the user guides here.
Learning Events Page
All users can access the Learning Events tab via the Navigation menu, which takes you to the learner view of the Learning Events module. Depending on your specific faculty permissions in Elentra, you may have the ability to toggle between the learner view and the Teacher/Director/Administrator view using the sidebar on the left side of the page. If you hold a Teacher, Director, or Administrator role, you can also access this view directly by selecting the Admin option from the Navigation menu and then clicking on Manage Events.

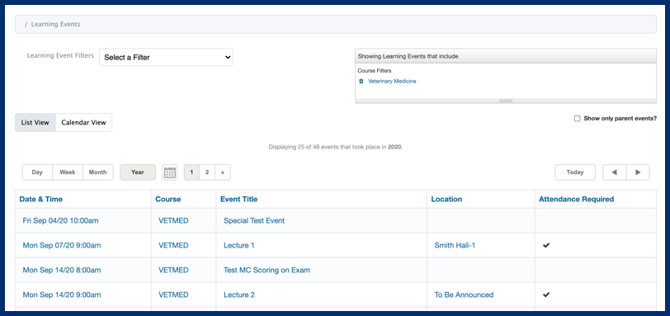
By default, faculty users will automatically see a filtered view of their events they are assigned to (using the Teacher Filter option). If any filters have been applied they will show next to the Learning Event Filters drop down list. To remove applied filters click the trash can icon beside a filter name or use the "Remove All Filters" option in the left sidebar. Users can optionally apply a variety of filters to their view to expand or narrow their search.

Users have the flexibility to switch between a list view and a calendar view for events, allowing them to customize how they display their schedule. They can further refine their view by selecting day, week, or month formats, and utilize the date picker to quickly navigate to a specific date.
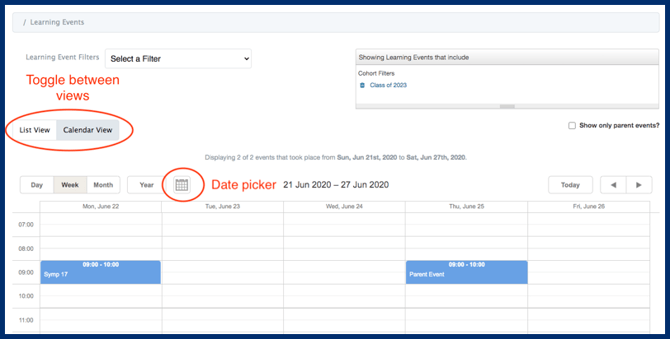
In the Calendar View, Event Icons as seen below signal additional information about events.

In the List View, users can additionally see the location of events and whether attendance is required.
Certain events may be put into what is known as a parent-child relationship in Elentra. This is typically done when multiple events offer the exact same content but each individual event has a mutually exclusive set of learners as the audience. Applying the parent-child relationship to events is important for tracking the experience of one learner's journey through the curriculum and reporting purposes. To view only the parent events and hide the children events select the Show only parent events option located adjacent to the Learning Event Filters drop down list.
Note: Parent-child events may also be in a recurring series in Elentra, but it is not mandatory to have events in a recurring series for them to have be in a parent-child relationship. Recurring series allows for bulk updating of certain fields in the series when in the Teacher/Director/Administrator view.
Managing Content on Events
- Enabling Lecture Capture, if available
- Editing the event type(s) and time distribution
- Adding/Editing the Event Description, Session Links, and Required Preparation content
- Adding/Editing associated Curriculum Tags and Free Text Objectives
- Adding resources to the event
For a step-by-step guide on how to edit the event description, session links, and required preparation content, please refer to the following tutorial.
![]()
Taking Attendance in Events
You may be required to take or facilitate attendance tracking at events to which you are assigned. This can be done from the Attendance tab of the event in the Teacher/Director/Administrator view. Depending on how the course is configured you may see a checkbox to mark the attendance or a drop down list with more granular options for marking attendance. Your organization may have also configured the Absence Management module in Elentra, which connects to learning events. Any student whose absence is approved will have a comment in the Absence Approval column in the Attendance tab indicating as such. They should still be marked absent by unselecting the checkbox or choosing the appropriate option from the drop down list. This will be recorded on their dashboard as an Approved absence.
Manual Taking Attendance

- Optionally mark all as attended or absent using the buttons at the top right
- Search for a learner by typing in their ID number.
Step 2: Add attendance notes as needed.