Article Content
This article covers the following topics. Click on the topic to go to that section of the article.
Introduction to Manage Cohorts
The Manage Cohort tool allows you to store groups of users in cohorts and course lists that can then be associated with other modules in the system. You can add specific learners to cohorts/course lists and set them as the enrollment or audience for courses, events, distributions, etc.
In some cases cohorts can be automatically populated based on information provided about a user when using a csv import to create users. The graduation year provided in the user CSV import will be used to slot the learner into the appropriate cohort if the cohort uses the naming convention Class of <insert graduating year>. Note that the appropriate cohort must exist before you import users for this feature to work.
User Permissions to Create & Manage Cohorts
Only Medtech:Admin & Staff:Admin can create and manage cohorts.
Manually Create Cohorts in the User Interface
Step 1: Navigate to Admin > Manage Cohort.
Step 2: Click Add New Cohort.
Step 3: Complete the required information, noting the following:
- Cohort Name: Make this clear as it will show up in various contexts throughout Elentra. Examples include Class of 2021, Class of 2022. etc. Cohorts will sometimes be available as filter options in Elentra. A cohort does not have to consist of an entire class in Elentra it can consist of any grouping of users in Elentra.
- Cohort Type: Define the type of cohort you are creating.
- Cohort: This is generally a full list of learners moving through a program together for a duration of time. They may take multiple courses together.
- Course list: A course list is a type of cohort. It is generally a list of learners in one specific course for a set duration of time. If you select Course List, note that you'll be prompted to select a specific course.
- Community Registration: If you create a community and you want set registration options by Group, the available options will include cohorts but not course lists.
- Clinical Experiences: In Admin > Clinical Experiences the top level filter options are Cohort or Course. Course List is not included, however you can filter by course and cperiod which will likely match a course list fairly closely. (The learners listed will be based on the actual enrolment in the course and cperiod.)
- Events Tab: You can filter by cohort or by course, by not by course list.
Creating cohorts via CSV Import
- Cohort Name (Group Name)
- First & last name of the cohort members
- Active status (1 for active & 0 for inactive)
- University ID (student/institutional number stored in the user profile in Manage Users)
Note: This tool cannot be used to create users; any user included in the cohort import must already exist in Elentra.
Editing an existing cohort
- To edit the cohort name, click the pencil icon to the right of the name. Change the text and click Rename.
- You can switch the group type from the dropdown menu under the Group Type section. If you are turning something into a course list you'll be required to add the relevant course. If you switch group type you must save your change using the small Save button to the right of Group Type.
- You can delete or deactivate members of a cohort.
- You can add additional learners in the Additional Learners section. Use the drop down list to find and select users you would like to add to the cohort.
- When you have completed your edits to the cohort, click Proceed.
Deactivating Users in a Cohort
- Deactivating a user in a cohort will mean that the user still appears on the cohort list. You can reactivate a deactivated member of a cohort at any time. Deactivated members of a cohort will:
- be removed from course enrollments (assuming the enrollment was set by cohort/course list)
- be removed from the audience of events in the course (assuming the audience was set by course enrollment)
- remain visible in the course gradebook
- be removed from the course logbook reports
- be removed from the My Learners list accessible to faculty or admins through the Assessment & Evaluation badge (as such those users will not be able to view an individual leaner's Assessments, Learner Explorer, etc.)
- display as "off-service" in Clinical Experiences > Rotation Schedule (assuming the learner was booked into at least one slot for the course)

- If a user has been deactivated the user will be highlighted in red. In the following example Stacey Smith has been deactivated in the cohort.
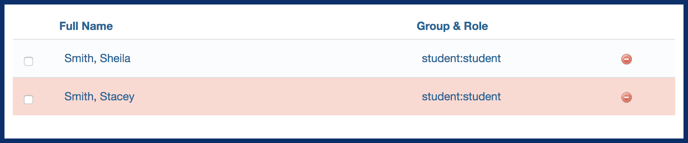
-
Cohorts/Course lists that include deactivated members will be highlighted yellow on the Manage Cohorts list.

- Deleting a user from a cohort will permanently remove them from the cohort and all subsequent enrollments. Deleted members of a cohort will behave like deactivated members of a cohort with the exception that they will be removed from a course gradebook.
Note: If a member of a cohort has been deleted it will not delete their progress in their courses, but it will remove their progress from the User Interface. If the student is added back to the cohort their progress in the course will reappear in the user interface.
- Click the red minus sign to the right of the user's name to deactivate/delete a single user or select multiple users using the checkbox next to the user's name.
- If you selected the red minus sign then you will be brought to a new page where then you can click Deactivate or Delete. If you use the checkbox to select multiple users then click the Deactivate/Delete button at the bottom of the page then you will be brought to a new page where you can choose to deactivate or delete those users.
Warning: Deactivating or deleting a user from a cohort does not remove them from any course group membership. If you wish to remove them from the course group(s) you must do so through Admin > Manage Courses > Course Groups.
Note that if event audiences were set to course groups, you will need to remove the user from their group to remove them from the event audience.
![]()