![elentra_logo_Blue-and-Black-3.png]](https://help.elentra.com/hs-fs/hubfs/elentra_logo_Blue-and-Black-3.png?height=40&name=elentra_logo_Blue-and-Black-3.png)
Article Content
This article covers the following topics. Click on the topic to go to that section of the article
- Learner-Driven Scheduling Overview
- Learner-Driven Scheduling Setup
- Managing Rotation Schedule Booking Requests
Learner-Driven Scheduling Overview
Learner-Driven Scheduling is a feature in Elentra that allows administrators to define available rotation slots for elective courses. Learners who are eligible to enroll in the elective will have the ability to request a spot in the rotation during an available time period. Administrators can control capacity requirements and manage the approval process for requests from students. Learners will see the schedule request on their Rotation Schedule Calendar’s Block view & see the status of their request from that screen. Learners can also drop elective rotation bookings before the rotation is due to start, allowing the learner to create and manage their unique elective schedule. This feature is off by default and must be enabled in an institution's Elentra instance in order to configure courses and rotation schedules for use with this module.
Learner-driven scheduling leverages course and rotation schedule features, so administrators can control rotation booking options, capacities, and approval/rejection processes within a rotation schedule. The process for implementing learner-driven scheduling is as follows:
- Course Setup:
- Create or configure a course with the following selections enabled:
- Clinical Experiences enabled
- Course is optional/elective, not a core course
- Course is eligible for learner-driven scheduling
- Configure an audience for enrolment eligibility
- Create or configure a course with the following selections enabled:
- Rotations Setup:
- Within a rotation schedule shell, create rotation(s) with the appropriate block schedule(s) applied. Define the default rotation Status.
- Define rotation slot(s) for each rotation’s blocks with available occupancy, and define occupancy enforcement.
- Make the rotation schedule visible to learners.
Once rotation slots have been configured for each rotation & block, learners can initiate a request for the available options.

Learner-Driven Scheduling Setup
Course Setup
Learner-driven scheduling is controlled on a per-course basis. Courses listed as an optional elective course will be able to enable learner-driven scheduling.
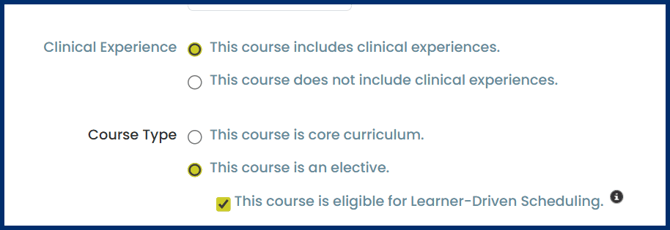
Once enabled, the enrolment process changes to an enrolment eligibility list. This means that instead of enrolling learners into the course, you are defining the list of learners who can request a spot in the course. Once a learner initiates a rotation booking request, they will display in the Enrolment tab for the course.
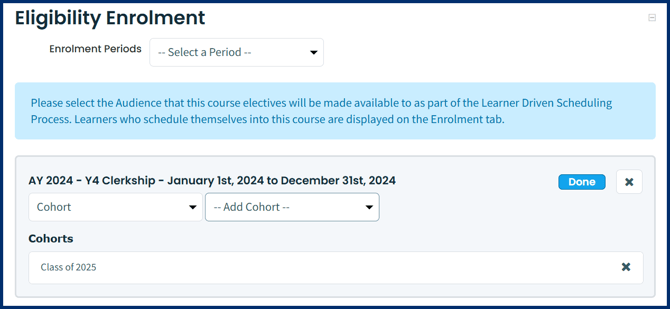
After saving your course settings & eligibility enrolment, the next step is to set up the rotation schedule & rotations.
Rotation Schedule Setup
Rotation booking options for learners to select from are built within a rotation schedule. For more information on building rotation schedule shells & rotations, see the Knowledge Base article Create & Manage Rotation Schedules.
First, create a rotation schedule shell which includes a LDS-enabled course (other clinical courses in your selected curriculum period can also be included in the rotation schedule, including core & non-LDS courses). Next, create the rotation & assign the applicable block schedule(s) you want your learners to be able to select from.
Step 1: From within your rotation schedule, navigate to the Rotations Setup tab. Click on the "Add Rotation" button.
Step 2: Select your LDS-enabled course, and add a title and rotation code.
Step 3: Set the default Rotation Status. When a learner requests a booking for this rotation, this status will be applied to the booking.
Optionally, enable the Scheduling Lock Period, which restricts learners from adding or dropping bookings within the specified number of days before each rotation block begins. To enable, select the check mark, then enter the number of days.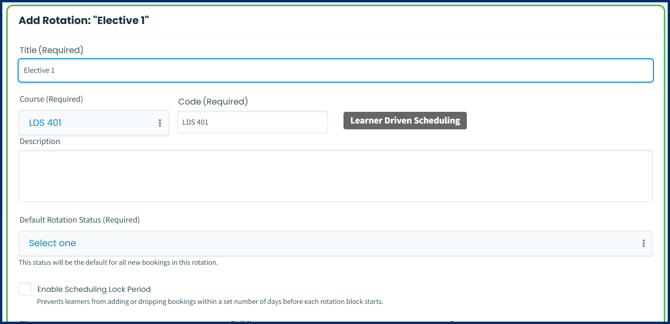
Step 4: Select the appropriate block schedule(s) for this rotation. For each block, a rotation slot will be generated, where administrators can further define capacity and capacity enforcement. Click Save to create the rotation.
Once a rotation has been created, click on the pencil icon to edit the rotation and view your rotation blocks. By default, each block will have 1 slot configured, which will have occupancy limits turned off. This means that an unlimited number of requests can be made for a space in the rotation during the block's specified time period.
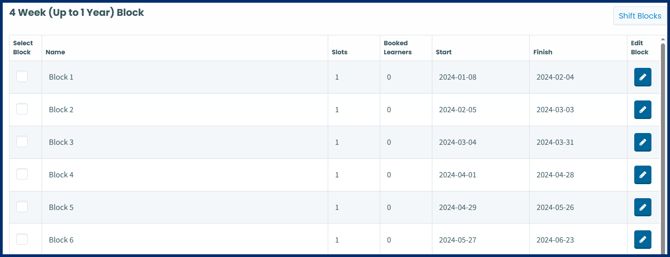
To adjust the rotation occupancy settings, or to configure additional rotation details such as site(s) and/or preceptor(s), click on the pencil icon for the block you wish to edit.
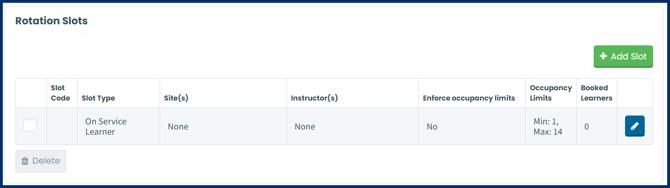
Rotation slots are what eligible learners will see when browsing scheduling options for a given time period, and be able request for their schedule. A slot will always have a time period & rotation, and can optionally display site(s) and preceptor(s), to give more information to a learner about the rotation they are requesting.
To configure the existing default rotation slot, click on the pencil icon at the right of the slot details; or click "+Add Slot" to configure another option within the same rotation and block.
- Sites & Instructors: These fields can be filled in with details of active sites defined in Manage Locations, and active Faculty users.
- Occupancy Limits: This section defines how many students this rotation option can accommodate. Set your capacity by adjusting the minimum and maximum number of spaces available.
- Enforce Occupancy Limits: If set to No, an unlimited number of learners can request a space within this rotation slot (administrators can then accept or remove the requests based on their institutional limitations & procedures). If set to Yes, the number of requests for space is limited by the Maximum Occupancy Limit defined in this slot. So, if the Max Occupancy is 14, a maximum of 14 learners can request a spot in this rotation slot. Once an administrator has removed a denied request, the space is opened back up for learners to request, until the maximum has been hit.
Repeat this process for each rotation block to configure a rotation's placement options. Repeat the rotation creation & rotation slot process for all LDS-enabled courses.
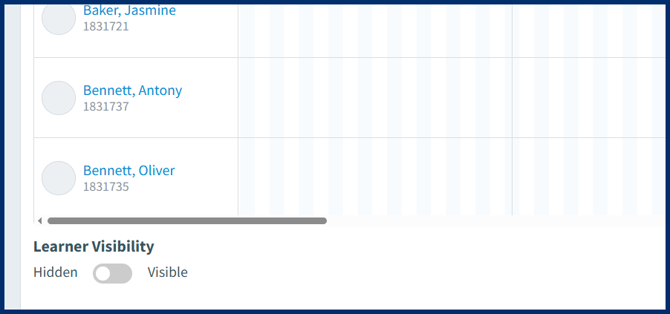
When you are ready for learners to view the rotation schedule & open the request process for LDS rotations, toggle the Learner Visibility from Hidden to Visible. This can be done from the Learners tab within the rotation schedule (below the learner grid view) or from the Clinical Experience Rotation Schedules tab.
Managing Rotation Schedule Booking Requests
Once a learner has made a clinical placement booking request, it will appear in the administrative view of the rotation schedule, with the default rotation status applied to the booking.
Note: The learner's experience is documented in this article "Request a Clinical Elective Rotation Placement".
To manage these bookings, utilize any of the following options:
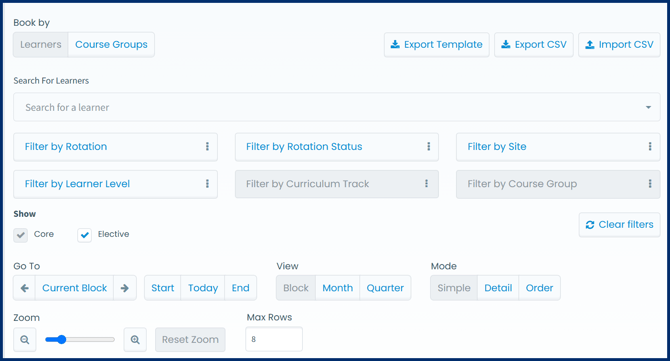
- Use the "Order" toggle to view the order in which requests were placed (see image below)
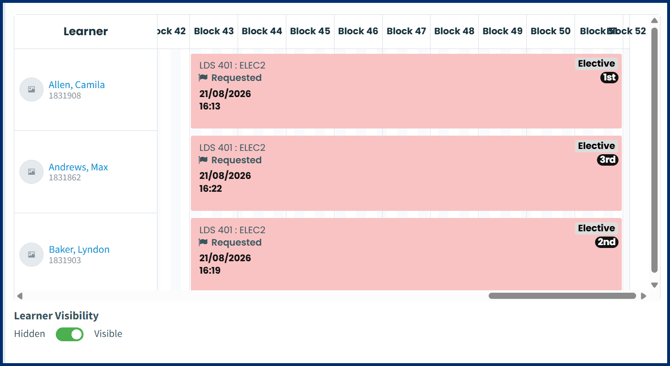
The rotation schedule view when "Order" details are turned on
- Use the filters to filter for rotation status "Requested" (or whatever your default status has been set to).
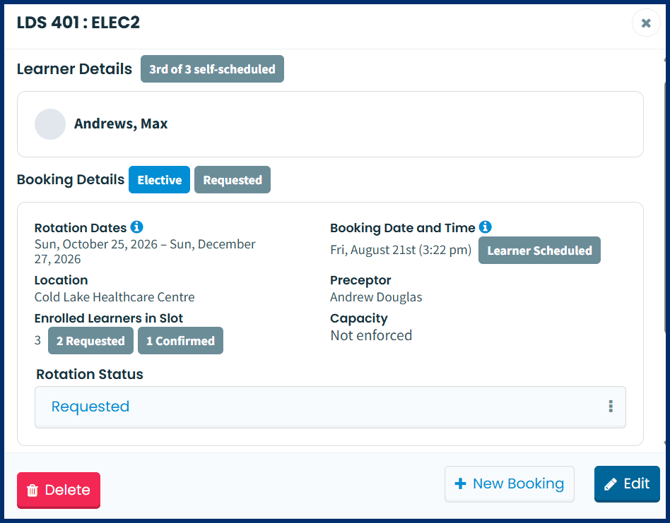
- Click on a booking to manually update the status or to remove the booking (see image below)
- The booking popup will allow you to change the rotation schedule status, or delete the booking.
- The booking popup will include rotation and request details, such as the order in which the request for this placement was received, the current number of current and requested bookings, and when the booking request was made.
- Alternatively, use the Export CSV button to export a list of some or all bookings in the schedule. Make your desired changes, then import the new schedules to apply your updates. The exported CSV file will display all the standard rotation details, plus:
- Booking date and time
- Booking status
- User who initiated the booking, and their user group (student or admin)
- Last booking update date and time
- User who made the last update, and their user group (student or admin)
- Details of previously initiated bookings that were later dropped by the student or an admin, and the status of the booking at the time it was dropped
Note: There is no notification mechanism to alert students of confirmed or deleted booking requests. Students can see the rotation booking status but are not alerted when this is changed or the booking is deleted.