Article Content
This article covers the following topics. Click on the topic to go to that section of the article.
Create & Manage Requests
As an admin user, you can create, edit, view and delete the Document Requests for which you are the author.
Accessing Requests
To access Document Requests, navigate to Admin > Document Requests.

You will be taken to your main dashboard, which will display all of the Document Requests you’ve created.
Adding Requests
To add a new Document Request, click the blue Add Request button.

Input a Name for the request, select the Request Type, select the Audience (Cohort or Specific Learners), add a Due Date, include a Message and add an optional Attachment.
Note: If the Required for Rotation Request Type is selected, there is an additional option to calculate the Due Date from a Rotation start date, as well as an additional Requested By field which indicates the entity requiring the information. Instructors are added when the Required for Rotation request is meant to satisfy registration requirements for a smaller clinical site, whereas Locations are added when it’s a larger site (e.g. a hospital).

Once all mandatory Document Request details have been filled out, the Save button will be enabled and the request can be created. When a Document Request is Saved, it will be sent to Learners immediately.

Editing Requests
To edit an existing request, click the blue Edit icon in the right-most column on the Document Requests table.

The Edit Document Request modal will open, allowing the user to modify the Title or Due Date of the Request.

Note: There is a notice informing the user that additional field modifications are not currently supported.
Deleting Requests
To edit an existing request, click the red Delete icon in the right-most column on the Document Requests table.

The Delete Document Request modal will open, with a prompt asking the user to confirm their action. The Delete button will not activate until the prompt has been checked.

When the user clicks Delete, the Document Request and all associated Learner submissions will be deleted.

Searching Requests
The Document Requests table can be searched on the Request Title field. The search should apply to all records, and results will be filtered based on a match to the search text.

If there is not a match for the search text provided, a muted alert will be displayed to the user.

![]()
Tracking Requests
As an admin user, you can track progress for a given request, to see how many Learners have and have not been approved.
Viewing a single Request
To view a single Document Request, click on the hyperlinked Request Title on the main Document Requests listing page.

The single Document Request page will show key details about the request, along with the list of Learners that the request has been assigned to.

Searching Learners on a Request
The Learner list can be searched on learner first name, last name, or both. To search for a learner, type your query text into the search box and click search.

The table will be filtered to display any Learners that match your search text.

If no matches exist, a warning message will be displayed below the search bar.

To return the table to a default state, you must clear the search bar and submit an empty search.
Filtering Learners on a Request
The Learner table associated with a given Document Request can be filtered to display Learner records based on the status of their submission. To filter Learners by status, open the Learner filter located above the Learner table within a Document Request.

With the filter modal open, you can filter Learner submission records by one or more statuses.

After applying the filter, the table results should be updated to reflect Learners that meet the status(es) selected in the modal.

![]()
Managing Learner Resources
As an admin user, you can approve, request resubmission, or upload a file on behalf of a Learner, in order to manage their responses to a given Document Request.
Uploading Files for a Learner
If a Learner’s response is Not Submitted or in a Resubmission Requested status, you may upload a document on behalf of that Learner from their submission page within a Document Request. To do so, click the Upload Document button to open the file upload modal.

With the file upload modal open, you must include a message that will be viewable to the Learner, in addition to any Backup Administrator added to the Document Request. After including a message, you can then either drag and drop a file into the file field, or browse your local computer to select the file you wish to upload. With both fields completed, you will be able to Upload the file and automatically approve the Learner’s submission.

Once the file has been successfully uploaded, the status of that Learner’s submission and Document Request will be updated to Approved.
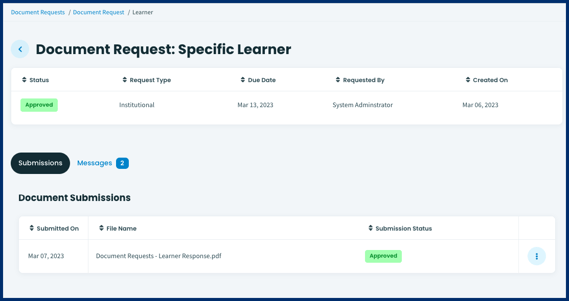
Approving File Submissions
When a Learner submits a new file, you should receive a notification with a link to their record. You can also navigate to a Learner’s response by opening a Document Request and then selecting one of the Learners from the audience associated with the request.

With the Learner selected, you view the file submitted by opening the action menu in the far-right column of the Document Submissions table. After opening and reviewing the file, open the action menu once again and click Approve to approve the submission.

Both the file submission and the Learner’s status for the Document Request should both now be set to Approved.

Requesting Resubmissions
When a Learner submits a new file, you should receive a notification with a link to their record. You can also navigate to a Learner’s response by opening a Document Request and then selecting one of the Learners from the audience associated with the request.

With the Learner selected, you view the file submitted by opening the action menu in the far-right column of the Document Submissions table. After opening and reviewing the file, open the action menu once again and click Request Resubmission to decline the submission and have the Learner upload a new submission.

Both the file submission and the Learner’s status for the Document Request should both now be set to Resubmission Requested.

![]()