Article Content
This article covers the following topics. Click on the topic to go to that section of the article.
- How to Manage the List of Departments
- Linking Departments and Divisions
- Custom Profile Fields
- Completing a Custom Profile Field as a User
How to Manage the List of Departments
Note: If you import Users using a CSV file, you can include a column for Department and add multiple departments for each user as needed.
Manage the List of Departments
Note: Only users who have Medtech: Admin or Staff: Admin permission levels are able to create courses.
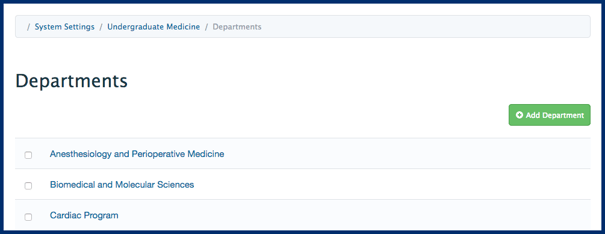
- Navigate to Admin > System Settings.
- Click on the name of the organisation you want to manage departments for.
- Click Departments from the left-hand sidebar.
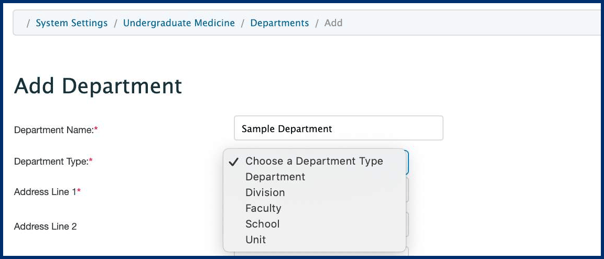
- Click Add Department to add a new entry.
- Complete the required information, noting the following:
- Department Type: You can select a department type from a dropdown menu. The options include department, division, faculty, school, and unit. There is no user interface to change this list.
- Click Save.
- To delete existing entries, click the checkbox beside the item name and then scroll down and click Delete Selected; confirm your choice.
- The list of departments will display alphabetically.
Currently, there is no user interface to link Departments and Divisions. There is space in the database to create a relationship between a department and its affiliated divisions, and a developer with access to the database can do this work if it is required by your organization. In a User Profile, you can assign someone to multiple departments and divisions in order to show their multiple affiliations.
![]()
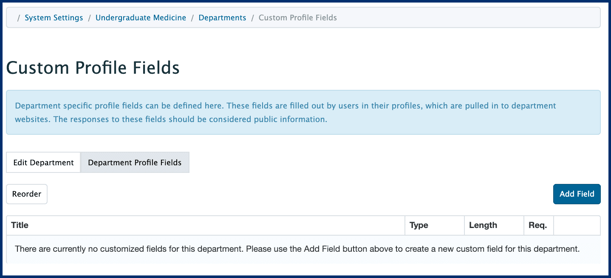
Each Department can configure Custom Profile Fields to collect additional information from their members. This allows an administrator to define the Custom Profile Field in terms of the type of information to collect and then create a space in the user's profile for them to provide said information.
Note: currently, there is no way to report on the data collected by Custom Profile Fields and this information is not made visible anywhere in the user interface. Administrators can access entered data by navigating to User's Profiles.
Create a Custom Profile Field
Note: if you have multiple Organisation's active within Elentra, the admin account you are currently logged into must be switched to the Organisation that you are looking to adjust this setting for. You can check and switch your active Organisation by clicking on the Organisation Switcher button in the top right corner of the screen.

- Navigate to Admin > System Settings, pick the appropriate Organisation (if required), and click Department from the left-hand sidebar.
- Click on the appropriate department.
- Click on the Department Profile Fields tab.
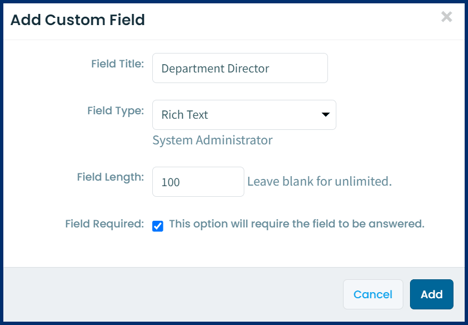
- Click Add Field.
- Provide the relevant information, noting the following:
- Field Type: allows you to customize how information can be collected. The options are:
- Rich text
- Plain text
- One Line text
- Checkbox
- External URL (e.g., for people to provide a link to their research project page)
- Field Length: set a character limit, if required.
- Field Required: use this checkbox to indicate whether this field is required.
- Field Type: allows you to customize how information can be collected. The options are:
- Click Add.
- The newly created field will display on a list of custom profile fields. You can edit, delete, or reorder the custom profile fields using the pencil and trash icons, or the Reorder button.
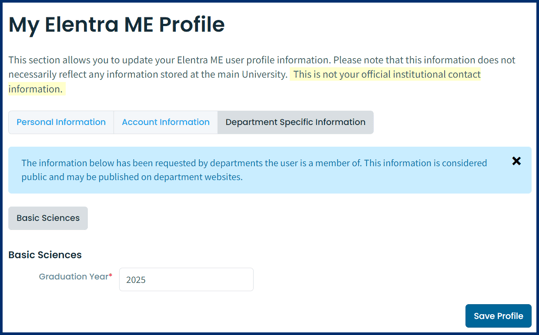
Completing a Custom Profile Field as a User
After creating a Custom Profile Field within the Department as shown in the above section, users can complete their custom profile fields in their User Profile, accessible through the user's profile button in the top right-hand corner of the screen:- Click on the circular Profile Badge in the top right-hand corner of the screen.
- Click My Profile to access their User Profile
- Within their profile tab options, they will see a Department Specific Information tab and can provide the required information there.
![]()