Create hierarchical and flat tag sets, tags and your curriculum map through linking your tags
Article Content
This article covers the following topics. Click on the topic to go to that section of the article.
- Curriculum Tag Sets Introduction
- Create an Empty Tag Set
- Adding Additional Tags to Tag Sets
- Editing Tags
- Deleting Tags
- Linking Tags
Curriculum Tag Sets Introduction
Curriculum Tag Sets are the different taxonomies an organization uses to tag and track content across the system. Examples of curriculum tag sets include school objectives, clinical presentations, diagnoses, etc. These tags can be
- applied to courses, learning events, gradebook assessment items, exam questions, assessment & evaluation form items, portfolio artifacts, learning objects, instructors, and locations. How to apply tags will be discussed in each article about the above topics.
- used as filters when searching the curriculum and are used in multiple reports.
You must create a tag set first and then populate it with curriculum tags. There are two types of tag sets that can be created within Elentra.
- Hierarchy Built into a Single Tag Set (hierarchical tag sets)
- Flat Tag Sets (Single list of items with no internal hierarchy)
Deciding which type of tag set to use will depend on whether there are one-to-one relationships or many-to-one relationships between the curriculum tags.
Hierarchy Built into a Single Tag Set
It is recommended to use a hierarchy built into a single tag set when only one-to-one relationships exist between tags from different sets. For example, course level objectives that have one-to-one relationships with session level objectives. If one-to-many relationships exist between tags then there will be a need to repeat tags within the system, which can create redundancy that may not be feasible.
An example of a hierarchy built into a single tag set is the AAMC Physician's Competency Reference Set (AAMC PCRS) seen below.
Flat Tag Sets
It is recommended to use flat tag sets when many-to-one relationships exist between tags in different sets. Relationships between tags can be built using the tag mapping tool within the tag set details, described later in this document.
Create an Empty Tag Set
Before adding the tags, we need to create the tag set & configure its details.
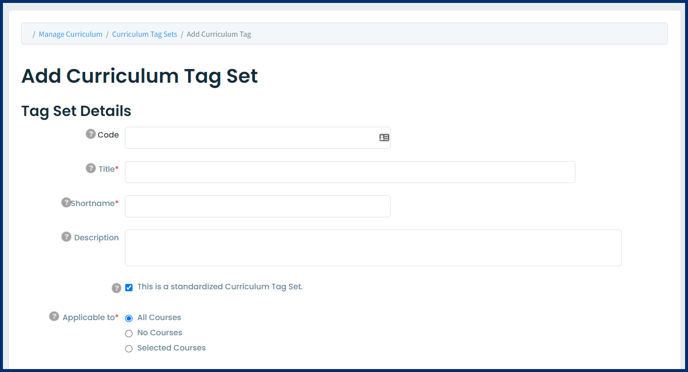
Step 1: Navigate to Admin> Manage Curriculum > Curriculum Tags
Step 2: Click on Add Tag Set to create and configure your tag set.
Step 3: Fill in the required fields. They are marked with a red asterisk.
Step 4: Configure your tag set to fit your needs with the following options:
Tag Set Details Section
- Fill in the title. The Shortname will autofill when the tag set title is entered, but can be edited. Optionally add a description about the tag set.
- This is a standardized Curriculum Tag Set option is used for a CBME enabled organization. It is for tag sets in the CBME organization that are to be used across courses/programs.
- The tag set can be scoped to all courses, no courses, or selected courses.
Tag Options Section
- Whichever Detail Requirements are set to required will dictate what fields are required in a CSV import.
- In this example only a title would be required on the CSV import.
- The option of having a hierarchy in a single tag set is set here. You are able to able to add multiple levels to your hierarchy and label each level.
Tag Display Options Section
-
The Short Display Method is what will show in a list like in the list view of the tags in a tag set
-
The Long Display Method is what shows for a tag tagged throughout the system.
Mappable Curriculum Tag Sets Section
- This is where a tag set can be mapped down to another tag set. This is the area where you would typically map flat tag sets to other flat tag sets to create a hierarchy.
Note: Any flat tag set and hierarchy in a single tag set can be mapped together. If you are not ready to map tag sets, you can return to this screen later once your tag sets have been created within Elentra.

Step 5: Click Save to create the empty tag set. You will be redirected to your new empty tag set and will be able to fill it with tags.
Populate a Tag Set
Once your tag set is created you can populate it with tags. There are two ways to populate a tag set with tags.
- Tags can be added manually, one at a time, using the Add Tag button in the tag set.
- Tags can be imported using a CSV file using the Import from CSV button in the tag set.
1. Manually Adding Tags
While it is likely you will be importing your tags in bulk, you also have the ability to manually create tags in Elentra.
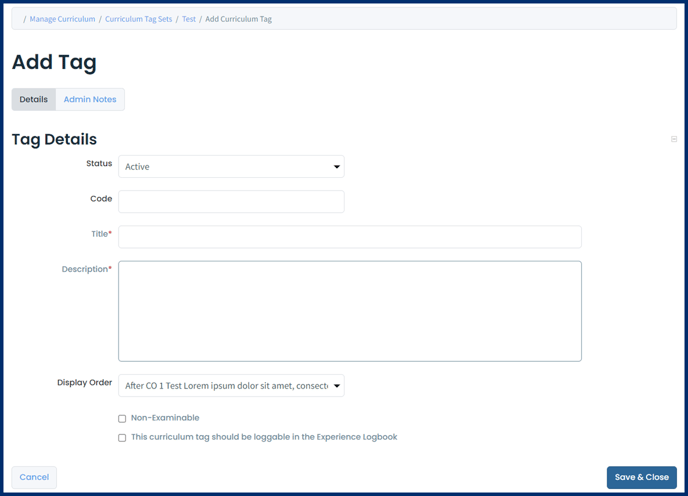
Step 1: When in the tag set, click on Add Tag and you will be redirected to the "Add Tag" screen.
- The Code field, Title field and Description field will only show as available when adding a tag if those options are chosen in the Tag Options setup of the tag set.
- The fields that show as required when adding a tag manually are controlled by the options that were chosen as required fields in the setup of the tag set.
- In this example the code, title and description are allowed to appear and the title & description are required. The reason why these are the required fields is because the title and description have the required checkbox checked in the Tag Options setup of the tag set.
- If the tag should be part of a logbook then check the box next to This curriculum tag should be loggable in the Experience Logbook. Tags can individually be made loggable in tag set or you can make all tags loggable in a tag set from the Curriculum Tag Sets page (under Admin > Manage Curriculum > Curriculum Tags). Please see the Logbook article to learn more about making a tag set for the logbook.


Step 2: Click Save
Step 3: Once the tag is created you can edit the tag, link it to other tags if you are using a hierarchy in a single tag set or have mapped tag sets to each other, and delete the tag, reorder the tag using the Display Order option on the edit screen of a tag.
2. Importing Tags in Bulk
Step 1: To import tags in bulk from a CSV first open the tag set where you want to import the tags.
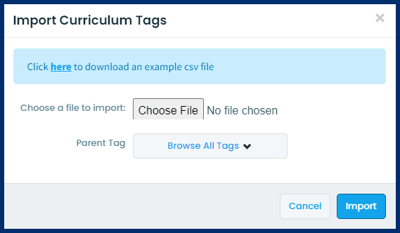
Step 2: From a Curriculum Tag Set page, click Import from CSV and a popup window will offer you a sample CSV template file to download.
Note: The sample CSV file will only show the fields that were marked as required in the tag set setup under the Tag Options section (the tag's code, title or description). However it is recommended at this time to include all three fields in the import so that it fills those other fields that are not being used with an empty value in the database.
If you are unsure what CSV template to use please ask Elentra Support which is the appropriate template to use.


Note: If you are using a hierarchy built into a single tag set you will have the option to import child tags, but you will have to do it separately for each parent tag. This means that you will need to keep the child tags in separate CSV files for each parent tag and can only upload one level at a time from the user interface.
Please note that the Elentra team can upload these child tags and create the relationships to the parent tags from the backend of the database instead of through the user interface. Please speak to Elentra Support if you have large sets to upload.
Caution: When downloading your data sets from Excel, be sure to use the "CSV UTF-8 (Comma Delimited) version of .csv . Other versions of .csv will work, but may contain unsupported characters that will not display as desired within the Elentra interface.
Step 3: Once the tag is created you can edit the tag, link it to other tags if you are using a hierarchy in a single tag set or have mapped tag sets to each other, and delete the tag.
Caution: When importing tags a second time, the system will generate duplicate entries within the tag set. The newly imported tags will not replace any existing tags in the system.
Viewing Tags
There are two viewing options of the tags in a tag set.
- Table View
- List View: Allows you to add additional columns to view such as the Elentra assigned tag id, code, title, description, an overview of existing links between tag sets. Please see this short video to see the differences between the table view and list view.

Exporting Tags
You can export curriculum tags by tag set. You must export all tags in a tag set at once. There is not an option to export just a subset of the tag set.

Adding Additional Tags to Tag Sets
Additional tags can be added to a tag set that already has tags populated inside of it. Tags can either be added manually or in bulk. The additional tags will be added to the bottom of the list. If you need to reorder the list you can either do this manually in the user interface by editing the tag and changing the order under the Display Order drop down or you can reach out to to Elentra Support for help with reordering the the tags in a tag set.
Editing Tags
In the list view when you hover your mouse over an existing tag the edit, link, and delete buttons will show up on the right hand side of the tag. Otherwise you can find these options on each tag in the table view of your tags.
Note: You may see a plus sign icon on the tag, this will only appear if you are using a hierarchy in a single tag set. Please see the Linking Tags & Tag Sets section lower down in this article to learn more about linking tags together.


Click on the pencil icon on the tag to go to the edit screen for the tag. You will be able to access different tabs on the edit screen. You will have access to the following tabs:
- Details
- Curriculum Mapping (will only show if a tag set is mapped down to another tag set)
- Admin Notes
- History
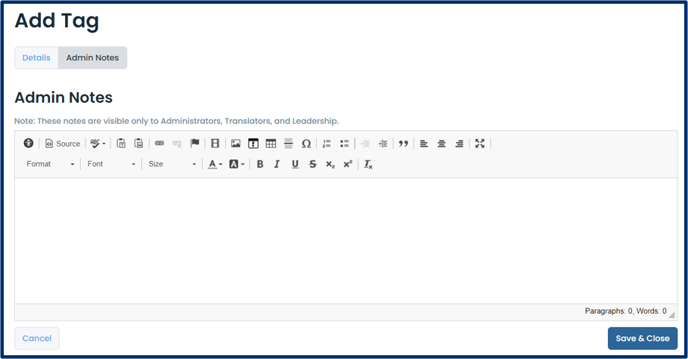

- Admin notes can also be added when adding a tag manually. Use this space to record notes about a curriculum tag (e.g. the committee that requested the tag, reason for changes, etc.)
- Admin notes can also be added after a tag has been created.
- A History tab will appear on the Edit Tag page of the tag after a tag is saved. The history of who has added an Admin Note and any changes made to the note are kept under this history tab.
- A Map Curriculum Tags tab will appear if tag sets are mapped to each other. This is where an individual tag can be mapped to other tags in the mapped tag set.
Deleting Tags
You can delete tags either individually or in bulk.
- Individually: To delete tags one at a time hover over the list view to make the delete button appear or go to the table view then click delete.
- In Bulk: Go to the table view and select as many tags you would like to delete then scroll to the bottom of the page and click on the delete button.
Deleting tags from the system is only a soft delete. The tag(s) will still exist in the database along with the relationships to other tags and where it will was tagged, but they will not be available in the user interface. You will not be able to visualize the relationships to other tags or objects in the user interface for deleted tags.
Linking Tags
To link tags to each other you must either have tag sets mapped to another tag set or use a hierarchy in a single tag set. When a tag set is mapped to another external tag set a link icon will appear on each tag. If the tag set is not mapped to any other tag set then the link icon will not be visible.

If you are using a hierarchical tag set (hierarchy built into a single tag set) you will have a plus sign icon on every level except for the bottom level of the hierarchy. Clicking on this icon will allow you to map tags in the next lower level in the internal hierarchy from this tag.
It is possible to have a hierarchical tag set mapped to a flat tag set. Do not confuse the plus sign icon with the link icon. The link icon allows you to map a tag to other tags in an external set and is not used to map tags inside of hierarchical tag set.

Note: If you have a large amount of tags to import please speak with Elentra Support. Tags and the relationships between tags and other objects can be imported in bulk through the backend of the database by the Elentra Team.
Linking tags in external sets
Note: In order to create a link between tags in external tag sets each tag set and tags much exist first. This method is only to be used for linking external sets and not for creating the relationships between parent and child tags in a hierarchy in a single tag set.
Tip: You will not be able to make the linkages by importing the relationships in bulk in the user interface for external sets. It is possible for the Elentra Team to import these relationships in bulk from the backend of the database. Please speak to Elentra Support about creating your curriculum map in bulk.
Step 1: Ensure that the parent set is mapped to the child set from the Mappable Curriculum Tag Sets section on the tag set setup page. The Elentra system assumes that the relationship between two sets is directional and takes a top-down approach to mapping. See the Create a Tag Set section earlier in this article if you are unsure how to do this.

Step 2: Click on the link icon on the parent tag in the external parent set. This will bring you to the Mapped Curriculum Tags tab of the tag. Here you can select the child tag(s) of this parent tag. If you have multiple tag sets set as child sets then you will be able to map to any of the tags in any of those sets.
![]()
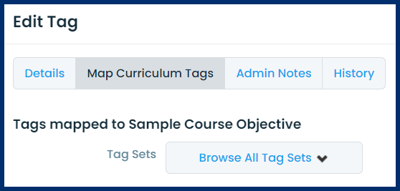
Step 3: Click on the Browse All Tag Sets button to open a drop down list to search for the child tag set and subsequent child tags you would like to link. To search within the child tag set, click on the plus icon next to the name of the child tag set. Once you choose the child tag(s) by checking the checkbox next to each tag(s) they will appear in a list under the Browse All Tag Sets button.
Step 4: Click Save. Once saved, if you go to the child tag's edit screen under the Mappable Tag tab you will be able to see that the parent tag is connected to the child tag. You can also use the Curriculum Tag Mapping Report under the Curriculum tab > Curriculum Reports to visualize the curriculum map and links between tags.
Linking tags in a hierarchy in a single tag set
Manually
Step 1: Click on the plus sign icon on the tag to add a child tag that parent tag. The Add Tag screen will appear and you will be able to create the child tag and have it linked to the parent tag. This means that to use this method you will need to create each tag one by one under the parent tag.


Step 2: Click Save.
In Bulk
Step 1: Click on the Import from CSV button from the tag set page. Click on Choose File and find your CSV of child tags for a particular parent tag. Then choose the parent tag the child tags in the CSV should live under.


Step 2: Click Import.
Note: You will have to have separate CSVs of child tags for each parent tag when using this importer in a hierarchy in a single tag set.


