Create & Manage Communities

Create communities and manage content and membership over time


Article Content

This article covers the following topics. Click on the topic to go to that section of the article.


Create a Community

Step 1: Click Communities in the navigation menu, then Create a Community and choose a category for your community by clicking on the appropriate title.
communities
 Creating a Community Step 1 Choose a Category

Note: The list of community categories cannot be changed through the user interface but can be adjusted by Elentra Support if desired by your organization.

Warning: Categories may be useful to see how users are using communities, but there are no filter settings or reports that rely on these categories at this time.

 
 Step 2: Complete the required fields detailed below.
step2community
Community Name: Pick a descriptive but concise name.

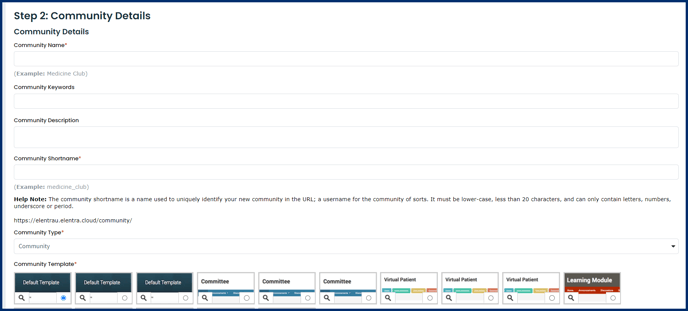
Note: We advise omitting colons from community names and using dashes instead. Colons will cause the community name to display extraneous characters in the email sender name when sending community Announcements.

Community Keywords: These will not be visible to users but will be applied when someone searches for an existing community. 
Community Description: This will be displayed to any user who searches for or tries to access the community. 
Community Shortname: This will be part of the community URL. It must be lower-case, less than 20 characters, and include only letters, numbers, underscore or period. After this is set there is no user interface to change the URL so pick carefully! 
Community Type: Select the appropriate community type from the dropdown menu.
If you are creating a course website, indicate which course should be connected to the community. Note that you can connect multiple courses to one course website and they will share their student-facing website. More information about this is in the Courses > Websites help section.
Community Template: A selection of templates are available but only those applicable to the community type you select will display. Click on the magnifying glass icon in the corner of each template to see a sample of its appearance. The templates are titled with their suggested uses.

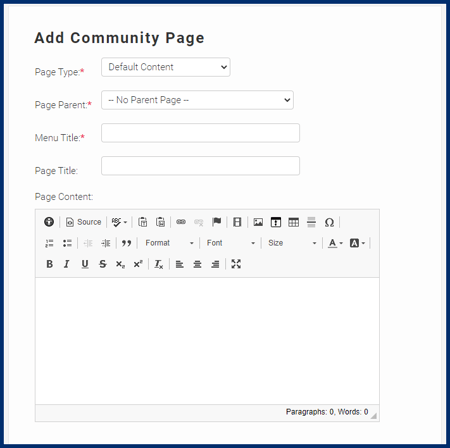
Community Pages: The options displayed under Default Pages will change depending on your selected Community Type.  See more information in the Community Pages Management section below. The ones that checked and greyed out are default pages and cannot be unselected. 

communitypageoptions

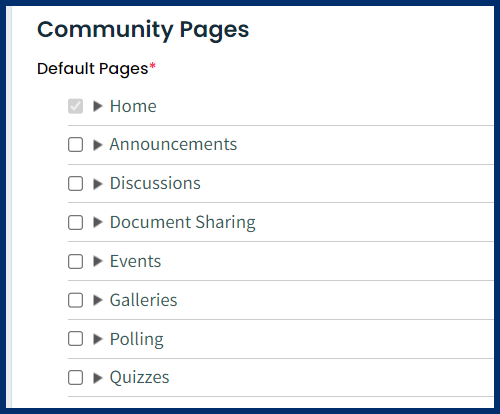
Generic Community: The only page included by default is Home. Select additional pages as desired.
Course Websites: A series of default pages are required. You will be able to add additional pages but there is no ability to delete or hide the included default pages within the UI.  To change the default pages, contact Elentra Support. 

Learning Modules: There are no required pages, you must select those you wish to include.

Community Permissions


communitypermissions
Access Permissions: Select whether this community should be a publicly accessible page, or for Elentra users only. The options are:
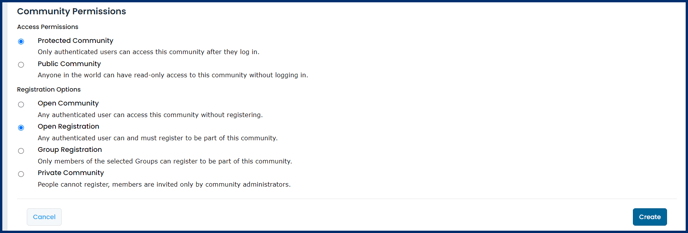
  • Protected Community: Only authenticated users can access this community after they log in.
  • Public Community: Anyone in the world can have read-only access to this community without logging in.
Registration Options: Select who is allowed to access your community, and how. The options are:
  • Open Community: Any authenticated user can access this community without registering.
  • Open Registration: Any authenticated user can and must register to be part of this community.
  • Group Registration: Only members of the selected Groups (permission level) can register to be part of this community.
  • Private Community: People cannot register, members are invited only by community administrators.

Step 3: Click Create. You will be redirected to the community and as the creator of the community can manage all pages. You'll notice an Edit button on some pages. Click on it to add or edit content on any page. 

Return to Article Content Section Image Beveled v1


Community Pages Management

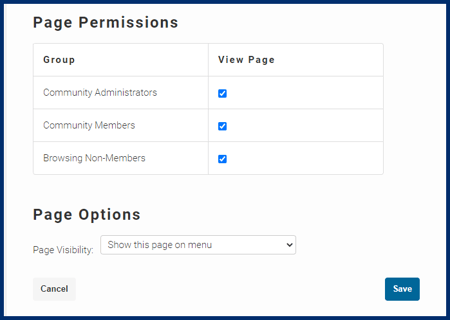
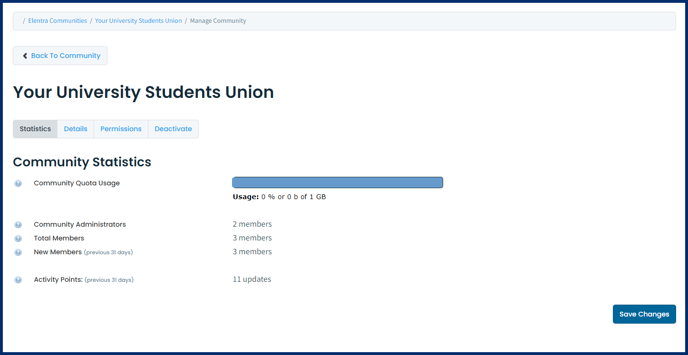
Anyone who is the administrator of a community can use various tools to manage community content and pages. If you create a community, you will automatically be a community administrator. Different pages are templated to serve different functions, and different community types come with specific page types. In most communities you can delete pages or hide them from view if they are unneeded (one exception is course websites, you are not allowed to hide or delete default pages). You can add pages of most types to any community and control which users have access to the page and how they interact with it (e.g. can upload or download files, can comment on files, time release of the page, etc.). 

Adding/editing content to community pages

When viewing a community you will have two options to navigate to add/edit content on most pages.
As an administrator you'll see an Edit button on most pages.
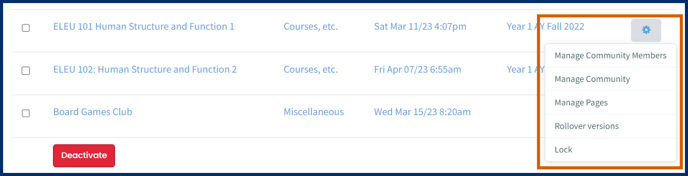
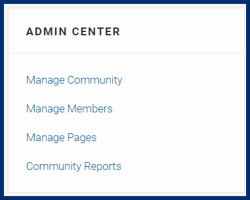
You also have access to an Admin Center card in the left or right sidebar. Click on Manage Pages to access a list of all pages in the community. From the Manage Pages page, you can
  • add new pages
  • reorder pages
  • click on the name of the page you wish to edit
managecommunitypages
 

Adding new pages to a community

Step 1: Click on Manage Pages to access a list of all pages in the community. Click the Add New Page button. This will take you to the Add Community Page, from here you will be able to configure your new page. 
addpage
Page Type: Your selection will alter the options below.
Parent Page: Assign the parent page to nest pages underneath a parent. The first and second levels of menu titles will show up on the menu. Additional levels will show up on tabbed or list menus once the parent page is opened. This will appear differently depending on the template you've selected. 
Menu Title: The title that will display on the community pages list.
Page Title: The title that will display on the page.
 
Step 2: Set your page permissions:
communitypagepermissions
 
From this section you can control access to specific pages, and hide pages from view as needed.

Note: In some community types (e.g., course website), the default pages can not be hidden from the menu.
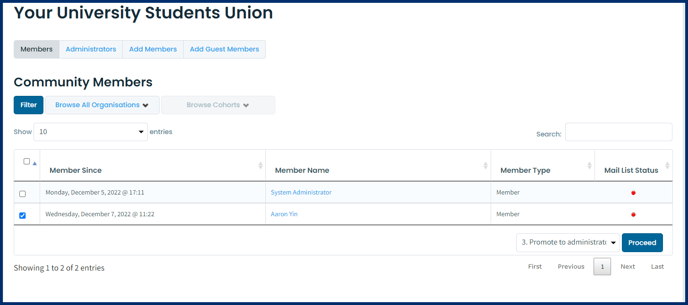
Warning: When visibility is set to Hide this page from menu the page still exists but will be hidden from view. If a user knows or has the page bookmarked, they will still be able to view the page.

Member Management

Medtech: Admin and Staff: Admin users in the system can access all communities via Admin > Manage Communities and change community settings and membership from there. To manage a community do the following.
Step 1: Navigate to Admin > Manage Communities
Step 2: Click on the cog beside the appropriate community title and select Manage Community Members or Manage Community. If an admin user is also the administrator of a community, they'll be able to access a Manage Pages option from this cog as well. If the community page is a course website they may have access to a Rollover versions option and the ability to lock the community.
Admin Manage Communities Page
 Admin Manage Communities Cog Menu Course Website

Note: Other user types who are a community administrator will have to access an Admin Center from the Communities tab in order to edit the community's settings or members as they will not have access to the Admin menu item Manage Communities. 

admindashboard


Adding members

Step 1: From the Admin Center on the community page, click on Manage Members to access a list of all members in the community. You will be taken to the Community Member management dashboard:
managecommunitymembers
 
Step 2: Click on the Add Members tab.  Click Select Organization to narrow down the audience to a particular organization.  Then click on Select Members to browse and search for users by cohort or Elentra group and role.
 Step 3: After you have checked off all applicable names, click Add Members. To view the members you've added, click the Members tab.
 

Promoting members to be community administrators

You can promote members of a community to be a community administrator.
Step 1: From the Manage Members dashboard, navigate to the Members tab. Click the checkbox beside the names of the users you'd like to make administrators.
promotetoadmin
Step 2: In the Select Member Action dropdown menu located next to the Proceed button towards the bottom of the page, select 3. Promote to administrator option. Click Proceed. To view the members you've promoted to administrators, click the Administrators tab.
 

Demoting, removing or banning members

Step 1:
To remove or ban members navigate to the Manage Members dashboard. From the Manage Members dashboard, use the Select Member Action dropdown menu to remove or ban members.
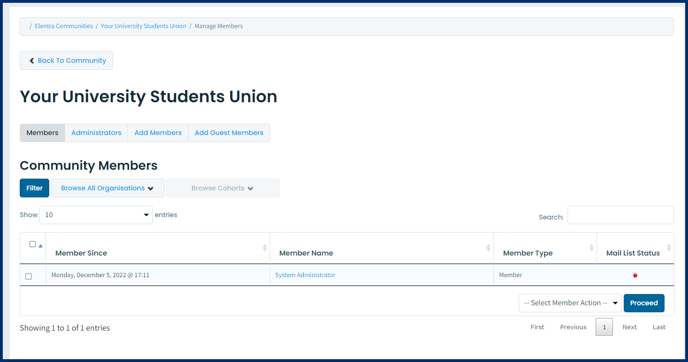
  • Select the Remove members option to remove the selected members or the Deactivate/ban members.
removeorban

Note: Removing a member will allow that person to rejoin the community at a later date.

Deactivating/banning a user means the user will receive a message alerting them to this fact if they try to access the community and they will not have the option to rejoin.
To demote an administrator, navigate to the Administrators tab.  Select the names you want to remove as administrator or demote to a member. Then select the Demote to members option in the Select Admin Action dropdown list. 
removeadmin

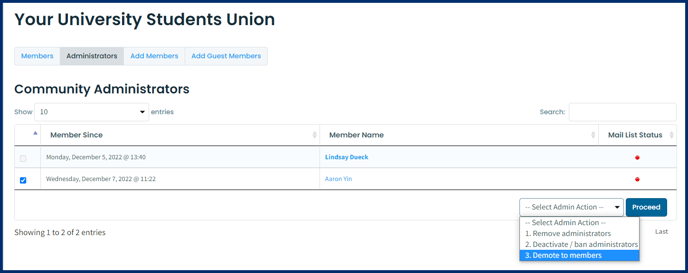
Step 2: Click Proceed.

Manage Public/Guest Account Access

Community administrators can invite members of the public to be community members. To do so, do the following.
Step 1: Navigate to the Admin Centre of a community and click on Manage Members. Click on the Add Guest Members tab and provide the required information (first & last name and email address).
Step 2: Click Save or Add Guest.
Note:  If you take this approach and invite members of the public to join a community please note that some of the public community members have limited access to certain functions.
Public users can't make their own discussion posts.
Public users can't vote in polls.
Public users can't upload files or comment on files.

If you don't want community administrators to be able to add guest accounts, there is a database setting option you can use to restrict this ability to Medtech:Admin users only (community_display_guest_enrollment).  Contact Elentra Support to enable this setting.

Return to Article Content Section Image Beveled v1

Community Management

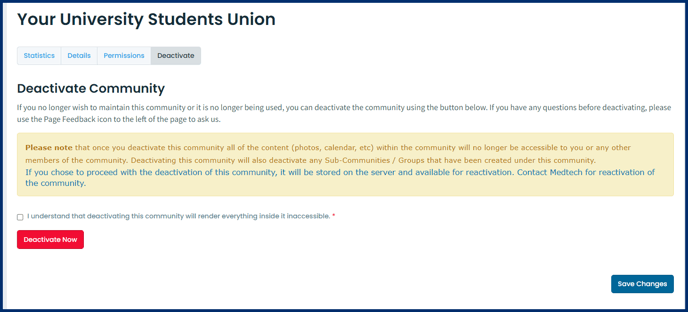
Editing the details or permissions of a community

If you are an administrator of a page, then you will have access to edit the details or permissions of a community.
Step 1: From the Admin Center in your community, click on Manage Community. This will take you to the Manage Communities page. If you are a Medtech: Admin or Staff: Admin then you will also be able to navigate to this page using the Admin menu > Manage Communities. 
admindashboard
 
managecommunity
Step 2: Click on the Details tab or Permissions tab as needed. Make your changes.
Under the Details tab you have the ability to change your community name, keywords, description, and template. 
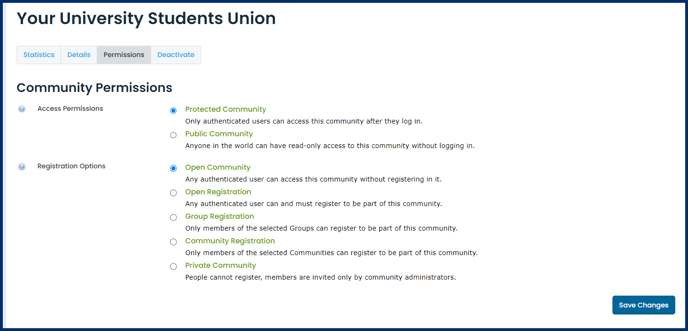
Under the Permissions tab you have the ability to change the Access Permission and Registration Options. 
Step 3: Click Save Changes once your updates are complete.  

Viewing community statistics

From within the Manage Community page, navigate to the Statistics tab. 
communitystats
The quota usage listed under statistics is a soft limit and once exceeded will not prevent you from posting content. If you'd like to enforce a quota at your institution, please contact Elentra Support. 

Deactivating a community

If you are an administrator of a community you will have the ability to deactivate a community.
Step 1: From the Admin Center of your community, click on Manage Community then navigate to the Deactivate tab. 
deactivatecommunity
Step 2: You will be required to check a box confirming you understand the implications of deactivating your community. Only a Medtech:Admin will be able to reactive it. 

Note: Locking a community is currently only available for course websites.  Please see the Knowledge Base articles about course websites for more details.

Community Reports

Administrators of a community can access Community Reports from the community Admin Center.
communityreports
Once on the Community Reports page you can apply a filter option to view activity within the community.
Return to Article Content Section Image Beveled v1