Article Content
This article covers the following topics. Click on the topic to go to that section of the article.
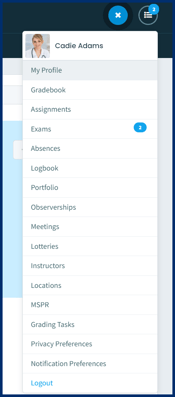
User Profile
A user's profile in Elentra has two different displays:
- An admin view under Admin > Manage Users for which only Medtech:Admin's and Staff:Admin's have access. The admin can manage the user's profile from Manage Users. Below is pictured the User Profile Overview.

- An individual user view called My Profile under any user's icon. The individual user can view and possibly edit some of their personal & account information from their profile.

Note: If you have users with identical first and last names we recommend that their middle initial be entered as part of the first name field. This will allow other users to more easily distinguish between people (e.g., when you are adding someone to a cohort or as the target of a distribution).
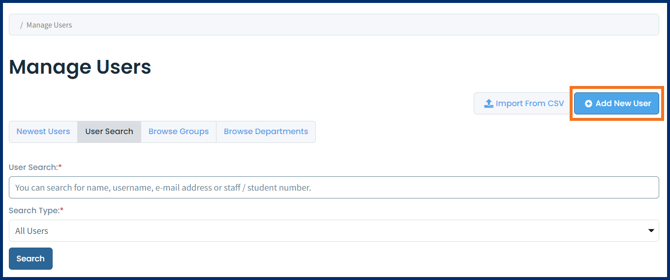
User Creation
Adding Users Manually
- Account Details Section
- Account Options Section
- Personal Information Section
- Permissions Section
- Notification Options Section
Account Details Section
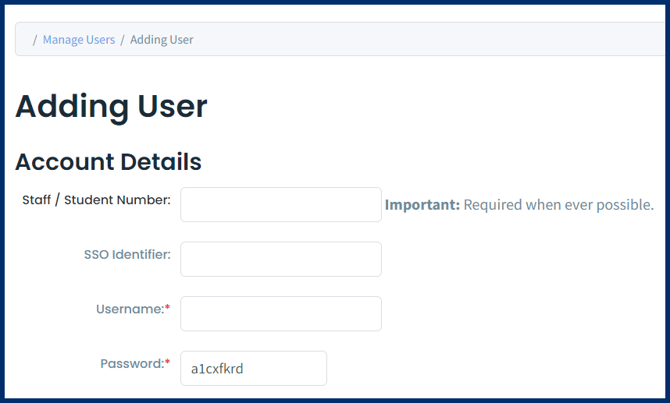
The fields in this section are
- Staff / Student Number: Sometimes referred to as institutional id, this represents the typically numeric or alphanumeric identifier used for members of an institution.
- SSO Identifier: This field may or may not be used when configuring single sign on. It depends on what the SSO identifier is for the institution.
- Username: (Mandatory field) What the user will enter to log in to Elentra (if single sign-on is used then the single sign-on username will be used here.
- Password: (Mandatory field if not using SSO) Elentra will autogenerate passwords for accounts manually created through the user interface.
Note: If single sign-on is configured, passwords stored in the Elentra user profile are not relevant.
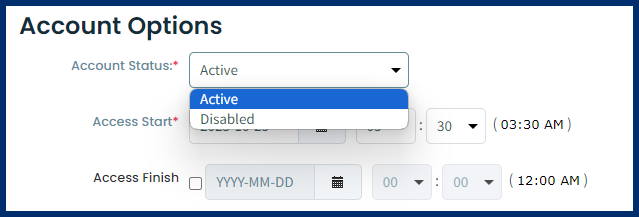
Account Options Section
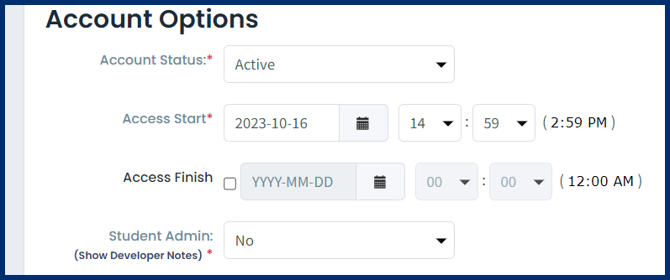
- Account Status: You can set the account to either Active or Disabled. Accounts with a disabled status will prevent users from logging in.
- Access Start: Limits a user's access to Elentra to the specified start and finish times.
- Access Finish: Limits a user's access to Elentra to the specified start and finish times.
- Student Admin: Visible only on a learner's Profile under the Account Options section, the Student Admin tool is to allow you to give a learner access to Exam question folders. The idea behind the Student Admin option is to allow experienced learners to create practice items for other learners. Students can also grade exam questions if they have been made a student admin, and assigned as a grader on an exam.
Personal Information Section
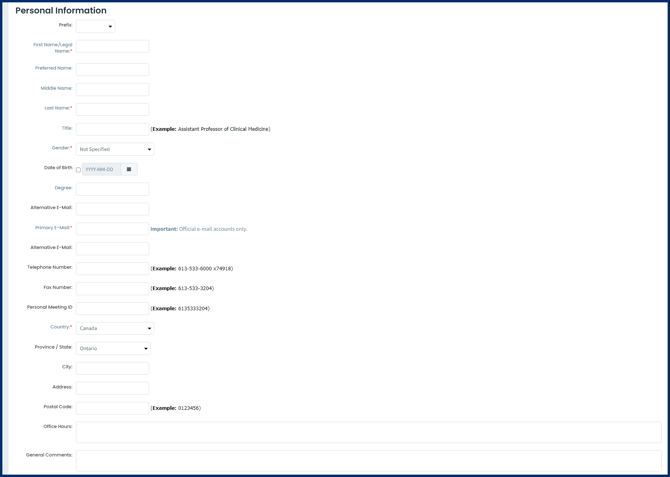
- Prefix: A drop down list with the default values are Dr., Mr., Mrs., Ms., Prof., Assoc. Prof., Asst. Prof.
- This is visible under the individual User's Profile, the admin view of the user's profile, and in Manage Instructors.
- First Name/Legal Name: (Mandatory Field) If you have multiple users with the same first and last name we recommend including their middle initial with their first name.
- Preferred Name: Note that while Elentra can store this information, it is not currently used/displayed elsewhere in the platform.
- Middle Name: This is an open text field
- Last Name: (Mandatory Field) This is an open text field
Note: The character limit on all name fields is 150 characters each.
- Title: This is an open text field.
- Generational Suffix: This is a drop down list with default values of
- Post-nominal letters: Optionally enabled using a database setting (profile_name_extensions). The default values are
- Pronoun: Can optionally enabled using a database setting (profile_pronoun_enabled) to allow staff:admin to enter this information on a user profile.
- Once this information is entered, it will display on the user profile page available to staff:admin users.
Note: An additional database setting (profile_pronoun_edit_enabled) can be enabled to allow users to edit their own pronoun information. Contact Elentra Support to enable this option.
- Gender: (Mandatory Field) The default options are not specified, female, male, non-binary, undefined.
- Date of Birth: The format is in YYYY-MM-DD.
- Degree: This is an open text field which shows on the Manage Instructors Page.
- Alternative E-Mail: You can store an alternative email here but it is for display purposes only, the system will not deliver emails to it.
- Primary E-Mail: (Mandatory Field) This field may be used as an SSO identifier. Typically official institutional emails are used here.
- Telephone Number: This is an open text field
- Fax Number: This is an open text field
- Personal Meeting ID: This field can be used if you are enabling database settings to enable Elentra to automatically display an online meeting room on events based on the Associated Teacher.
- Country: (Mandatory Field) This is a drop down list.
- Province/State: This is a drop down list or an open text field depending on which country you choose.
- City: This is an open text field
- Address: This is an open text field
- Postal Code: This is an open text field
- Office Hours: Information entered here will display on the user's profile when viewed in People Search.
- General Comments: This is an open text field
Permissions
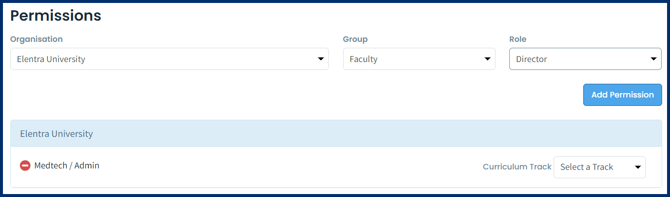
In this section the permission level(s) of the user needs to be set. It is mandatory to set the permission level for each organization the user is part of in Elentra. The user must be assigned at least one permission level.
To add a permission level to the user choose the Organization, Group and then Role and click Add Permission.
The group & role permissions define a user's basic abilities in Elentra; additional access and capabilities are granted by further being associated with a specific course or group of learners. For example, a user who is staff:pcoordinator has read access to open courses and events, however they will gain administrative abilities in a course if they are specifically associated with a course as its designated pcoordinator on the Course Setup page.
The following are the group and role combinations to choose from when adding a permission level to a user. Different group types have different role availability as shown in the table below. For more detail about user permissions please see the Permissions help section.
| Group | Role |
| Medtech | Admin, Staff |
| Staff | Admin, Pcoordinator, Staff, Translator |
| Faculty | Admin (We do not recommend organizations use this group:role combination), Director, Lecturer, Faculty |
| Resident | Lecturer, Resident |
| Student | Student |
| Alumni | Year of Graduation |
Note: One group and one role is chosen for a permission level. A user can hold multiple group permissions but can only have one role assigned within each group.
For example, a user can have the permission level Staff:PCoordinator and the permission level Faculty:Director at the same time in the same organization. On the other hand, a user can not have a permission level of Faculty:Director and Faculty:Faculty because they can only be assigned one role within the same group at one time in the same organization.
A user can be permissioned to multiple organizations with the same or differing permission levels within one instance of Elentra.
Notification Options Section
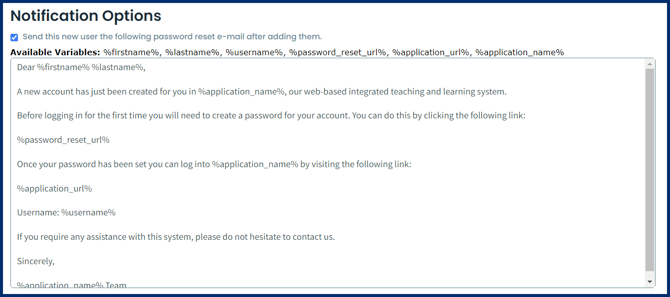
Select the check box next to Send this new user the following password reset e-mail after adding them, to send the newly created a user an email that will allow them to reset their password. This checkbox will be selected by default unselect it if you do not wish to send this email.
Note: This option is used when using local authentication. You should not use this option when using single sign on because the user's password reset for SSO is handled outside of Elentra.
Step 4: Click the Add User button to add the new user.
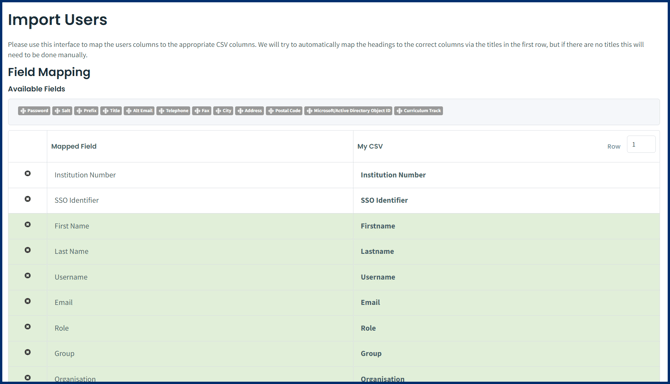
Adding Users in Bulk
- First Name
- Last Name
- Username: This will be the username for your Elentra installation.
- Email: This should be the user's email and must be distinct for each user.
- Group
- Role
- Organization: This should be a numeric id and reflect which organization a user should be added to if there are multiple organizations on an installation (e.g., undergraduate medicine and postgraduate medicine). When logged in as a Medtech:Admin you can find the organization id by navigating to Admin > System Settings and clicking on the organization. When the page for that organization opens the url will include the org id at the end. You can also ask Elentra Support what the organization ids for your installation are.
- Institution Number: The user's university id (e.g., staff or student number). As of ME 1.20 this can include letters and numbers.
- Entry Year: The year the learner entered/will enter a program.
- Grad Year: The anticipated graduation year.
Note: The "Grad Year" field is strongly recommended for undergraduate organizations since users will automatically be added to an existing cohort if one exists for the graduation year. If using, you must also include an Entry Year value.
- SSO Identifier
- Address
- City
- Province: This could be a province or a state.
- Postcode: This could be a postal code or zip code.
- Telephone
- Fax Number
- Notes: Information provided here will display in the General Comments section of the Personal Information section.
- Account Status: You can enter active or disabled in this column, you'll be able to change this setting in UI after the user is created.
- Access Start: Unix timestamp (e.g. 1512086400) or date-time format (2017-12-01 12:35) are accepted.
- Access Finish: Unix timestamp (e.g. 1512086400) or date-time format (2017-12-01 12:35) are accepted.
- Department: To enter a department affiliation for a user you must have department's Elentra id code. This is information you can request from a Elentra Support or you can find it by looking at a url. To discover the department id for yourself, you must be able to access Admin > System Settings. When you do, click on the name of the organization you are working with and then click Departments in the left sidebar. Click on a department name and when the page for that department displays the url will include the department id at the end.
- Country
- Gender: Gender is a required field in your upload. By default Elentra includes Female (F), Male (M), Non-Binary (NB) and Undefined (U).
Note: If you associate a faculty user with multiple departments, that user will show up in departmental reports for each department they are associated with.
- Curriculum Track ID: To enter a curriculum track for the user you must have the curriculum track's Elentra id code. This is information you can request from a Elentra Support or you can find it by looking at a url. To discover the curriculum track id for yourself, you must be able to access Admin > Manage Curriculum > Curriculum Tracks. Click on the name of the curriculum track and look at the url for the id.
- Is Instructor: The value is either 0 or 1. If set to 1 then the checkbox for Clinical Faculty Member will be selected. This allows for the user to be pulled into the Manage Instructor's module. This setting only pertains to the Faculty group. if set to 0 the checkbox will not be selected.
- Password: Passwords can be set using an import but we recommend only importing existing passwords if you exported them from elsewhere.
- Salt: This is a way to make a password more secure. It is recommended that you use this field only if you've exported a list of users and already have the salt information (and the password).
- Prefix: Accepted prefixes are Dr., Mr., Mrs., Ms., Prof., Assoc. Prof., and Asst. Prof.
- Alt Email: This is a second or alternative email the user can provide.
Note:
- Every column header included in your file must be completed. If there is a column header with no information present, delete that column before you upload the file.
- If you are importing a significant number of users, we recommend limiting your file size to 1000 users or less.
- It is recommended that you use different files for different groups (e.g. faculty and learners) as they may not require the same fields, and partially complete columns may result in errors. If you have blank cells, please fill them with NULL.
- If the user has the same group but a new role compared to their previous record - system will update the role and everything else (start and end date, and account status). You will be asked to confirm whether you want to update the user record. If the user has a different group from their previous record that group will be added to the user's account and all other information will be updated.
- If the user has the same group and same role as their previous record, the system will automatically update everything included in the csv.
- When the system finds two records for the same user it will display the two records.
Creating a Guest User Account in a Community
Note: You must be a community administrator to add a guest member.
Managing the Guest Member's Access to the Community
Note: To permanently remove the user account from Elentra you will need to use the Manage Users
![]()
- Account Status: updating a user's account status to Disabled will prevent the user from logging in.
- Account Start and Finish: If you want to temporarily remove access to Elentra, you can edit a user's Access Finish date and time.
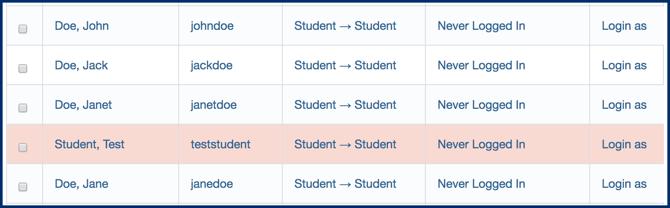
Note: Users who have been deleted will display on the list of users with a green plus icon beside their name. This allows you to reactivate their account if needed (please note you will need to reassign them to a group and role, department, etc.)
To view a deleted user, navigate to Admin > Manage Users and search for the user.
