Use different page types to serve different functions within a community
Article Content
This article covers the following topics. Click on the topic to go to that section of the article.
- Introduction to Page Types
- Default Content Page
- Announcements Page
- Discussions Page
- Document Sharing Page
- Events Page
- Galleries Page
- Polling Page
- External URL Page
- Basic LTI Consumer Page
Introduction to Page Types
Within each community, a variety of pages are available and they are templated to serve different functions. Different community types (Community, Course Website, Learning Module) come with specific page types. The following are pages types that can be added to a page after the creation of the community.
- Default Content
- Announcements
- Discussions
- Document Sharing
- Events
- Galleries
- Polling
- Basic LTI Consumer
Warning: There are other pages than those listed above that can only be added upon the creation of the community (e.g., Gradebook page and Manage Notices page in a Course Website). You will not have the opportunity to add these pages after the community is created. The page types that cannot be added after the creation varies across communities.
It is recommended to add all pages to the community and then hide or delete any that are not needed after the creation of the community. If there are pages that you missed adding that need to be added to a community please contact Elentra Support.
When you use page types and their features in a community space, they are for members of that community only.
Course Websites
Most of the pages in a course website template are of the default content type and allow you to add information. The exceptions to this are the Background, Course Calendar, Learning Objectives, MCC Presentations, and Gradebook pages; these have some information that will auto-populate based on information provided during the course setup.
This article details the page types listed above. To learn more about pages that are specific to a community type (e.g., course websites) please see those articles in the knowledge base.
Default Content Page
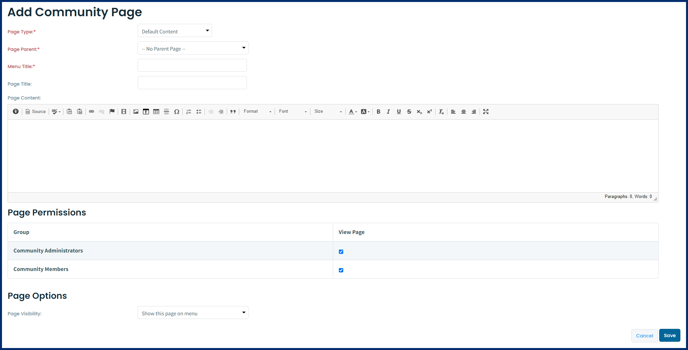
Default Content pages allow you to add any information to the page using the rich text editor (includes ability to embed media and post images). Many of the default pages in all of the communities are of the default content page type.
Announcements Page
Announcement page types can be used to house announcements for the specific community. Announcements can have a time release applied and can also optionally have email notifications sent to community members. Community members also have the option to subscribe to an RSS feed or e-mail notifications for this page.
Create an Announcement
Step 1: From the community Announcements page, click on Add Announcement.
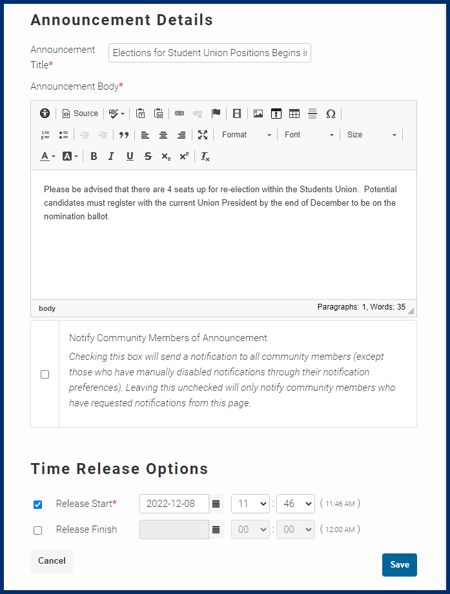
Step 2: Complete the required fields and click Save.
Allow Community Members to Post Announcements
Administrators of a community can optionally allow communities to post announcements. See the following steps to do so:
Step 1: Navigate to the Admin Center in your community
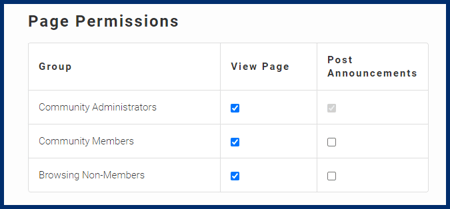
Step 2: Click Manage Pages > Announcements page and scroll down to the Page Permissions section. From the permissions section, adjust the page permissions to allow community members to post announcements.
- If the announcement is to be moderated, members will be notified of that.
- Community administrators will be alerted to announcements requiring review on the Announcements page. Click to view the announcements and release, edit, or delete them as appropriate.
Viewing Announcements
Discussions Page
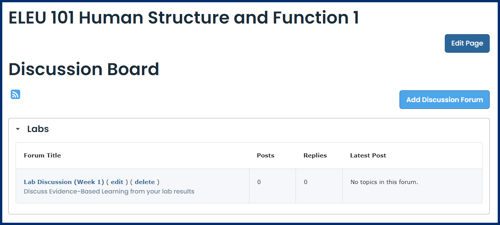
Community administrators must create discussion forums prior to members being able to engage in Discussions. To setup your discussion boards you will first need to setup forums for the community members to participate in, then community members can start adding posts to the forums.
Adding a forum
Step 1: From your community Discussions page, click on Add Discussion Forum.
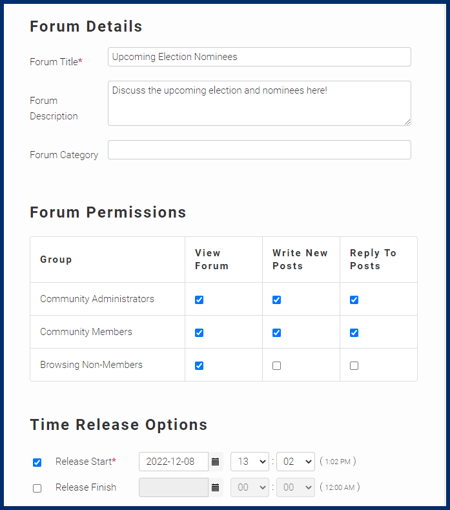
Step 2: Fill in the require information. You must provide a title, set up the forum permissions and provide a Release Start Date. The description and category are optional.
- The forum category will be the most easily viewable label for users, think of it as a folder or label for the discussion forum.
- Under the Forum Permissions section you can customize which community member types can view the forum, write new posts, and reply to posts.
- The Time Release Options for the discussion forum controls when the discussion forum will be accessible to users. The Release Start Date will auto fill to the date you create the forum. Adjust as needed.
Step 3: Click Save.
Editing/Deleting Community Forums
To edit or delete an existing discussion forum, navigate to the discussions page, click on the category name, and then click edit or delete beside the discussion forum you want to modify. If you delete a discussion and it was the only discussion forum in a category, the category will also be removed.
Note: Community members who participate in discussion forums have the option to post anonymously, however, community administrators will be able to see the identity of all users who post to a discussion, whether anonymous or not. If you have faculty in community administrator roles responding to discussion posts it may be worth letting them know that students may be posting anonymously.
Posting & Participating in Discussion Threads
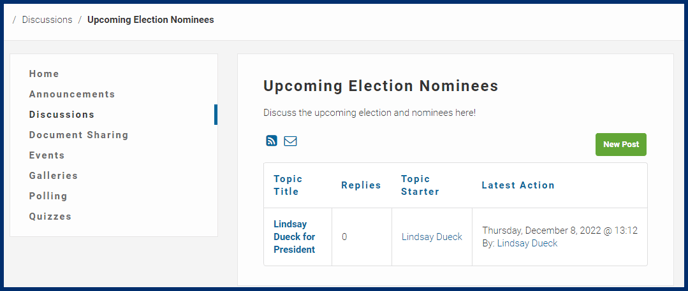
- You can reply to a post and reply to replies and this is as far as you can go at this time for threading of posts.
Document Sharing Page
A Community Document Sharing page allows for administrators to share documents with community members and optionally allows for community members to also share documents and comment on documents. It is not intended as a repository for submission of graded material. Please use gradebook assessments with a dropbox for that function.
Creating a Document Folder for Sharing
To create a document folder for sharing do the following:

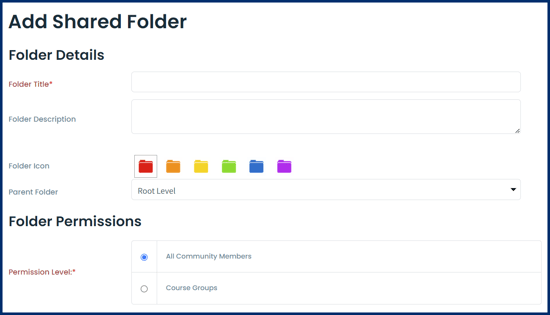
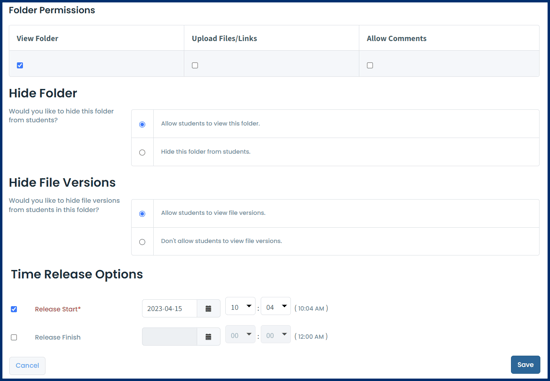
- The folder description will be visible to community members.
- Set permissions for the folder. You can customize which community member types can browse the folder, upload files, and comment. If you are in course website then you can permission the folder to particular course groups.
- By default folders are visible to students. If you'd like to hide the folder from students, click the appropriate radio button.
- Set the Time Release Options for the folder. This controls when the folder will be accessible to users.
Editing/Deleting/Moving Shared Folders
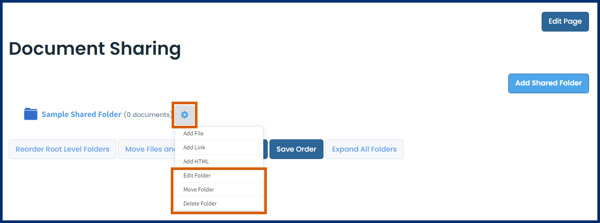
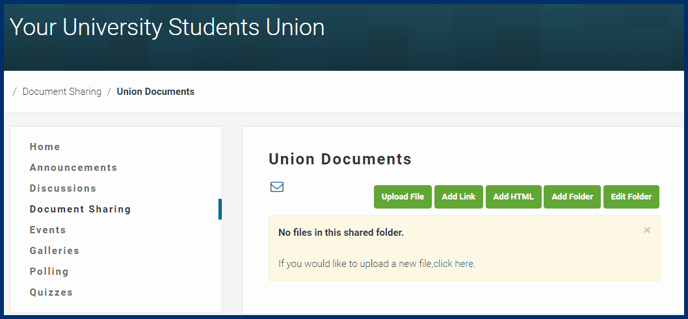
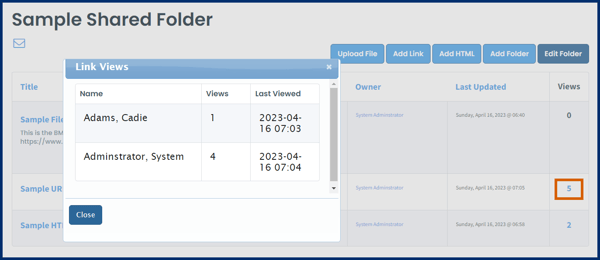
To edit or delete an existing folder, navigate to the document sharing page, click on cog to the right of the folder title and then make a selection from the dropdown menu. Note that within document sharing you can reorder folders, move files within folders, and expand all folders to view all files. Click on the appropriate button for each task from the document sharing page.
Adding Content to a Shared Folder

Events Page
Warning: Community Events should not be used to create curricular events for learners. Curricular events should be built using the Manage Events module found under Admin > Manage Events.
The events from the Manage Events module can filter into a course website by including the Course Calendar page in the course website. Please see the article on Course Websites to learn more about the Course Calendar page.
Events can be added to a community by adding an Events page. Once events are created for a community, the community members can optionally show those events on their Dashboard calendar.
Creating a Community Event
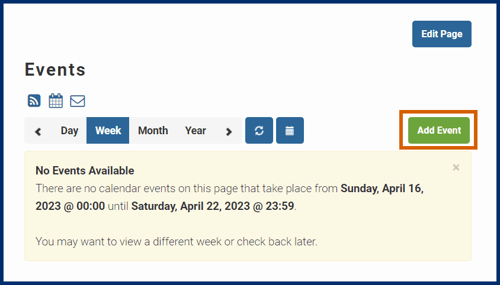
Step 1: As a community administrator, navigate to a community and click Events to open the events page, then click on Add Event.
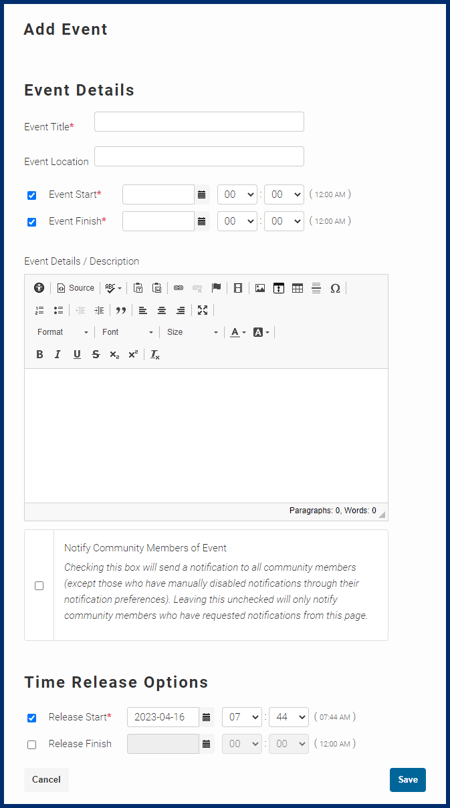
Step 2: You will be brought to the Add Event screen.
- Provide the event title, location, start and finish dates & times, and details or a description of the event.
- If you wish to send out notifications to the community members that the event has been posted select the checkbox to Notify Community Members of Event.
- Set the Time Release Options for the event, the start date will be auto-filled to the date & time you clicked the Add Event button. This controls when the event will be accessible to users.
Step 3: Click Save.
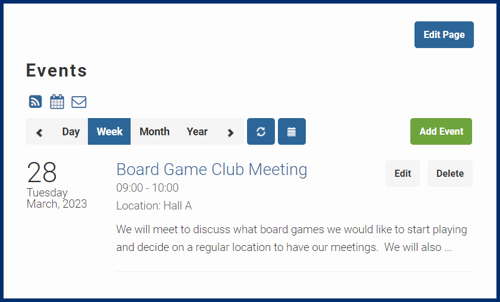
View Community Events
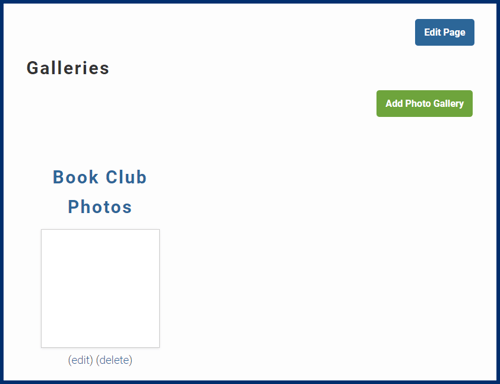
Galleries Page
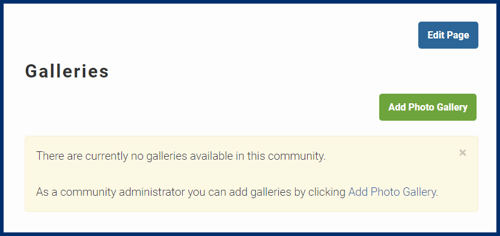
Creating a Photo Gallery
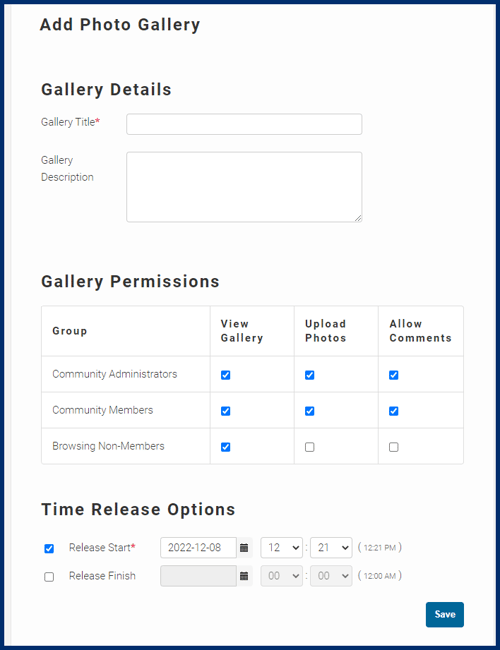
- Gallery Details: Provide gallery details including title and description. The gallery description will be visible to community members.
- Gallery Permissions: Set permissions for the gallery. You can customize which community member types can view the gallery, upload photos, and comment.
- Time Release Options: Set the Time Release Options for the gallery. This controls when the gallery will be accessible to users.
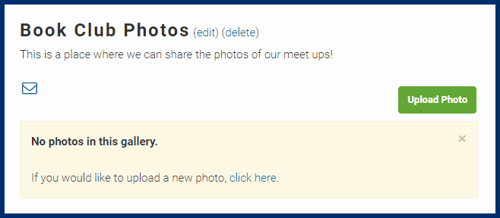
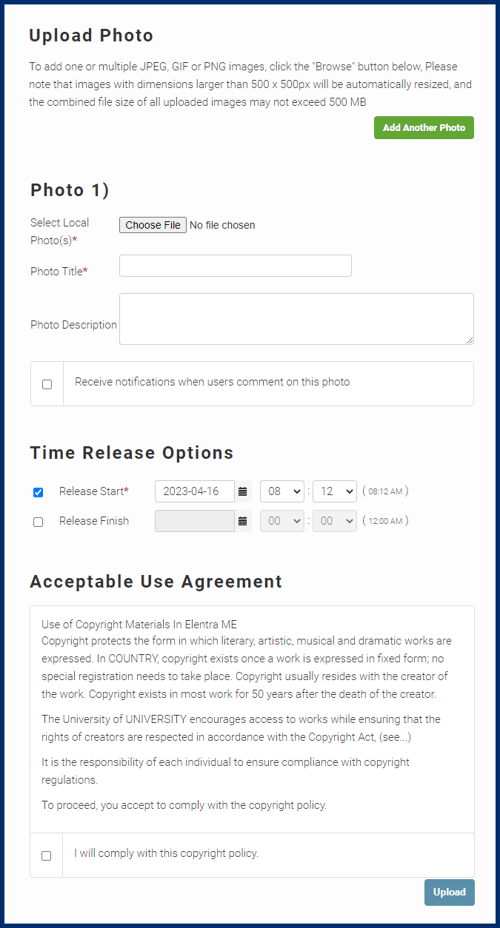
Add Photos to a Gallery
- Photo 1: Upload the photo from your local device and add a Title. Optionally add a description and choose whether to receive email notifications when users comment on this photo.
- Time Release Options: Set your photo permissions.
- Acceptable Use Agreement: You must agree to the copyright statement in order to post your photo.
Comment on Photos in a Gallery
Polling Page
These polls function differently than polls set up via Admin > Manage Polls. These polls will only show up to users when they are in a community and navigate to the polling page (community administrators can send an e-mail notification to let community members know a poll is available).
Creating a Poll
Step 1: To begin, navigate to the Polling page in your community, and click on Create Poll.
Step 2: This will bring you to the Add Poll screen.
- Poll Details: Create a title for your poll and decide if voters can vote multiple times. Optionally add a description.
- Question Details: Configure your poll question and response options.
- Poll Permissions: configure your poll permissions and visibility settings:

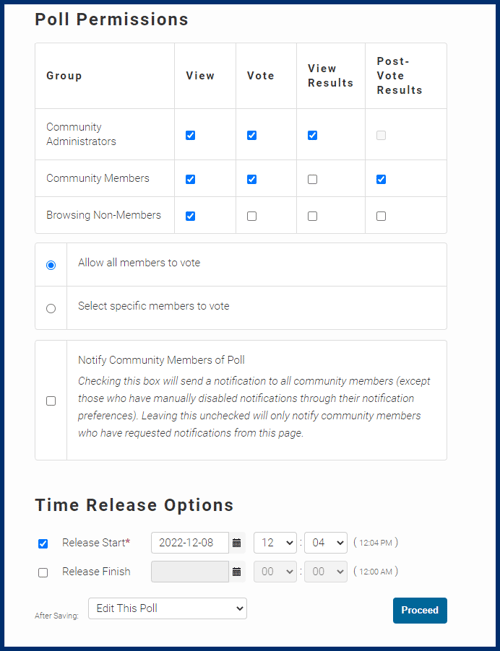
Step 3: Click on Proceed.
Editing/Deleting Polls
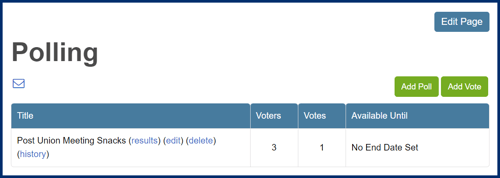
To edit or delete an existing poll, navigate to the polling page, and then click edit or delete beside the poll you want to modify.
- You may also see a vote option if the poll is set up to allow administrators to vote.
- After at least one vote has been cast, administrators will also see a results and history option beside a poll name.

- You can now add additional questions to the poll if desired. To do so, click edit on the poll where you would like to add a new question, then click Add New Question. Questions can be edited or deleted by clicking on the blue pencil icon or red trash can icon.

External URL Page
An External URL page type allows you to add a url to a community. The menu title will be a live link that redirects a user to a new site when they click on it.
Basic LTI Consumer Page
Elentra offers the ability to integrate with LTI tools. There are three areas where a LTI Consumer can be used: Course Pages created when a Course is added, Course Websites in Communities and Learning Events. Please contact Elentra Support to discuss integrating an LTI tool.

