Article Content
- Lecture Capture Overview
- Requirements Overview
- Configure Panopto as a Media Source
- Configure Courses, Users, & Events
- Monitor & Manage Lecture Captures
Requirements Overview
To use the Lecture Capture tools, you must provide the appropriate information in various parts of the platform.
![]()
Configure Panopto as a Media Source

Warning: This URL must be exact for this to work. The only part that should change is the institutional Elentra URL which comes before the /admin part and the organization ID which comes after the last equals sign. The /admin/settings/manage/mediasources?section=add&step=3&org= portion will remain constant.
Step 3: Once you’ve correctly set the redirect URL, you can click Create API Client.
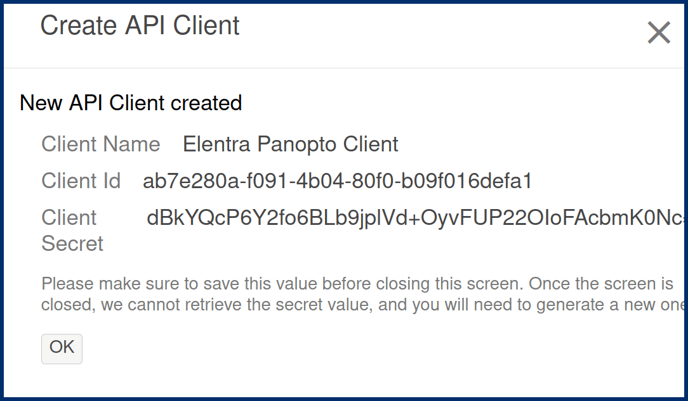
Your screen should look similar to the image above. Save the client ID and secret in a safe place. You’ll need to provide them when creating the media source in Elentra.
Step 4: Repeat Steps 1-3 for each recorder you want to set up within Elentra.
Step 5: Once the recorder set up is complete, then as a Medtech:Admin in Elentra, navigate to Admin > System Settings and select the organization you configured the Redirect URL to point at.
Step 6: In the side panel, click on Media Sources Management. Click on Add Media Source.
Step 7: From the Media Source Type list, select Panopto. Complete the form information using the API and recorder ID information as follows:
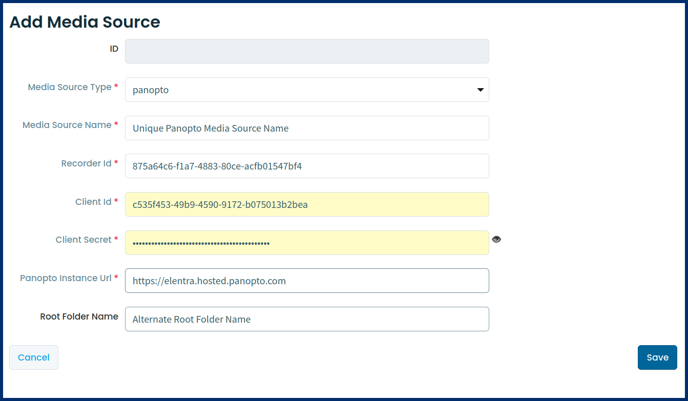
Media Source Name: Name your Media Source something descriptive that will make it easy to configure to a room in Elentra. For example, "Lecture Hall 1 Recorder"
Client ID: From the API you created in Panopto
Recorder ID: To get the recorder ID, head back over to Panopto and navigate to System Settings > Remote Recorders page. Find the recorder you want to use and copy the Recorder ID. Paste it into this field in Elentra.
Client Secret: From the API you created in Panopto.
Configure Courses, Faculty, & Events
Courses

Faculty


Events

Monitor & Manage Lecture Captures
Lecture Capture

- Synchronize Now: Click Synchronize Now to initiate synchronization with the various media sources associated with your events and update all outstanding synchronization records.
- Enable Capture: Select an event or many events by placing a checkmark in the checkbox to the left of the Event ID(s). Click Enable Capture to enable lecture recording for the selected event(s).
- If an event has already occurred, changing this setting will have no effect.
- If an event has yet to occur, the recording schedule will be synchronized automatically in a few minutes.
- Enable Auto-Resource: Select an event or many events by placing a checkmark in the checkbox to the left of the Event ID(s) column. Click Enable Auto-Resource to add a resource to the selected events with a read-only link to the recording. When the recording takes place, the resources will be automatically populated with the appropriate recordings.
- Disable Capture: Select an event or many events by placing a checkmark in the checkbox to the left of the Event ID(s). Click Disable Capture to prevent the selected events from being recorded (for the relevant media sources).
- If an event has already been recorded, the corresponding resource (if it was generated) will be hidden.
- Recordings are not deleted and can be made visible again by re-enabling Lecture Capture.
- Disable Auto-Resource: Select an event or many events by placing a checkmark in the checkbox to the left of the Event ID(s). Click Disable Auto-Resource to remove the automatically generated resource for the selected events. They can be re-added any time by clicking on Enable Auto-Resource.
Schedule Recording Details
The Schedule Recording Details will display all pertinent details for all scheduled recordings.

Transaction Log
The transaction log will show all transactions with media sources and what the response was (e.g., if there was an error or if the recording was successful.)
![]()