Article Content
This article covers the following topics. Click on the topic to go to that section of the article.
- Review of Rotation Schedule Pre-Conditions & Considerations
- Create a Rotation Schedule
- Create Rotations
- Rotation Slots
- Subdisciplines
- Using Multiple Rotation Schedules
Review of Rotation Schedule Pre-Conditions & Considerations
Prior to building a rotation schedule within the Clinical Experience module, there are a number of components that must be created:
- A curriculum layout and curriculum period must be created in Manage Curriculum
- At least one block schedule must be created within the relevant curriculum period
- Courses with "Includes clinical experiences" selected must be created
- Course enrollment must be configured for all relevant courses, using the relevant curriculum period.
Once all relevant courses have enrollment configured; and your desired block schedules have been created, you are ready to begin building in the Clinical Experience module.
Key Configuration Considerations Before Implementation
Prior to starting the building process for rotation schedules, it is important for your institution to explore the different configuration options available in Elentra for rotation schedules. Consider how rotations and courses will require assessments, gradebooks, and other related content to be set up effectively. The following details important key configuration considerations for building rotation schedules in Elentra.
- A one-to-one course to rotation configuration. This configuration necessitates the creation of a distinct course for each rotation required by your institution. For instance, if learners are enrolled in a Pediatrics course, they will participate in a Pediatrics rotation associated specifically with that course. In this setup, every rotation maintains its own gradebook, and enrollment processes must be tailored for each individual course.
- A one-to-many course to rotations configuration. This configuration allows multiple rotations to be linked to a single course within a rotation schedule. For instance, if learners are enrolled in a Pediatrics course, they could participate in the NICU rotation, Transitional Care Unit rotation, Well-Baby Clinic rotation, Adolescent Clinic rotation, etc. that all link back to the same Pediatrics course. This method can significantly decrease the number of courses to maintain for course administrators as compared to a one-to-one course-to-rotation model. However, it is important to note that this structure results in several rotations sharing the same gradebook and course code. This means that students will receive one final grade for the course in the associated course gradebook and the individual rotations taken underneath that course contribute to this one final grade.
- Optionally, configure Subdisciplines. This configuration allows for a clearer identification of the specific discipline linked to a learner's rotation booking. This configuration is commonly applied to elective or selective courses that serve as umbrella courses for various electives. In this scenario, grades for all electives taken under the umbrella course are consolidated and reported as a single "Elective" course on the learner's transcript, without specifying individual discipline's details, but the individual discipline does need to be identified in the rotation schedule and associated clinical assessments. Once subdisciplines are configured in Elentra they can optionally be associated with any of the rotations created within a rotation schedule, and will display to the learner on their schedule and in clinical assessments that are delivered with the rotation schedule distribution method.
![]()
Create a Rotation Schedule
To create the rotation schedule shell do the following:
Step 1: Navigate to Admin > Clinical Experience.
Step 2: Click on the "Rotation Schedule" tab. From here, you will see a list of existing rotation schedules and their Draft/Published status. Optionally, utilize the filters to refine the list of visible rotation schedules.

Step 3: Click on "New Draft". You will be required to define the following:
- Select the relevant curriculum period
- Select all courses you may need to associate with a rotation.
- Define your schedule title (e.g. "Year 3 Clerkship 2025-26")
Caution: Additional courses cannot be added to the rotation schedule shell once it has been created. If you omit a course, you can create a secondary rotation schedule using the same curriculum period & block schedules for the missing courses. From a learner's perspective, they will see all assigned rotation bookings on their Elentra calendar, and will not see that their bookings exist across multiple rotation schedules.
Step 4: Click "Confirm" to create the rotation schedule shell.
You will return to the list of rotation schedules and should see your newly created schedule on the list in Draft status. You will also see a Courses field displayed this indicates the course(s) associated with each rotation schedule.
Note: Remember to return to this screen later to publish the rotation schedule so that its contents become visible to learners. You might do this after a lottery has run or after all courses have set their schedules.
Note: The edit screen is only available for rotation schedules in "Draft" status.
Note: You can continue to edit rotations and bookings within a rotation schedule even after it has been published. You can also withdraw a published schedule and republish at any time.
Create Rotations within a Rotation Schedule
Create a Rotation in the Interface
- Rotation Name: (Required) The name of the rotation.
- Course: (Required) All rotations must be associated with a course. See the
"Key Configuration Considerations Before Implementation" section of this article for more information on configuration options for the relationship between courses and rotations.
- Rotation Code: (Required) This may be the same as the course code, or different, depending on the configuration strategy used by your institution. The code becomes the shortname of the rotation and is displayed on the rotation scheduler and on learners' schedules.
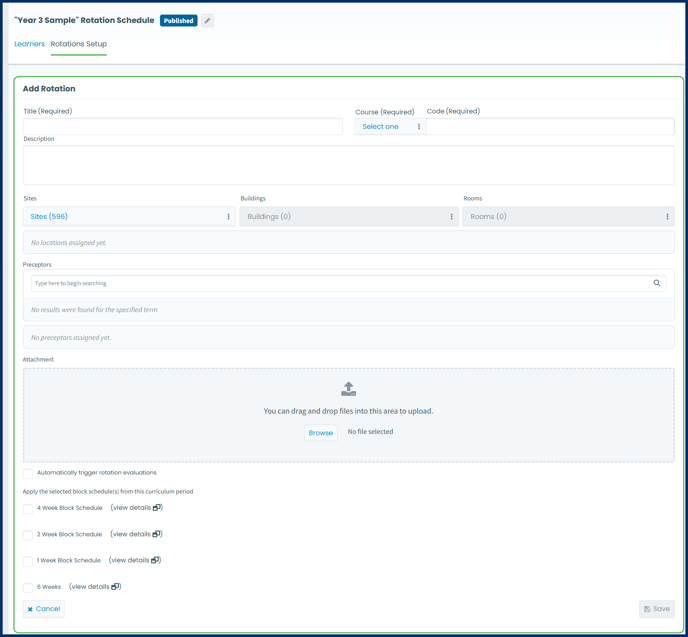
- Sites: Optionally, you may configure location sites, buildings, and rooms (which come from the Manage Locations module) with a rotation. This creates a "Site Pool" for the rotation, which is a shortened list of locations where this rotation is frequently offered as a convenience feature for administrators who will be booking learners into rotations. A Location must be marked as "Active" in Manage Locations for it to be available in any part of the Clinical Experience module.
- Preceptors: The same "Preceptor Pool" option can also be configured if desired, from Faculty users. This creates a "Preceptor Pool" for the rotation, which is a shortened list of preceptors with whom this rotation is frequently offered.
Note: For both "pool" features, the shortened list will display for selection when booking a learner into rotation. Administrators will not be limited to select from the shortened list, and can browse the full list of locations and preceptors that are active in Manage Locations and Manage Instructors, respectively, if needed. The pools are meant as a convenience feature for administrators who will be booking learners into rotations, so they do not have to load and search through large lists of sites and/or preceptors.
- Attachments: Documents can be attached to a rotation, which will be available for download to learners scheduled into the rotation from their dashboard calendar.
- Automatically trigger rotation evaluations: To use this feature, you must have a standard rotation evaluation form built and permissioned to the course in which this rotation exists. A rotation evaluation form will automatically be sent to all learners in the rotation. Set a number of days and whether the rotation evaluation should be sent before or after the end of the course. You will require the help of Elentra Support in order to set this up.
Please know that using this option means you would NOT need to set up an additional distribution to send rotation evaluations to learners. The automated rotation evaluation will automatically be sent, however you will not be able to view a progress report for it as you would a normal distribution. You can rely on the Admin > A&E dashboard to monitor progress of tasks sent via the automated rotation evaluation. Additionally, you can report on results using the Automated Rotation Evaluations (Aggregated) report. - Choose the block schedule(s) you wish to associate with this rotation. By associating block schedules with a rotation, you can make those specific time periods accessible for booking learners at a later stage. Click the view details link beside a block title to view the individual blocks and their dates.
Warning: You will not have the opportunity to associate additional block schedules to a rotation after the rotation is created. You must recreate the rotation to associate additional block schedules to the rotation.
Import Rotations from a CSV
Copy Rotations from a Previous Rotation Schedule
Note: This option is only recommended for copying schedules where the required block schedule types are the same as the originating schedule. The copying function will copy the applied block schedule types from the originating rotation schedule only if the corresponding block schedules types have been created in the new curriculum period. For example, if you are copying rotations from a rotation schedule where a 4-, 2-, and 1-week block schedule have been created and applied to the rotations then same block schedule types must be created for the new curriculum period.
Step 1: Confirm that your block schedules have been created within Manage Curriculum, using the same block schedule types as the originating schedule.
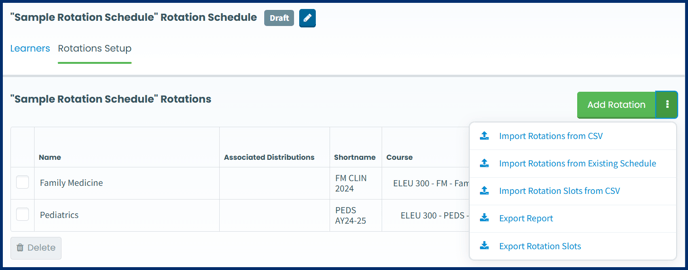
Step 2: From within your new rotation schedule shell, navigate to the Rotations Setup tab.
Step 3: Click the three vertical dot menu option beside "Add Rotation" and select "Import Rotations from Existing Schedule" from the dropdown options.
Step 4: Select the title of the rotation schedule you want to copy.
Step 5: Select the course(s) you want to copy over. Optionally, select "Import files attached to the rotations" to copy over documents associated with the originating rotations.
Step 6: Click "Import Rotations". Depending on the volume of rotations, this may take several minutes to complete the copy-over.
![]()
Rotation Slots
Once a rotation has been created in a rotation schedule, rotation blocks will be created based on the block schedule selected. Within each block, rotation slots can be created to define the site(s) and preceptor(s) and enforce capacity limits. By default, each block has one rotation slot automatically created, where capacities are not enforced. This slot can be used for booking learners. To create additional slots following the steps below.
Note: The Elentra Lottery module relies on rotation slot characteristics, and requires that capacity limits are defined & enforced. For more details, see the Knowledge Base article here.
Step 1: From the relevant rotation schedule, navigate to the "Rotations Setup" tab.
Step 2: Click on the pencil icon next to a rotation name. This will take you to the rotation edit screen and view of the blocks within the rotation.
Step 3: Scroll down while in the rotation edit screen to view the blocks created for the rotation.

You will see the block names (as copied from the corresponding block schedule in Manage Curriculum), block dates for each block schedule, the number of slots, and the number of booked learners.
Step 4: Click on the pencil icon next to the block for which you'd like to view or edit rotation slots.

Below the block information you'll see a section for "Rotation Slots". By default, each block has one rotation slot created. Learners can be booked into the default rotation slot and have the related site(s) and preceptor(s) defined on the rotation booking. Otherwise, rotation slots can be configured to define the site(s), preceptor(s), and capacities available for each slot. These slots will be available for selection when booking learners. If occupancy limits are enforced, you will not be able to book learners into rotation slots where the capacity has been met. If you wish to add additional slots to the default slot then click the "Add Slot" button from this screen. A pop up modal will appear where you can configure the slot to be on or off service, include sites, instructor(s)/preceptor(s) set the occupancy limit and enforce it.
Note: For lottery purposes, rotation slot codes are required. Contact your Elentra account manager or Elentra Support for help with importing rotation slot codes & slot details for a lottery in bulk.
Subdisciplines
Subdisciplines serve as an optional feature designed for elective or selective rotations and are applied at the rotation booking level. They provide specific discipline information relevant to each booking in an umbrella "elective or selective" rotation for learners, assessors, and course or rotation administrators. This allows learners to engage in the same elective or selective rotation multiple times during a curriculum period, such as an academic year, with the opportunity to choose different disciplines each time they are booked into that rotation.
This feature is commonly utilized in course or rotation structures where a course is labeled simply as "Elective" or there are multiple courses designated as "Elective 1," "Elective 2," and so forth. In such cases, grades for the elective course are most likely recorded without specifying the discipline on the learner's transcript. A learner can enroll in the elective course multiple times; however, they will receive only one grade for the entire curriculum period for that elective or selective course. This feature allows multiple learners to enroll in the same elective or selective course while exploring various disciplines throughout the curriculum period. Consequently, administrators only need to manage one overarching elective course, simplifying the administrative process.
For example, if a student chooses to enroll in a "Nephrology" rotation as their Elective 1 option, the individual responsible for creating the rotation booking will assign the learner to the "Elective 1" rotation and designate the "Nephrology" subdiscipline for that booking. As a result, the learner will view both the "Elective 1" rotation and the details of the "Nephrology" subdiscipline on their rotation schedule calendar entry. Additionally, when establishing a rotation-based distribution for this "Elective 1" rotation the chosen subdiscipline will display on the form task, allowing users to easily identify which subdiscipline is associated with the assessment or evaluation.
To enable the subdiscipline feature contact Elentra Support and provide a list of subdisciplines to display in the user interface.
![]()
Using Multiple Rotation Schedules
Multiple rotation schedule shells can be created within a single curriculum period for a specified audience. A common use for this is for specific departments or disciplines to each have their own rotation schedule shell that all fall within the same curriculum period. When using multiple rotation schedules for the same audience of learners, rotation bookings for learners that exist in a rotation schedule other than the one in view, will appear in grey. This is to ensure that coordinators entering the rotation schedule bookings into Elentra are aware of a student's existing bookings, and do not double-book a learner.

In the above image, the bookings in grey are bookings for the learner that were created in a different rotation schedule than the one currently in view. The bookings in color are bookings that exist within the rotation schedule in view. Clicking on the grey booking will display the rotation booking details, which will not be editable from this rotation schedule. Clicking on a rotation schedule booking that is in color will display the same rotation details, but provide the user with the option to edit or delete the booking.
![]()