Article Content
This article covers the following topics. Click on the topic to go to that section of the article
- Rotation Schedule Booking Overview
- Create a Booking in the Interface
- Import a CSV of Rotation Schedule Bookings
- View Rotation Schedules
- Learner View of Rotation Schedule Bookings
Rotation Schedule Booking Overview
Once a rotation schedule shell and rotations within the shell have been created, learners can be booked into a rotation block & slot. Rotation schedule bookings will be visible to learners when the containing rotation schedule shell has been published. Learner bookings can be created in schedules in Draft and Published status. Rotation schedule bookings can be made in Elentra in the following ways:
- Created within the interface
- Imported from a CSV
- Assigned through the Elentra Lottery module
![]()
Create a Booking in the Interface
Learners can be booked into a rotation block & slot by clicking into the applicable block in the rotation grid and completing the booking details.
New Booking fields:
- Rotation: Select the appropriate rotation, as configured in this rotation schedule shell's Rotation Setup tab.
- Rotation Status: This is an optional field to reflect the status of the rotation booking. These options can be configured for your instance by contacting Elentra Support with a list of your desired status options.
- Subdiscipline: This field will only appear if subdiscipline options have been applied to your institution's instance of Elentra. This is an optional field.
- Blocks/Slots: The options displayed here will reflect the selected rotation.
- Block Span: If a learner's booking spans multiple blocks, use this feature to book the learner into multiple blocks of the same rotation.
- On Service/ Off Service: The slots displayed here will reflect the slots configured in the selected rotation's block.
- Custom Dates: If a learner's rotation booking dates do not align with an existing block's dates, use the Custom Start and/or Custom End date to specify the correct rotation dates for this learner.
- Sites: Optionally, apply site(s) details to the booking. Sites can be selected from the Site Pool (if configured) or from the list of all active sites as created in Manage Locations.
- Preceptors: Optionally, apply preceptor(s) to the booking. Preceptors can be selected from the Preceptor Pool (if configured) or from the list of all active clinical preceptors as seen in Manage Instructors.
- Comment, Title, & Text Box: Optionally, add an internal or learner-facing comment to the rotation booking. Select "Internal Comment" or "Learner Comment", then enter in a comment title and text using the Title and rich text editor fields, respectively. Comment history can be viewed on the booking's History tab.
Step 6: Click "Save" to save the booking details. It will appear on the rotation schedule grid, spanning the specified date range of the booking.
Editing Existing Bookings in the Interface
Step 2: To delete the booking, click on "Delete". To make changes to the existing booking, click on "Edit" to open the rotation booking modal. Make changes as desired, then click "Save" to save your changes when done editing the booking.
![]()
Import a CSV of Rotation Schedule Bookings
Importing your learners' rotation schedules via CSV will allow you to build out your learners' rotation schedules in a spreadsheet before importing it into Elentra, which can be an efficient way to book a large amount of learners into slots.
NEW: Multi-Block Rotation Schedule Import
(see release note: Multi-Block Rotation Schedule Import - Helpful Tips)
You can now import bookings directly into any block on any block schedule, simply by telling the importer which one to use. No more falling back on custom dates when a booking belongs in a different block schedule than the one the importer was using before. We've also added new export options to make building and editing schedules even easier.
Faster builds, fewer workarounds, bookings anchored to the right blocks. Check out [link to support article] for the full details and FAQs.
Preparing the CSV
Tip: Use the "Export Bookings" feature to export the existing rotation schedule bookings into a CSV. The exported file uses the same column structure as the import, so it can be reimported without modification. Alternatively, use the "Export Empty Schedule" feature to generate a blank template pre-populated with all enrolled learners and all available blocks across all block types.
- Number: Required. Enter the learner's Institution ID/Student Number. For learners who do not have Institution Numbers, enter their email address instead.
- First Name: Enter the learner's first name.
- Last Name: Enter the learner's last name.
- Course Code: Required. Enter the Course Code associated with the rotation.
- Rotation Code: Required. Enter the rotation's code (i.e., shortname).
-
Schedule Block (No.): Required. Enter the block number within the specified block type. The block number corresponds to the position the block is in the list (i.e., listed first, second, third, etc. in the list going top to bottom). When used in combination with the Block Type column, this identifies the exact block where the booking should be placed. For example, if the Block Type is “4 Week (Up to 1 Year)" and the Schedule Block (No.) is 2, the booking will be placed into Block 2 of the 4-week block schedule because Block 2 was listed second and it used the 4-week block type.
-
Block Type: Required. Enter the block type label as it appears in the rotation setup (e.g., “4 Week (Up to 1 Year)”). Combined with the Schedule Block (No.), this uniquely identifies the target block for the booking. The block type label can be found in the rotation's block schedule configuration or in the exported CSV.
- Site(s): Optionally, enter the codes that correspond to the sites at which the learner will be participating in the rotation. This field can take Site, Building, and Room information in the following format:
- Format: s-, b-,r-/
- For example: When importing site of Kingston General Hospital (code = KGH), building of Richardson Labs (code = RLabs), and room Lab 1 (name Lab 1), the cell would be filled as follows: s-KGH, b-RLabs, r-RLabs/Lab 1
- Note that these entries are case sensitive.
- Format: s-, b-,r-/
- Preceptor(s): optionally, enter the email addresses of the preceptor(s) that will be associated with the rotation. If entering more than one preceptor, separate their email addresses with a comma and a space.
- (Custom) Start Date: optionally, enter the start date for the rotation (see notes regarding Schedule Block (No.), Block Type, and Start/End Dates below).
- (Custom) End Date: optionally, enter the end date for the rotation (see notes regarding Schedule Block (No.), Block Type, and Start/End Dates below).
- Has Custom Date: If a booking requires dates that do not align with any existing block, input Yes and include the rotation dates in the (Custom) Start and/or End date fields. By inputting No in this field, the booking will be scheduled according to the block identified by the Block Type and Schedule Block (No.) fields.
- Status: Optionally include the Status by typing in an existing Status field option as configured in your organization.
- Subdiscipline: Optionally include the name of the subdiscipline that you wish to assign to the booking. Ensure that you use a subdiscipline that has been configured in your Elentra organization.
- If Start and End Dates are left blank and Has Custom Date is set to "No", the system will use the start and end date of the block identified by the Block Type and Schedule Block (No.) columns.
- If Has Custom Date is set to "Yes" and a Start Date is provided but End Date is left blank, the system will use the start date provided and derive the end date from the identified block.
- If Has Custom Date is set to "Yes" and an End Date is provided but Start Date is left blank, the system will use the end date provided and derive the start date from the identified block.
- If Has Custom Date is set to "Yes" and both Start and End Dates are provided, the system will use the dates provided regardless of the identified block's dates.
Export Options
Two export options are available from within the Learners tab:
-
Export Bookings: Exports a CSV containing only existing bookings. The exported file includes the Block Type and Schedule Block (No.) for each booking and can be reimported directly after edits are made.
-
Export Empty Schedule: Exports a CSV template pre-populated with all enrolled learners and all available blocks across all block types on the rotation. Booking-specific fields (sites, preceptors, etc.) are left blank for the user to fill in. This is the recommended starting point when building a schedule for the first time via CSV.
Uploading the Prepared CSV
Step 1: Navigate to Admin > Clinical Experience > Rotation Schedule tab.
Step 2: Navigate to the applicable rotation schedule. Click "View Schedule".
Step 3: From within the Learners tab, click on Import CSV. A popup modal will appear.
Step 4: Click on Import CSV and select the appropriate CSV file for import then click "Next".
Step 5: You will be given the option to do the following,
- Replace the existing schedule: Selecting this option will overwrite the schedules only for learners included in your CSV. Learners not included will not be affected. Optionally check Full Replacement to also delete bookings for learners not included in the file.
- Merge into the existing schedule: Selecting this option will add the bookings listed in your CSV to the existing scheduled bookings. Learners not included will not be affected.
Important: When using the Replace option, the import file is treated as the complete schedule for each learner included in the file. If you are updating only some of a learner's bookings, you must also include any existing bookings that should remain unchanged in your import file. Any bookings for that learner that are not included in the import file will be deleted.
Note: This behavior applies even when Full Replacement is not selected. Full Replacement extends the replacement to all learners in the rotation schedule, removing bookings for learners who are not included in the import file.
.png?width=670&height=461&name=image%20(34).png)
Make your selection and click "Next" to continue.
Step 6: A preview of the imported bookings will display. Review the contents of the preview to ensure the results will be as expected. Click "Import Schedule" to complete the import.
Once completed, you will see the imported bookings applied to each learner's schedule.
![]()
View Rotation Schedule Bookings
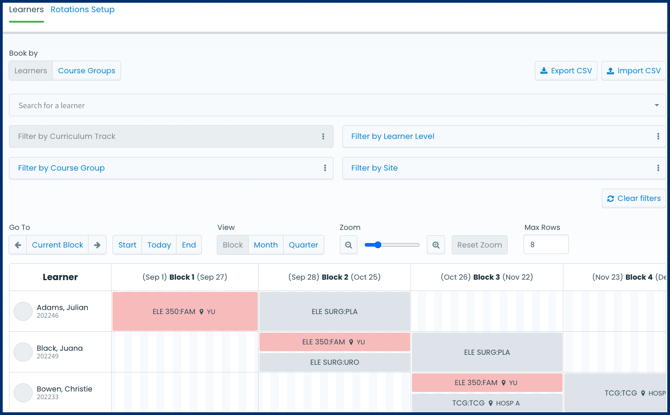
- Ensure that the top level filter settings are set as needed (e.g., if filtering by course you have a curriculum period and course set).
- Learner search.
- Set any filters as required (e.g. Curriculum Track, Learner Level, Course Group, Site. Note that these features must be in use in order for the filters to be usable).
- Clear filters using the button on the right.
- Use the "Export CSV" button to export rotation booking data into a CSV file.
- Jump to the current block with the button on the left. Move between blocks with the forward and back arrows.
- Jump to the start, today, or end of the rotation schedule using the available buttons.
- Toggle from block to month to quarter view if desired.
- When using quarter view note that the system will still book a block in its specific dates even if the view is less clear.
- Toggle between "Simple" and "Detail" display views:
- The "Simple" display will show the course & rotation code, rotation name, and site(s) and preceptor(s) assigned on the booking.
- The "Detail" display will include the "Simple" display details, as well as the rotation dates & subdiscipline (if applied to the booking).
- Zoom in or out as desired. Note the option to reset the zoom.
- Configure the number of rows displayed.
Note: Staff: Pcoordinator users will only have create & edit access for rotations associated with their affiliated courses/programs. Rotation bookings associated with courses they are not assigned as coordinators on, will appear in grey on the rotation schedule grid view.
- Be aware that the rotation scheduler will display the longest existing block structure available to the schedule. There is currently no way to adjust that view in the user interface (i.e., you can not toggle between viewing 2-week blocks and 4-week blocks when viewing the schedule). Your Elentra instance can be configured to allow all rotation schedules in your organization to be displayed using the shortest existing block structure under the curriculum period instead of the longest block schedule. Contact Elentra Support to adjust this setting (it will affect all rotation schedules across all curriculum periods and layouts).
- Greyed out bookings indicate that the learner is scheduled into another rotation schedule, or if the user is a Staff:Pcoordinator, it indicates a rotation booking in a course they are not assigned to manage. Users can't edit a booking outside the rotation schedule they are currently working in. but they can book the learner into another slot in the same block.
- Off service rotations you've booked a learner into will display in grey and show the rotation shortname.
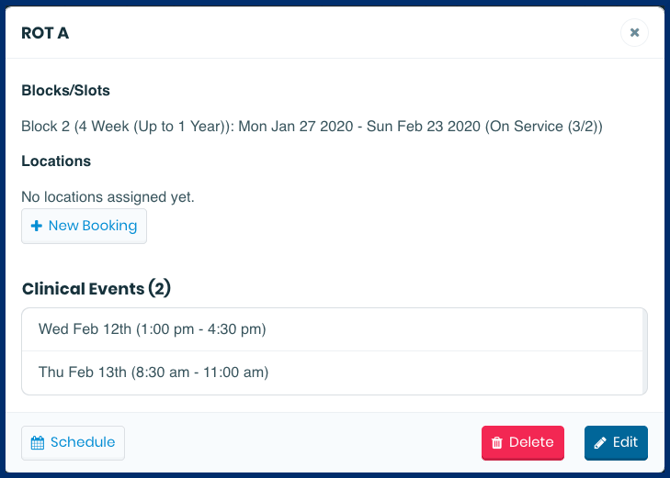
Viewing Booking Details
Step 1: From within the Learners tab, click on an existing learner booking. A popup with basic rotation booking details will appear.
Step 2: Click "Edit" on the booking popup. You will be taken to the Details tab for that booking.
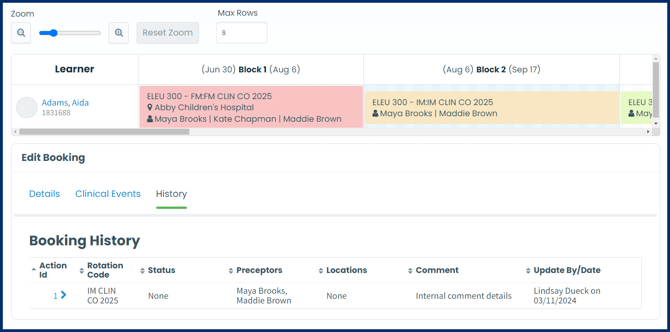
From this screen, you can navigate to the Clinical Events tab to view & manage granular clinical events for this rotation. From the History tab, you can view an ordered list of booking notes, and changes that have been made to the booking since it was created.
![]()
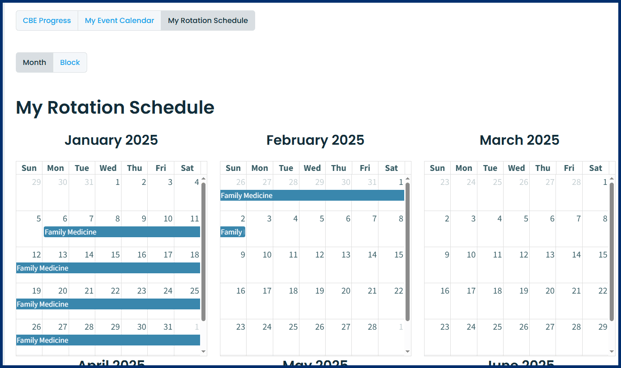
- The learner can click My Rotation Schedule or view their rotations on their My Event Calendar.
- Switch between Monthly and Block view while in My Rotation Schedule.
- Subdiscipline assignment details are only visible when viewing My Rotation Schedule from the Block view.
-
If a learner is booked into overlapping slots, their rotations will stack on top of each other (e.g. obstetrics and psychiatry below).
-
If a site is assigned to the booking, the learner will see the site code displayed beside the rotation name.
-
Clinical events are shown with the first aid kit icon beside the event time.

- Having the learner manage their attendance through their granular clinical events schedule is a setting option in Elentra and is disabled by default. If you'd like to have learners use this feature please contact Elentra Support to make sure that 'clinical_event_approval_enabled' is enabled in the settings table.
- The learner will also be able to log an encounter directly from this pop up. (They must first confirm their attendance.)
![]()